# Address Verification implementation guide
> Install Address Verification, a Salesforce managed package by To A Finish that checks and corrects physical addresses, emails and phone numbers. Connect it to Smarty, set up the addresses on Accounts, Contacts and Leads, add the Verify buttons and verify a first address. Then verify addresses on a custom object, mark changed addresses with a Flow, and set up email and phone checks. Verify many records from a list, in the background, with a Flow, with a batch job or by email. Add autocomplete to the New and Edit windows, and verify on the record page.
- Publisher: To A Finish LLC
- Applies to version: 7.3.x
- Last updated: 11 Oct 2026
- Web page: https://www.toafinish.com/support/guides/address-verification/
- Works in: Salesforce Lightning Experience. This guide does not cover Classic.
- Price: paid, with a free trial from the AppExchange. Address checks also need a Smarty plan, bought through To A Finish or directly from Smarty.
## 1. Before you begin
Address Verification checks and corrects addresses inside Salesforce. A user clicks **Verify** on a record, or Salesforce checks records in the background. Address Verification also writes extra data to the record, for example the county, the latitude and longitude, and the time zone.
This guide takes you from the install to a first verified address on an Account. It covers physical addresses on Accounts, Contacts, Leads and custom objects, and the email and phone checks.
### Smarty and lookups
Address Verification sends each address to Smarty, at smarty.com. Smarty is a separate company that holds the address data. Each check of one address uses one **lookup** from a Smarty plan.
- You can buy a Smarty plan through TAF. TAF then gives a discount on the app and sends you the Smarty keys.
- You can also use your own Smarty account. Smarty offers a free trial with 1,000 US address lookups for 42 days, with no credit card. TAF advises it for a first test of the app.
> **Each check uses a lookup**
>
> The Verify button on the setup page, each Verify on a record and each check in the background use a lookup from your plan. Test with a few records, not with a whole list.
### What you need
- A Salesforce org in Enterprise Edition or higher.
- A user with admin rights in that org.
- A sandbox, to set Address Verification up there first.
- Lightning Experience. Most steps also work in Classic. For the differences, open a case.
- The Auth ID and the Auth Token of a Smarty account. The next chapters tell you where they come from.
### Email and phone checks
Address Verification can also check email addresses and phone numbers. These checks are add-ons that TAF turns on for your org. To buy them, email [sales@toafinish.com](mailto:sales@toafinish.com). See [Check email addresses and phone numbers](https://www.toafinish.com/support/guides/address-verification/#email-phone).
### Try it first
Address Verification has a free trial of 30 days. Start it from the [AppExchange listing](https://appexchange.salesforce.com/appxListingDetail?listingId=a0N300000059eEUEAY), or [book a demo](https://calendly.com/toafinishdemo/address-verification) with TAF.
## 2. Install Address Verification
Install into a sandbox first. When the whole guide works there, come back and install into production.
If TAF sent you an install link, for example with an invoice or with a Smarty plan, open that link and sign in. Then go on at step 5.
1. **Open the Address Verification listing on the AppExchange. Click Get It Now.**
Go to [Address Verification on the AppExchange](https://appexchange.salesforce.com/appxListingDetail?listingId=a0N300000059eEUEAY). Sign in when the AppExchange asks. It shows a Trailblazer sign-in or a Salesforce login page. A Trailblazer account is the free login for Trailhead and the AppExchange. If the AppExchange lists your orgs and your org is not there, link it to your Trailblazer account first. The top of the site now reads AgentExchange. It is the same marketplace.
2. **Pick your sandbox as the place to install.**
A window asks **Where do you want to install this package?**. Pick the login of your sandbox. Then click the install button.
If the window offers only **Install in Production**, click **Cancel**. Open the [Address Verification change log](https://www.toafinish.com/support/changes/address-verification/#install-newest) and click **Install in a sandbox**. Sign in to your sandbox, and go on at step 5.
Later, when the whole guide works in the sandbox, repeat these steps and install in production.
3. **If a terms box shows, tick it. Then click Confirm and Install.**
Some installs show the box **I have read and agree to the terms and conditions**. If yours does not, go to the next step.
4. **Sign in to the org, if Salesforce asks.**
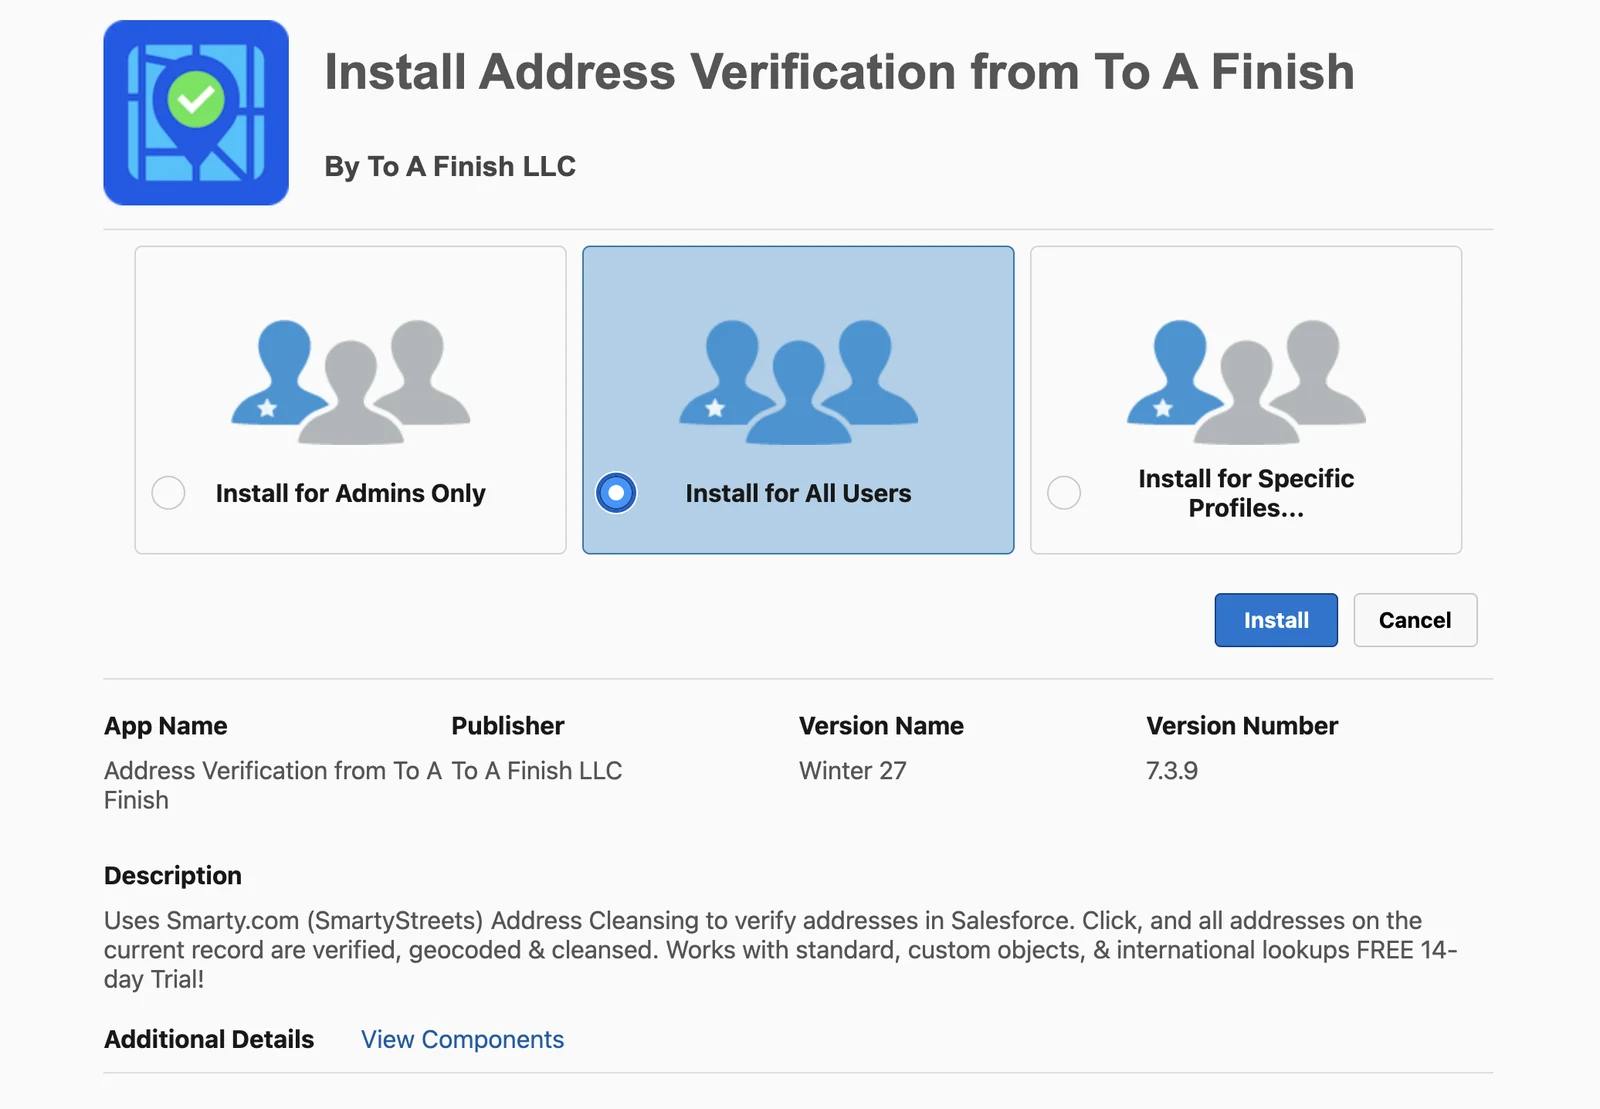
Salesforce opens the install page. Its title reads **Install Address Verification from To A Finish**. The **Version Number** sits below the buttons. When Address Verification is already in the org, the page offers **Upgrade** in place of **Install**.
5. **Pick Install for All Users. Then click Install.**
The three choices are **Install for Admins Only**, **Install for All Users** and **Install for Specific Profiles**. Only an admin sets Address Verification up, but every user who works with addresses needs access to its fields and buttons.
6. **Approve third-party access. Then click Continue.**
A window named **Approve Third-Party Access** lists the web sites that Address Verification calls. They are the Smarty services, Google Maps and the TAF service for email and phone checks.
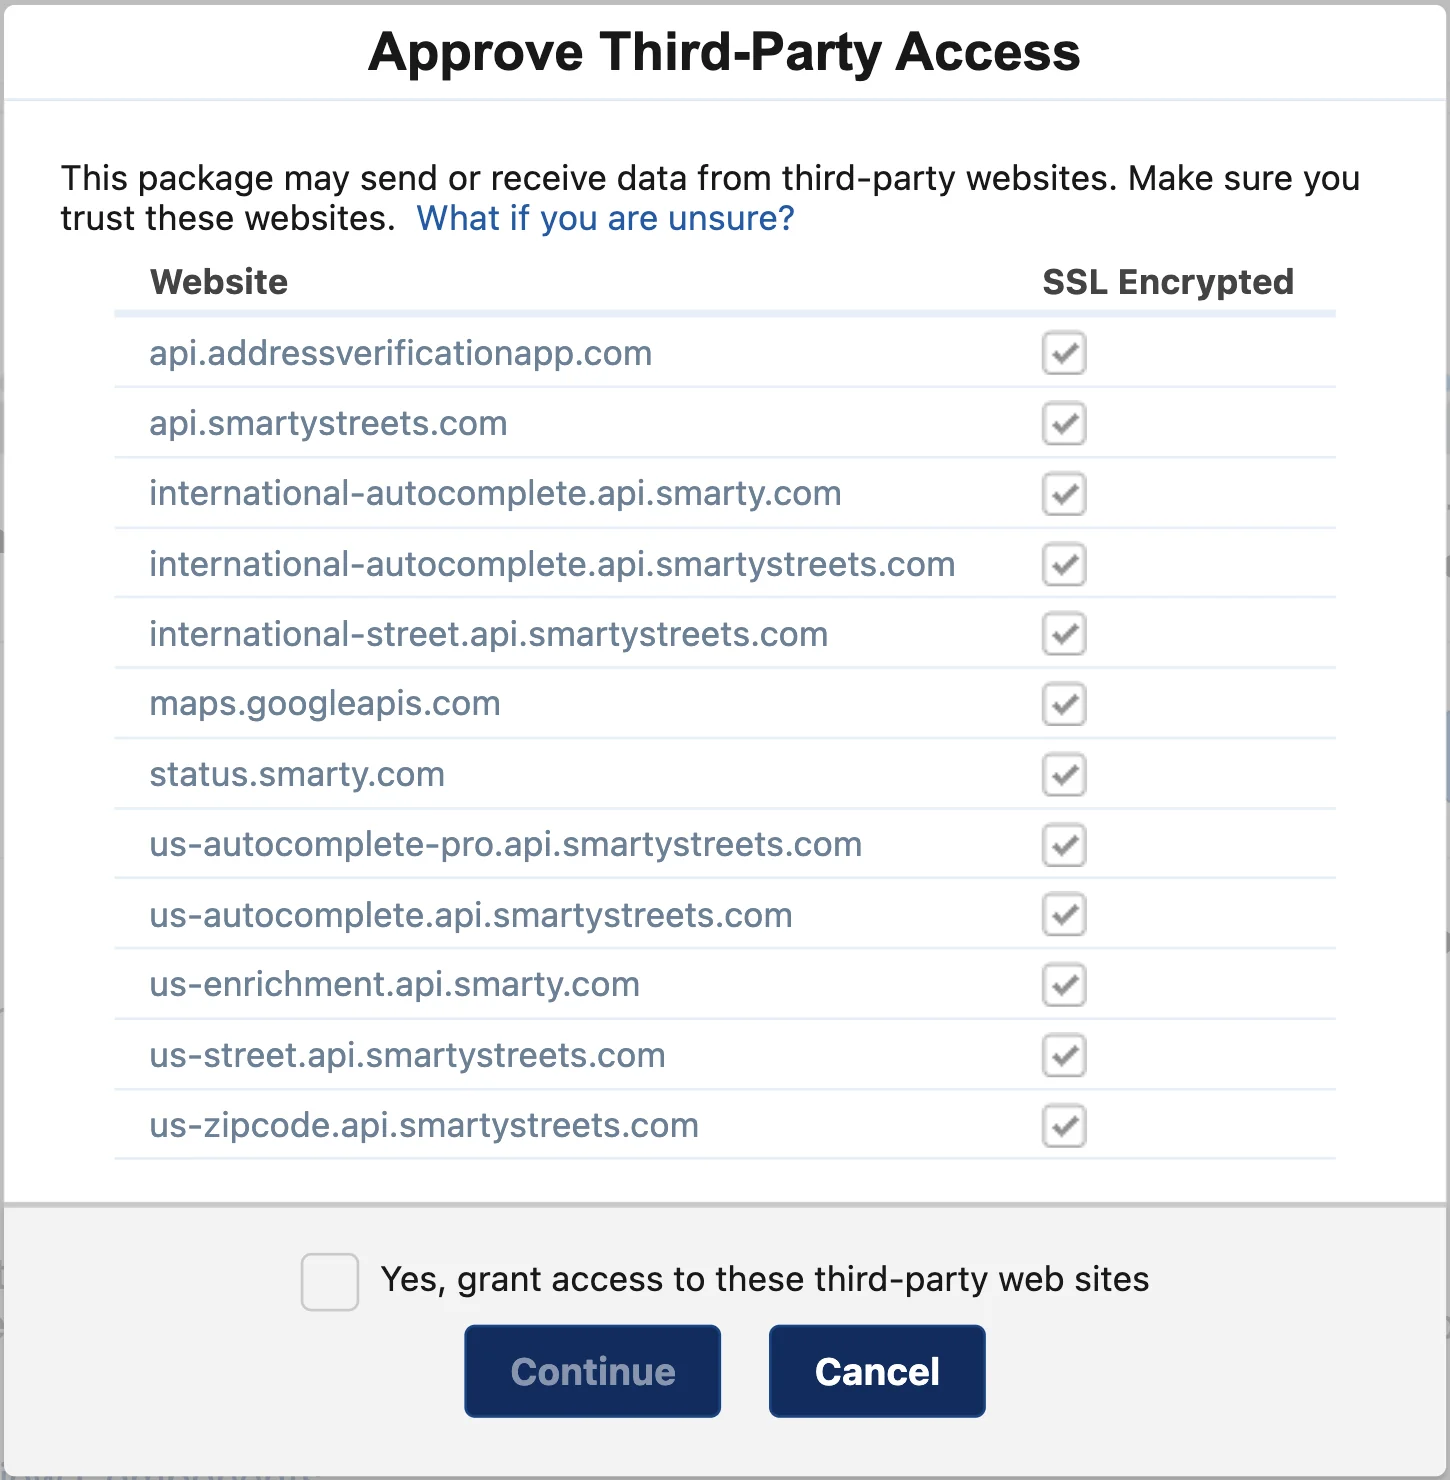
Tick **Yes, grant access to these third-party web sites**. Click **Continue**.
When the install takes a while, Salesforce says it will email you when it finishes. Installed Packages then lists **√ Address Verification**, with the namespace prefix `smartystreets`. The name starts with a check mark. Many names in the app start with the prefix.
7. **Assign Address Verification (Admin) to each admin who sets up Address Verification.**
Address Verification has four permission sets. This guide needs the first two.
| Who | Permission set | What it allows |
| --- | --- | --- |
| Admins who set up Address Verification | Address Verification (Admin) | Full use of the app, with the setup page. |
| Every other user who works with addresses | Address Verification (User) | Full use of the app, without the admin features. |
| The guest user of a Salesforce Site | Address Verification (Guest User) | Checks of records that site visitors make. Skip it if you have no site. |
| Users of an Experience Cloud site | Address Verification (Community) | Checks on an Experience Cloud site. Skip it if you have no site. |
Open Setup. In the Quick Find box, type **Permission Sets**. Click **Permission Sets**. Click **Address Verification (Admin)**. Click **Manage Assignments**, then **Add Assignment**. Tick each admin. Click **Next**. Salesforce asks whether the assignment expires. Leave it with no expiration date. Click **Assign**.
8. **Assign Address Verification (User) to every other user who works with addresses.**
Go back to **Permission Sets**. Click **Address Verification (User)**. Assign it the same way.
## 3. Connect Address Verification to Smarty
Address Verification needs the keys of your Smarty account. Smarty gives each account two values that work like a user name and a password: the **Auth ID** and the **Auth Token**.
- If you bought your Smarty plan through TAF, TAF sends you the keys and the name of your license.
- If you use your own Smarty account, copy the Auth ID and the Auth Token of a secret key from your Smarty account.
Keep the keys private. Anyone who has them can spend the lookups of your plan.
1. **Open the Address Verification setup page.**
Open Setup. In the Quick Find box, type **Installed Packages**. Click **Installed Packages**. Click **Configure** beside **√ Address Verification**.
The setup page can take about 10 seconds to load. It opens on the **Authentication** tab. The other tabs are **Data Mapping**, **Options**, **Automation** and **More...**. You need the permission set Address Verification (Admin) for this page.
2. **Open Address Verification Default.**
Under **Authentication Configuration**, click **Address Verification Default** to open it, if it is closed.
3. **Paste the Auth ID into Auth-Id (Default). Paste the Auth Token into Auth-Token (Default).**
Paste each value exactly, with no space before or after it. The boxes show dots in place of the values.
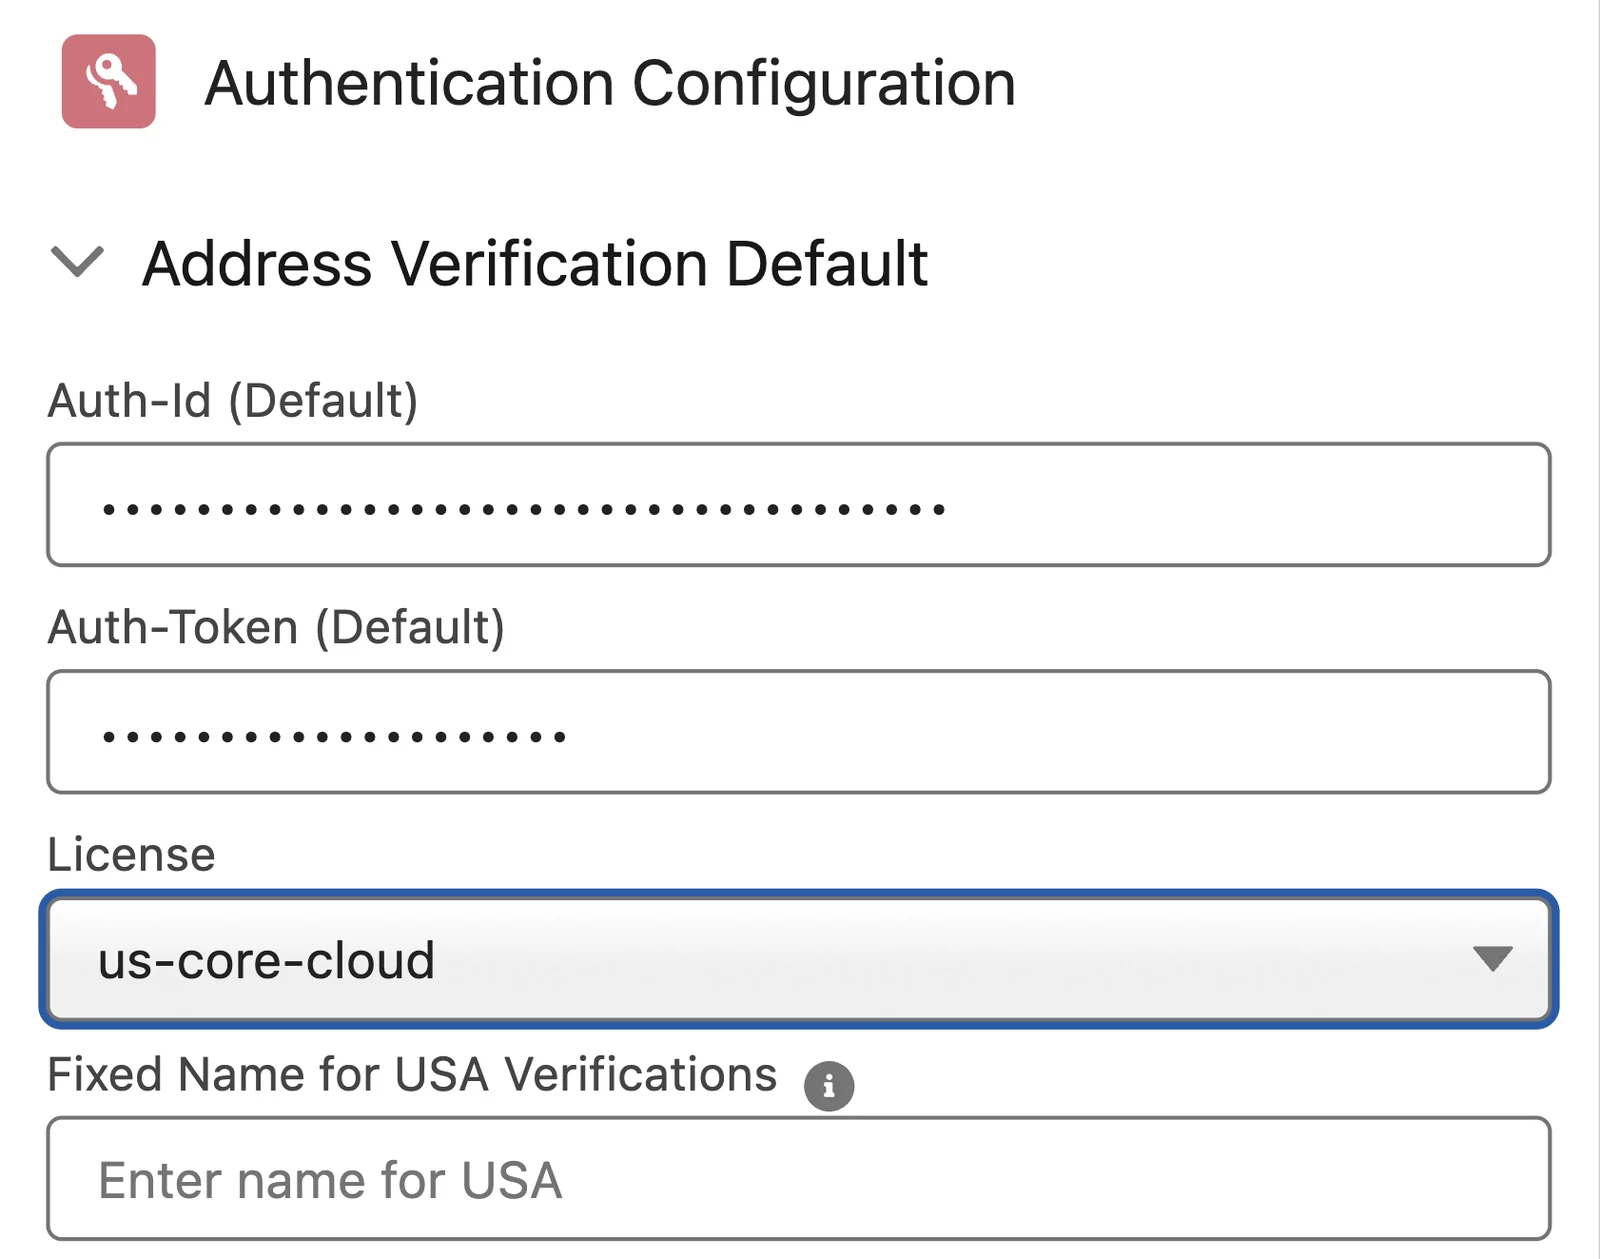
4. **In License, pick the license of your Smarty plan.**
TAF names the license when it sends the keys. With your own Smarty account, find your plan on the **Subscriptions** page of your Smarty account.
The names in the list follow the Smarty plans. For example, the plan **US Address Verification, Core Edition** with a **Cloud License** uses `us-core-cloud`.
5. **Click Save All Settings.**
A message reads **Successfully saved the setting.**
6. **Click Verify.**
**Verify** sits in the Address Verification Default section. It checks the keys with Smarty and uses one lookup. When the keys work, a message reads **The Settings are Correct for US Addresses!**
If a button floats over Verify, see [A button on the setup page covers a field](https://www.toafinish.com/support/guides/address-verification/#floating-buttons).
7. **Type the address for error emails in Admin Emails. Then click Save All Settings.**
**Admin Emails** sits under **Optional Settings**, lower on the Authentication tab. Type one email address, or several with commas between them. Address Verification sends its error emails there. When the box is empty, the errors go to the last three admins who logged in.
> **The other sections on the Authentication tab**
>
> **Address Verification International**, **Autocomplete Domestic**, **Autocomplete International** and **Enrichment** take a second set of keys. Fill them in only when you use another Smarty account for that service. When a section is empty, Address Verification uses the default keys.
> **An older install**
>
> A new install needs no more setup in this chapter. If you updated an older install, check its remote sites. See [Address Verification cannot reach Smarty](https://www.toafinish.com/support/guides/address-verification/#remote-sites).
## 4. Set up the addresses
Address Verification checks only the addresses on the **Data Mapping** tab. Each entry names an object, its address fields, and the fields where Address Verification writes the result. The app comes with fields for the standard addresses of Accounts, Contacts and Leads.
1. **On the setup page, click the Data Mapping tab.**
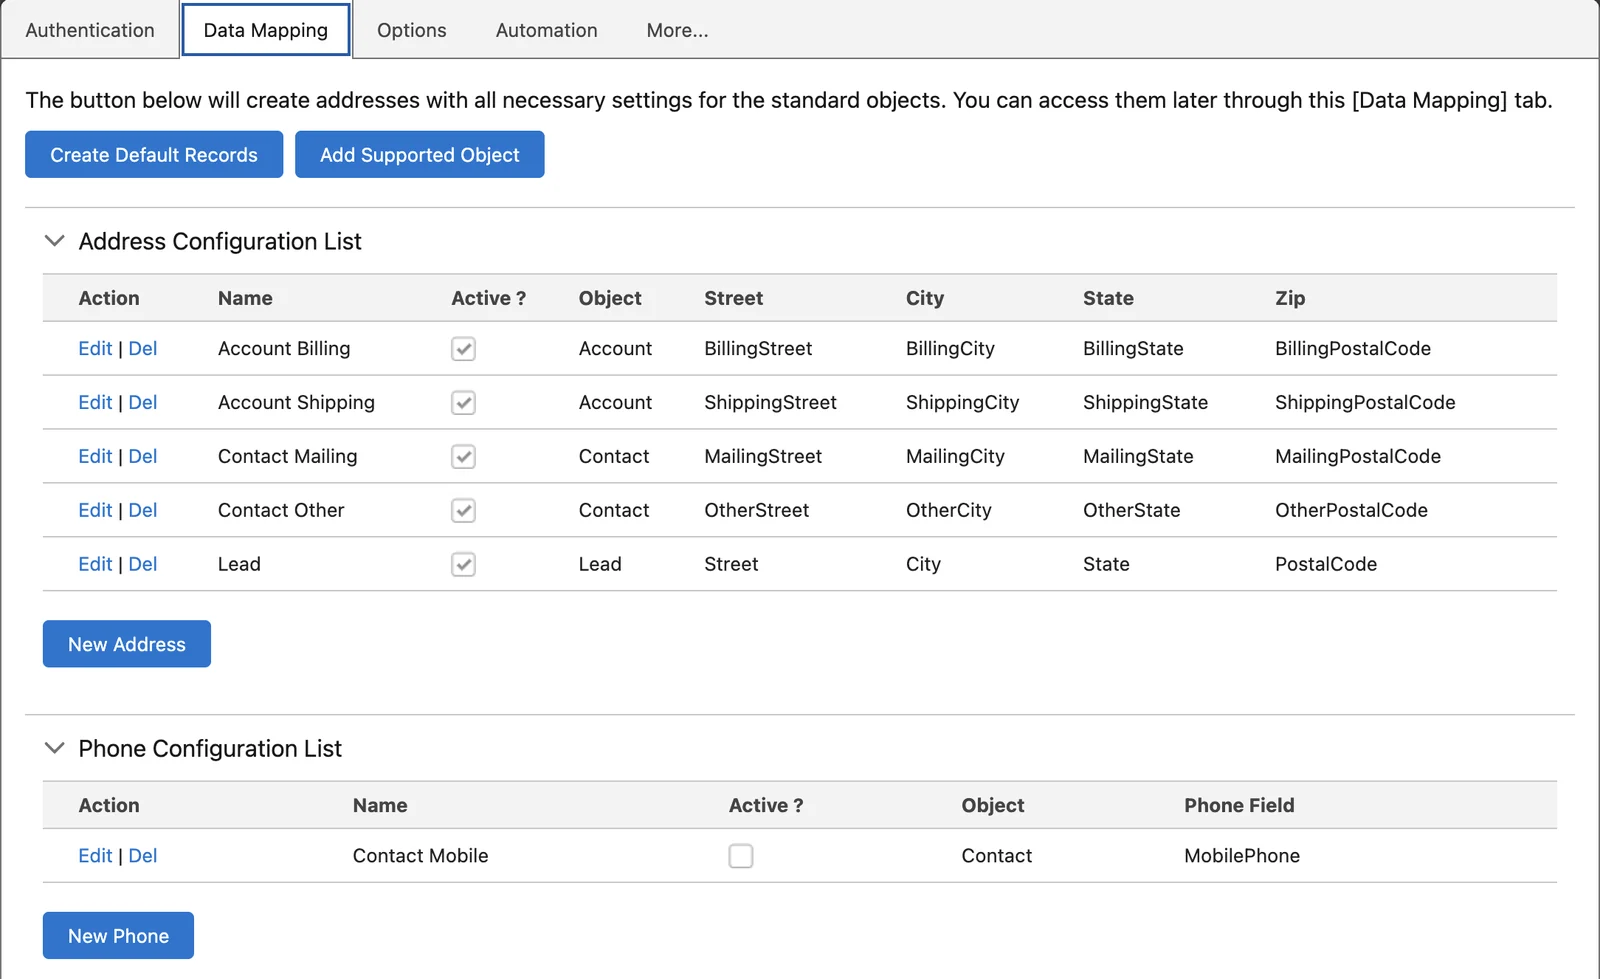
2. **Click Create Default Records.**
A message reads **Reset Done Successfully**. The list stays empty until you reload the page. Reload it.
The **Address Configuration List** now holds an entry for each standard address: **Account Billing**, **Account Shipping**, **Contact Mailing**, **Contact Other** and **Lead**. With Person Accounts, there is one more entry.
The **Phone Configuration List** gets a **Contact Mobile** entry. It is not active. Lower on the tab, more lists hold the entries for emails and other data.
3. **Click Edit beside Account Billing. Look at the fields.**
A window shows the fields and the options of the entry. The required fields are already filled in: **Street**, **City**, **State**, **Zip Code**, **Country**, **Verified**, **Last Verified**, **Return Code** and **Footnotes**.
Some optional fields are filled in too, for example **Latitude**, **Longitude**, **Clean Street**, **Do Not Verify** and **Verification Used**.
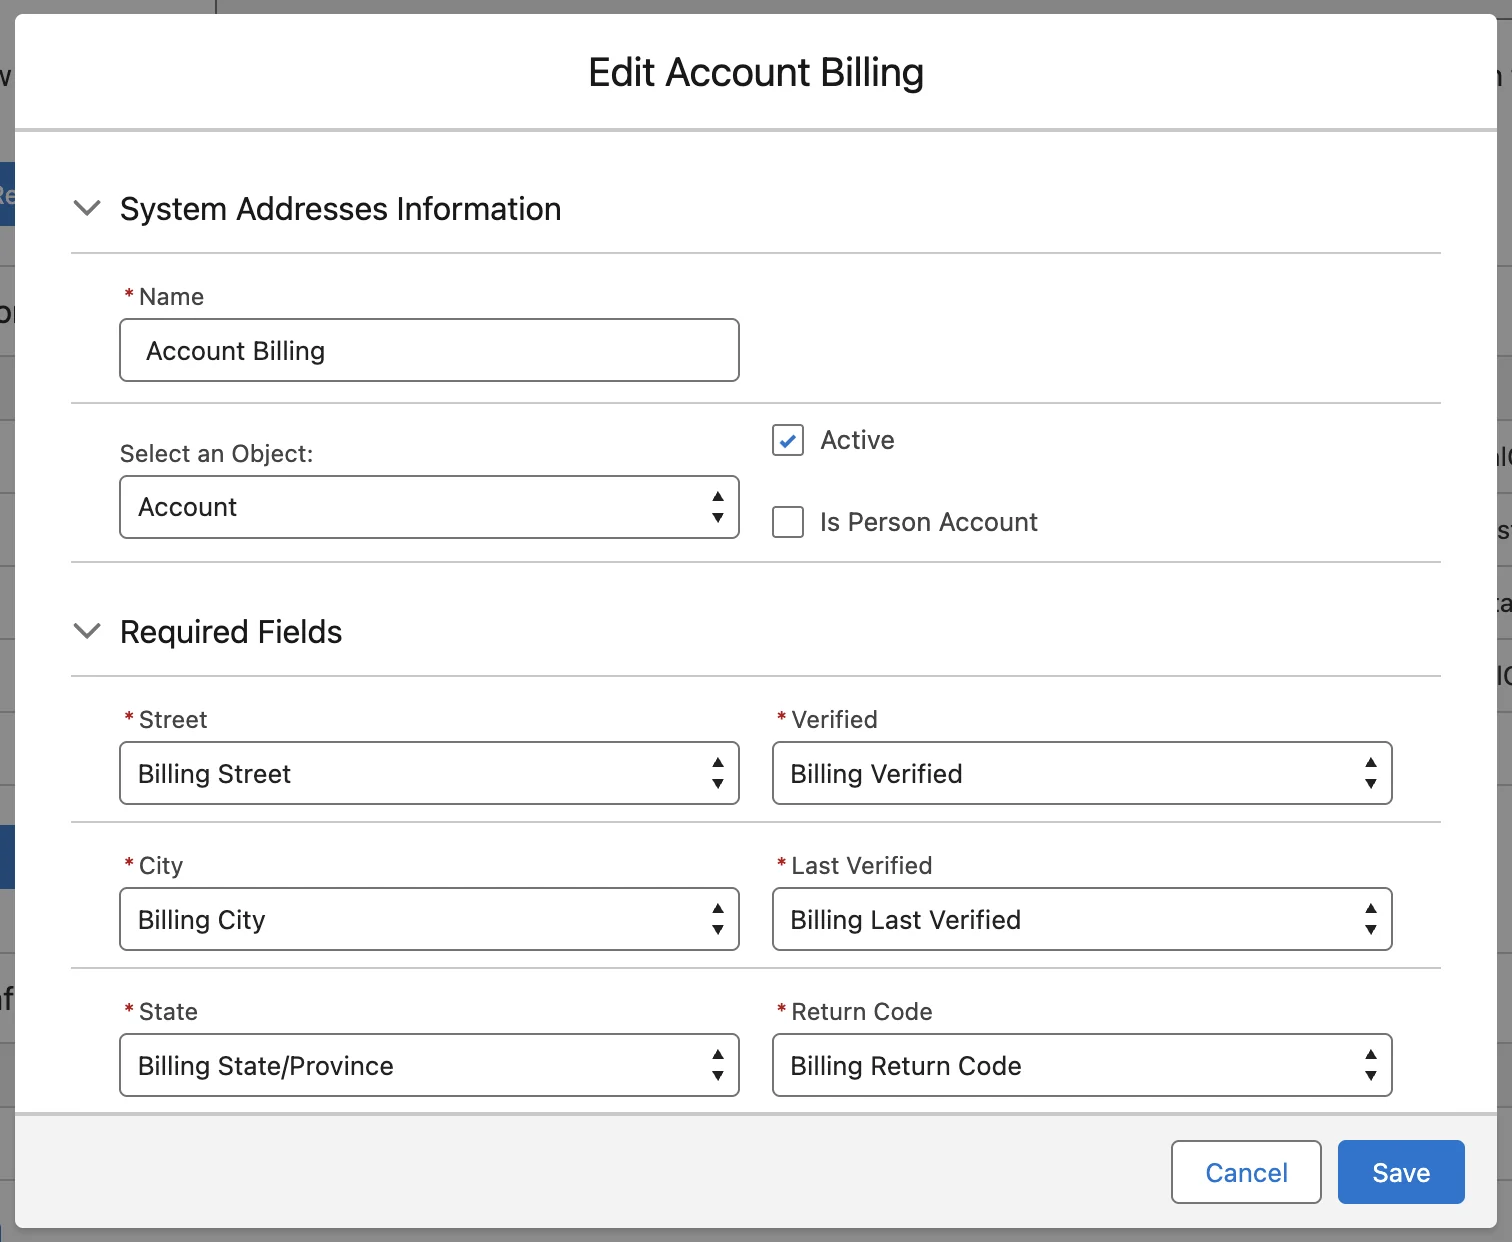
4. **Set the options you need. Then click Save.**
Most orgs leave the options as they are at first. See [Address options](https://www.toafinish.com/support/guides/address-verification/#address-options) below. If you change nothing, close the window.
> **To stop the checks of one address**
>
> Edit the entry and untick **Active**. This has the same effect as a delete, but you can tick the box again later.
> **Lead addresses and background checks**
>
> On a new install, the **Automation** tab has **Active** and **Verify Addresses** ticked for Lead. With Verify Addresses ticked, Address Verification can check new and changed Lead addresses in the background. Each check uses a lookup.
>
> If you do not want these checks yet, open the Automation tab. Click **Edit** beside Lead. Untick **Verify Addresses**. Save the change. See [Verify records in the background](https://www.toafinish.com/support/guides/address-verification/#background).
### The fields of an entry
| Field | What it holds |
| --- | --- |
| Name | Any name. Start it with the object name. |
| Object | The object of the address. Add an object that is not in the list with **Add Supported Object**. |
| Active | Turns the checks of this address on or off. |
| Street, City, State, Zip Code, Country | The address fields. All five are required. |
| Is Person Account | On Account only. The entry is for Person Account records. |
| Verified | Required. A checkbox that Address Verification ticks when the address is verified. A ticked address is not checked again, so it does not use a second lookup. |
| Last Verified | Required. The date and time of the last check, also when the address is no longer verified. |
| Return Code | Required. The result of the check. See [Read the results](https://www.toafinish.com/support/guides/address-verification/#results). |
| Footnotes | Required. Notes about the check. |
| Optional fields | More data from Smarty, for example County, Latitude, Longitude, Time Zone and Zip Plus 4. Map each one to a field on the object. |
| Force Latin?, Force Native? | International addresses only. Writes the address in Latin letters, or in the local script of the country. |
### Address options
Each entry has its own options, at the bottom of the edit window. The options under **For Autocomplete Lightning Component Only:** work only with the autocomplete component.
| Option | What it does |
| --- | --- |
| Don't Overwrite Street1, City, State or Zip Code | Keeps the value that the user typed in that field, in place of the value from Smarty. |
| Truncate Values Longer Than Mapped Fields | Cuts a value that is too long for its field. The cut address may be wrong for shipping. Map a Complete Address field as a backup. |
| Clear all verified fields after address change | Clears every mapped field when the address changes. Without it, only Verified and Return Code change. |
| Clean Address Prior to Verification | Fills the Clean Street field with a short, standard form of the street. Use it to find duplicates, never for shipping. |
| Only 5 Digits on Zip Code | Writes the five-digit ZIP Code, without the four extra digits. |
| Separate Unit Field | Writes the apartment or suite number only in the Unit field, not on the first line of the street. |
| Less Strict Verifications/Enhanced Data | Confirms addresses that exist but are not registered with the USPS, with the result Confirmed - May be Undeliverable. The Enhanced Matching option needs it. |
| Populate Info from Unknown Addresses | Writes all the data Smarty knows, also for an address that is not registered or is bad. |
| Remove Additional Info from Street 1 | Removes extra text from the street before the check, also suites and apartments. This can make an address undeliverable. Use it with care. |
| Run Enrichment API | Calls the Smarty Address Enrichment service after the check. It needs an Enrichment plan. |
| Allow Verifications with no Street | Checks only the City, State and ZIP Code when the street is empty. It still uses a lookup. |
| Use FedEx Address Standards | Applies the FedEx field lengths. Extra text moves from the first street line to the second. |
| Always Use Locality for City on International | Fills City with the Locality from Smarty, for international addresses. |
| Stop If Not Fully Confirmed | Autocomplete only. Stops a save when the address is not fully confirmed. |
| Stop record creation on bad addresses | Autocomplete only. Removes the Use as it is button for an address that cannot be verified. |
| Use Street 2, Use Street 3, Use Street 4 | Autocomplete only. Adds a box for that street line. Map the field too. |
| Do Not Check For Address | Autocomplete only. Lets a user save a record with no address. |
| Copy Parent to Child Address | Autocomplete only. Copies the address of the parent, for example the Account, to a new child record. |
## 5. Check the main options
*Optional. Most orgs leave these options as they are.*
The options on the **Authentication** and **Options** tabs change how Address Verification works for the whole org. The options of one address sit in its entry on the Data Mapping tab.
After a change on the Authentication tab, click **Save All Settings**. After a change on the Options tab, click **Save Settings**.
On the Options tab and in the entry windows, a tick shows an option that is on. A **+** shows an option that is off. Click the box to change it.
> **Country and state picklists**
>
> Three options do not work with State and Country/Territory Picklists. If your org uses these picklists, keep the options off: Use 3 Character Country Codes, Use Long Country Names and Use Long State Names. Salesforce rejects values that are not in its picklists.
### Options on the Authentication tab
The first three options sit in the **Address Verification Default** section. The others sit under **Optional Settings**.
| Option | What it does |
| --- | --- |
| Fixed Name for USA Verifications | The value to write in Country for a US address, for example USA, US or United States. When it is empty, Address Verification leaves Country as it is. |
| Use IANA Time Zones | Writes the time zone from the IANA time zone list, for example America/Los\_Angeles. |
| Use Standard (not IANA) Names | With Use IANA Time Zones only. Writes the regular name, for example Pacific Standard Time. |
| Admin Emails | The addresses that get the error emails, with commas between them. When it is empty, the last three admins who logged in get them. |
| Default Autocomplete Country Name | The country that autocomplete uses first. Type USA unless you have an International Autocomplete plan. With State and Country/Territory Picklists, type the two-letter code, US. |
| Default Autocomplete Country Name Recordtypes | The IDs of the record types that show the default country. Leave out the record type for foreign addresses. |
| (pro only) Autocomplete Filters | Autocomplete Pro only. Limits the suggestions, for example to one state or a range of ZIP Codes. |
| Ignore User ID | The 15- or 18-character ID of one user to skip, for example a site guest user or an integration user. The background checks and the Flow checks skip this user. A click on Verify still works. |
| Name Of Named Credential | The name of the Named Credential for autocomplete. Fill it in only when autocomplete asks for it. See [Set up the Named Credential for autocomplete](https://www.toafinish.com/support/guides/address-verification/#named-credential). |
### Options on the Options tab
| Option | What it does |
| --- | --- |
| Allow 1 LineAddress Verifications | Checks an address with no ZIP Code, city or state, for example when the whole address sits in Street. This can use many lookups. |
| Chain Apex Jobs | For orgs with many background checks. Helps to stay under the Salesforce limit for Apex jobs. |
| Copy Account Contact Verifications | Copies the result of an Account Billing check to Contacts with the same address, and the other way round. |
| Do Not Verify After AutoComplete | Skips the second check after an autocomplete pick. It saves lookups, but fills fewer fields, for example no Zip Plus 4 or County. |
| Log Responses | Saves each call to Smarty in the √ Verification Log object. Without it, only errors are saved. The object can grow very large. See [Keep a log of each check](https://www.toafinish.com/support/guides/address-verification/#logs). |
| Restrict Reverifications | Ignores small changes to an address, so the record stays verified. Useful when another system updates the addresses. |
| Stop at Duplicate Alerts | Stops the save when a duplicate rule with Alert on blocks it. Without it, Address Verification saves past the duplicate rule. |
| Turn OFF All Triggers | Turns off all the background checks and the change tracking of the Automation tab. Flows are not affected. |
| Use 3 Character Country Codes | Writes the three-letter country code. Not with State and Country/Territory Picklists. |
| Use Auto Complete Pro | Uses the Autocomplete Pro service in the autocomplete windows. It needs an Autocomplete Pro plan, an add-on from TAF. Leave it off without one. |
| Use Enhanced Matching for US Addresses | Only TAF support can change it. When it is on, also tick Less Strict Verifications/Enhanced Data in each address entry. |
| Use Google Search | Searches Google for an address that Smarty cannot verify. Leave it off for now. A change on Google's side stops it from working, and TAF is working on a fix. See [Improve checks with Google Search](https://www.toafinish.com/support/guides/address-verification/#google-search) and [Verify fails with Unexpected character](https://www.toafinish.com/support/guides/address-verification/#google-fails). |
| Use Long Country Names | Writes the full English country name. Not with State and Country/Territory Picklists. |
| Use Long State Names | Writes the full English state name. Not with State and Country/Territory Picklists. |
| Verify International | Checks addresses outside the US. It needs an international plan. See [International addresses](https://www.toafinish.com/support/guides/address-verification/#international). |
### International addresses
With **Verify International** off, Address Verification skips every address whose Country is not empty and is not a form of USA.
With it on, Address Verification checks those addresses with the international service of Smarty. This needs an international plan. To buy one, email [sales@toafinish.com](mailto:sales@toafinish.com). Turn the option on only after the plan is active. Without the plan, every international address shows an error.
If the international plan has its own Auth ID and Auth Token, paste them in **Address Verification International** on the Authentication tab. Then click **Save All Settings**.
The same section holds four more options for international addresses. Click the section to open it.
| Option | What it does |
| --- | --- |
| International License | The license of your international plan. |
| Only use states in these countries (use for country/state picklists only) | With State and Country/Territory Picklists. The two-letter codes of the countries whose states you keep in the picklists, with commas between them, for example US, GB, FR. Salesforce rejects a state that is not in its picklist. |
| Countries with Basic Package | Seldom used. Only for a special agreement on some countries. |
| Verification Premise Minimum | International checks only. Confirms an address only when Smarty finds the house or building number. |
| Treat US Territories as USA (not their own country) | Writes USA as the country of an address in a US territory, for example Puerto Rico. |
Turn on **Verify International** on the Options tab. Then click **Save Settings**.
## 6. Track address changes
*Optional. Skip this chapter if you do not need a history of address changes.*
Field history shows who changed an address, and when. This chapter uses Account. Contact and Lead work the same way.
1. **Open Account in Object Manager. Click Fields & Relationships.**
Open Setup. Click **Object Manager**. Click **Account**. Click **Fields & Relationships**.
2. **Click Set History Tracking.**
The button sits at the right end of the Fields & Relationships header. In a narrow window, the page can cut it off. Make the window wider, or zoom out, to see it.
The page **Account Field History** opens.
3. **Tick Enable Account History, if it is not ticked.**
The list of fields shows when the box is ticked.
4. **Tick Billing Address and Shipping Address. Then click Save.**
You can also tick the Address Verification fields, for example Billing Verified and Billing Return Code.
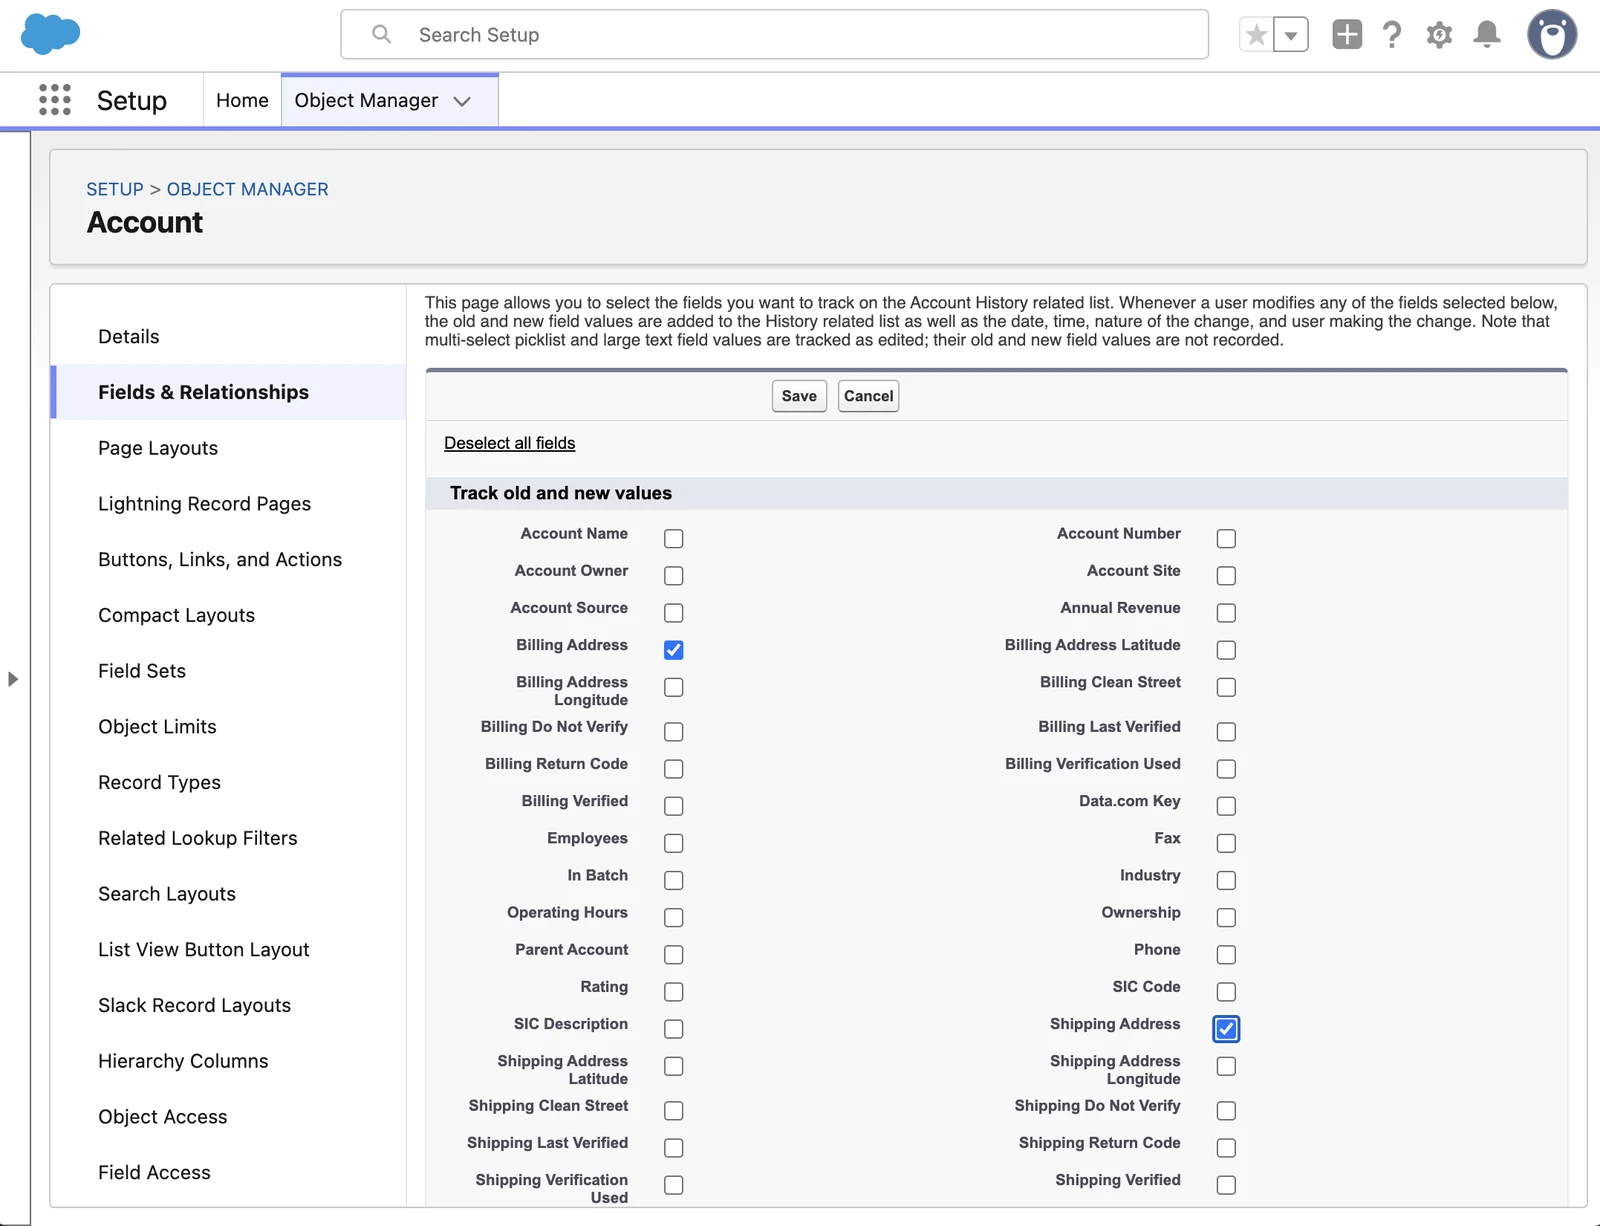
5. **Do the same for Contact and Lead.**
On Contact, tick **Mailing Address** and **Other Address**. On Lead, tick **Address**.
## 7. Add the Verify button
The **Verify Addresses** action checks every address on the record. This chapter uses Account. Contact and Lead work the same way, but each object has its own action:
| Object | Action label | Action name |
| --- | --- | --- |
| Account | **Verify Addresses** | `smartystreets__Verify_AddressesComp` |
| Contact | **Verify Addresses** | `smartystreets__Verify_Addresses` |
| Lead | **Verify Address** | `smartystreets__Verify_Address_Component` |
1. **Open Account in Object Manager. Click Page Layouts.**
Open Setup. Click **Object Manager**. Click **Account**. Click **Page Layouts**.
2. **Open the layout your users work with.**
Click the layout name, for example **Account Layout**. If you have more than one layout, click **Page Layout Assignment** to see which profile uses which layout.
3. **Optional: add the Address Verification fields.**
In the palette at the top, click **Fields**. Drag the fields you want to see into the layout, for example **Billing Address Status** and **Billing Last Verified**. A new section keeps them together.
4. **Drag Verify Addresses into the Salesforce Mobile and Lightning Experience Actions section.**
In the palette, click **Mobile & Lightning Actions**. In the palette's **Quick Find** box, type `Verif` to show only the Verify actions. More than one action reads Verify Addresses. Point at each one to see its name. The name of a Quick Action starts with the object name and a dot, for example `Account.` On Account, use the one named:
`smartystreets__Verify_AddressesComp`
Do not use the actions that start with **(Deprecated)**. If the section asks you to override the predefined actions, click the link to do so first.
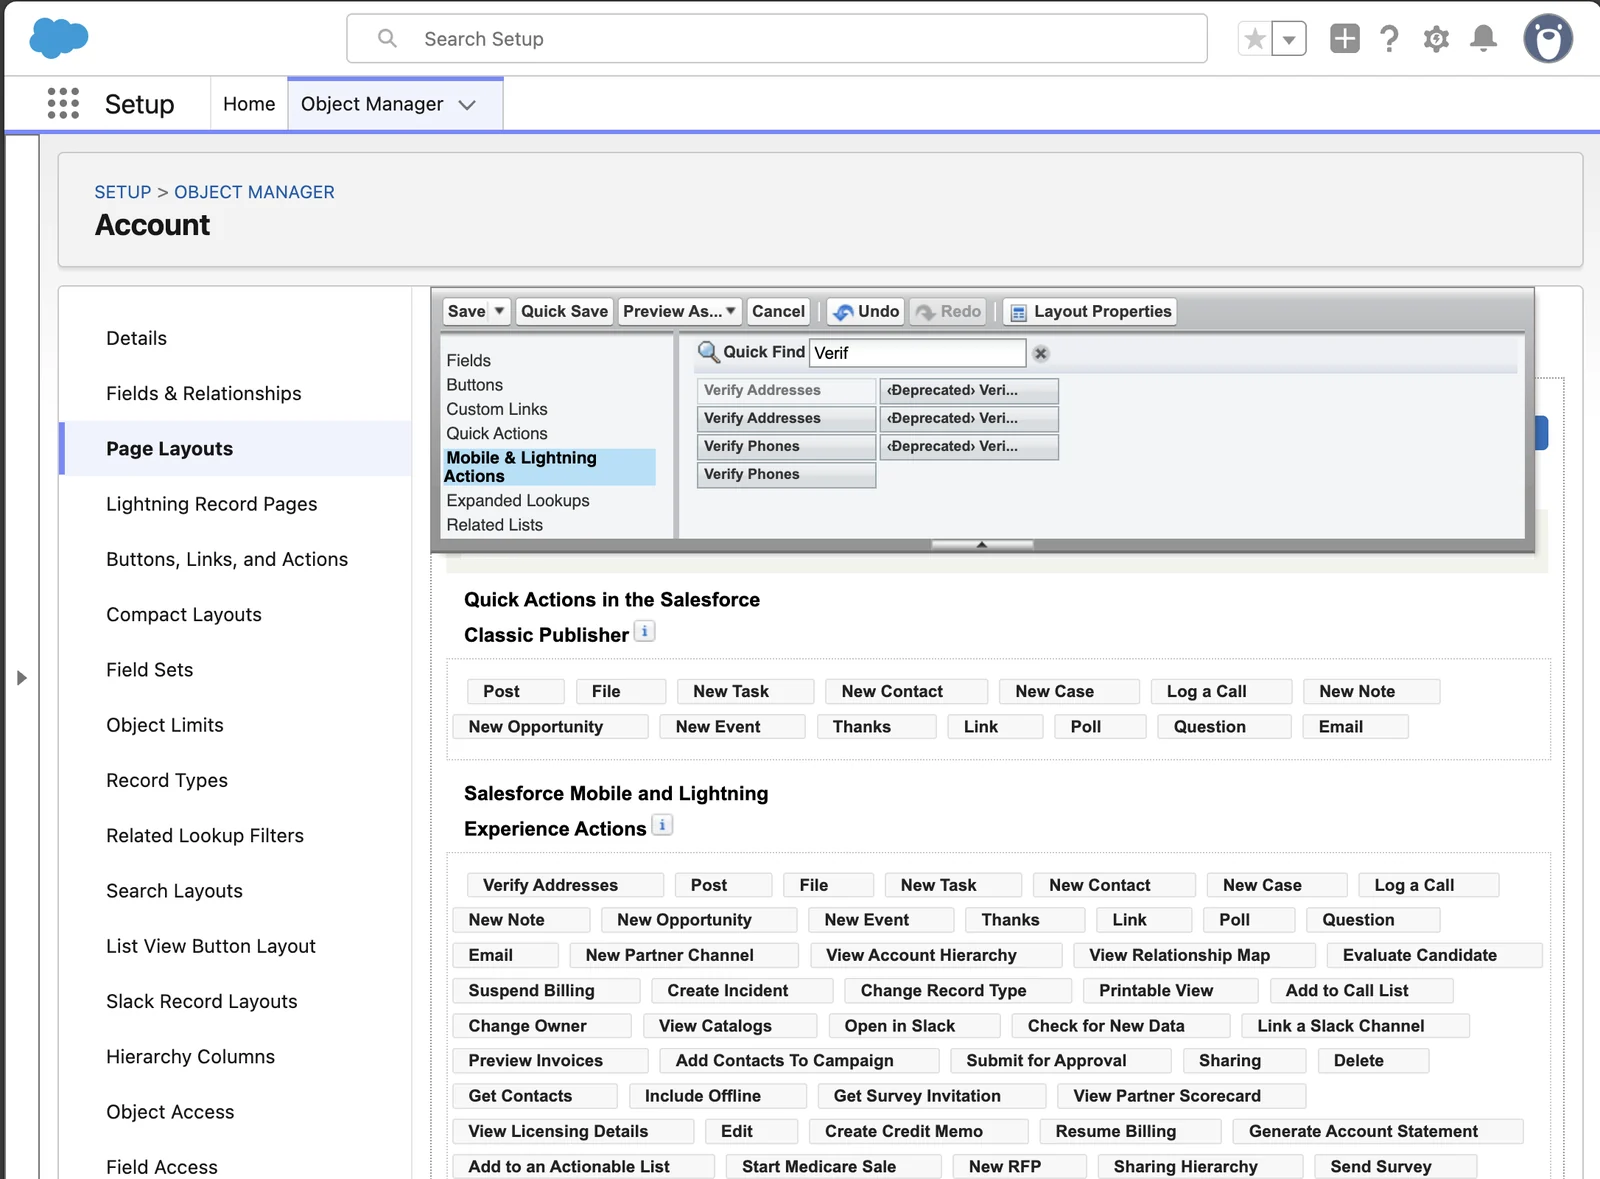
5. **Optional: add the Account History related list.**
If you did [Track address changes](https://www.toafinish.com/support/guides/address-verification/#history), click **Related Lists** in the palette. Drag **Account History** into the Related Lists section.
6. **Click Save.**
If Salesforce asks **Save page layout changes?**, leave the overwrite box as it is. Click **Yes**.
Do the same on each layout that needs the button.
7. **Do the same for Contact and Lead.**
Use the layouts of Contact and Lead, and the Contact History and Lead History related lists. Use the action name from the table at the top of this chapter. On Lead, the action reads **Verify Address**.
> **A button for lists**
>
> A list button can verify up to 200 records at once. Each record still uses its own lookups. See [Verify many records from a list](https://www.toafinish.com/support/guides/address-verification/#list-verify).
## 8. Verify a test address
Check the whole setup with one address on a test Account.
1. **Open a test Account with a US billing address.**
In a sandbox with no accounts, open the **Accounts** tab and click **New**. Type an Account Name, for example `Test Address`. Type a real business address in **Billing Address**, for example the Salesforce Tower:
| Field | Value |
| --- | --- |
| Billing Street | `415 Mission St` |
| Billing City | `San Francisco` |
| Billing State/Province | `CA` |
| Billing Zip/Postal Code | `94105` |
| Billing Country | `USA` |
Click **Save**.
2. **Click Verify Addresses.**
It sits with the buttons at the top right of the record, or in the menu under the arrow at the end of the buttons. Address Verification sends each address on the record to Smarty. For the Salesforce Tower, a message reads **Record Updated**, **Addresses Partially Verified.**
3. **Reload the page. Check the result.**
The address shows the form that Smarty returned. For the Salesforce Tower, the ZIP Code becomes `94105-2533`.
If you added the Address Verification fields to the layout, they show the result. The Salesforce Tower has many suites, so the status reads **Confirmed - Missing Secondary Info**. The address is valid, and **Billing Verified** is ticked. See [Read the results](https://www.toafinish.com/support/guides/address-verification/#results).
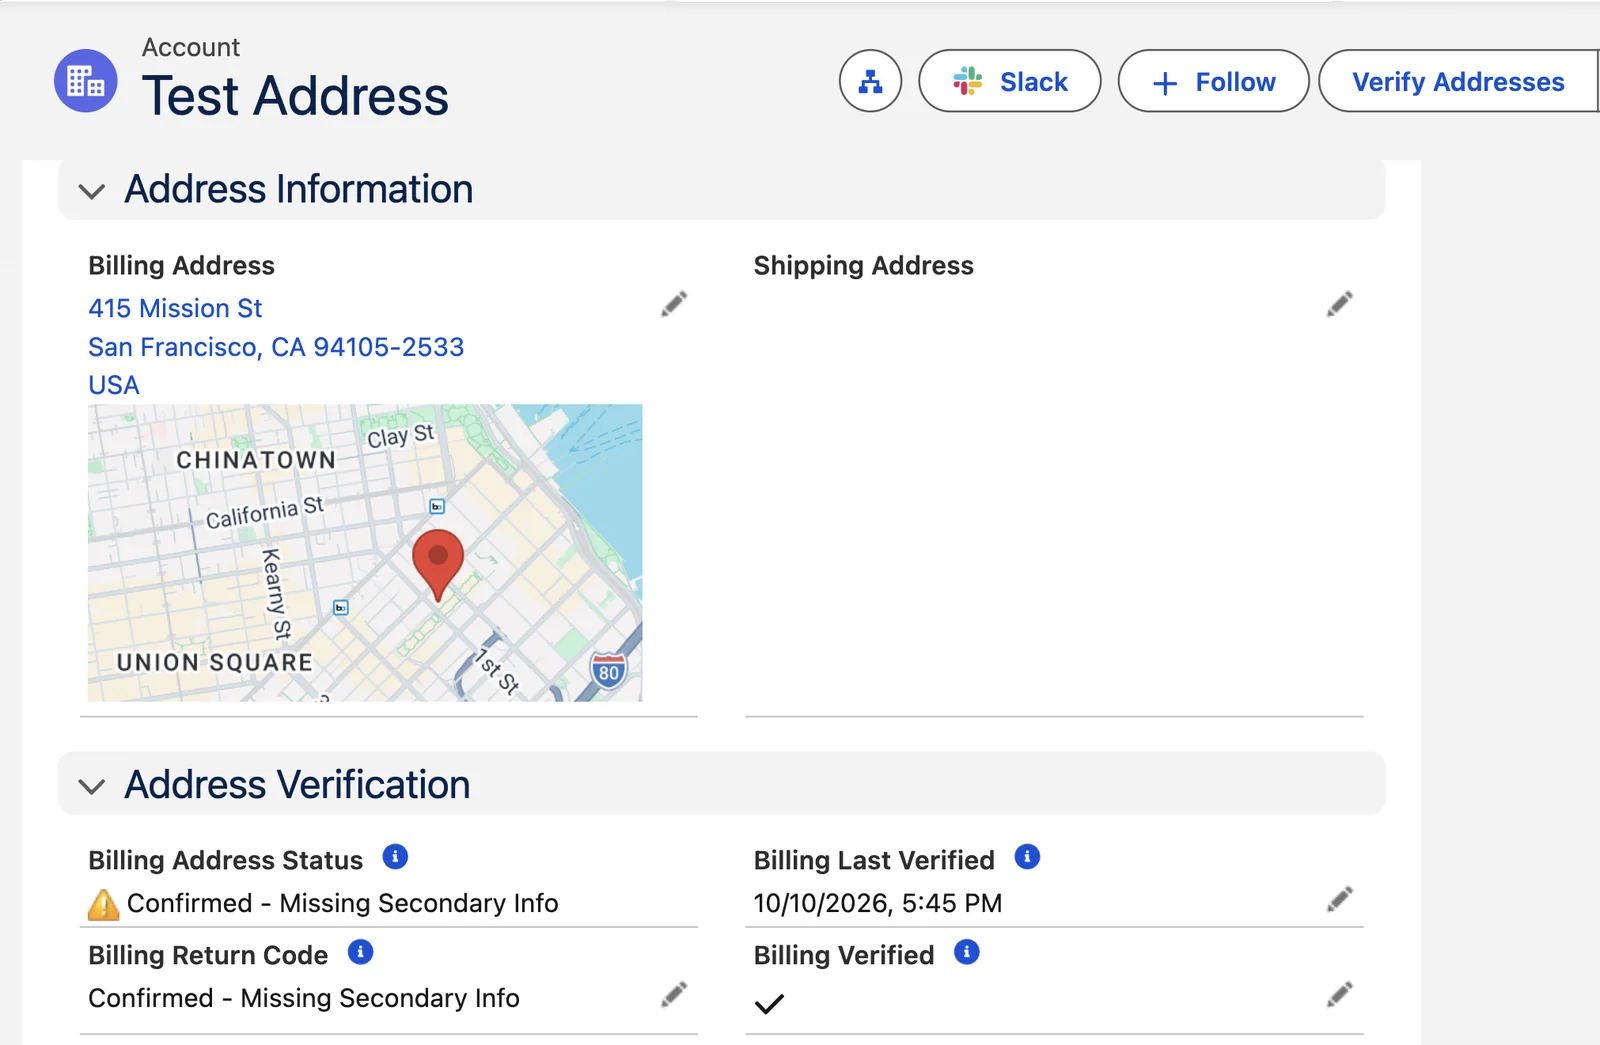
4. **Optional: try an address that does not exist.**
Click the pencil beside the address. Change the street to one that does not exist, for example `99999 Nowhere St`. Click **Save**. The Return Code reads **Changed**, and the status reads **Not Yet Verified**.
Click **Verify Addresses** again. The Return Code reads **Bad or Blank Address**. This check uses one more lookup.
> **Verify skips a verified address**
>
> Address Verification checks only an address whose Verified box is not ticked, so it does not use a lookup twice. A change to the address unticks the box. The Return Code then reads Changed until the next check.
## 9. Add the Verify and Confirm button
*Optional. Skip this chapter if the Verify Addresses action is enough.*
Two components sit on the record page itself. They work for physical addresses only.
| Component | What it does |
| --- | --- |
| verifyAndConfirm | Shows the result before the save, with each changed value in red. The user clicks Confirm or Cancel. It also has a Verify and Save button. |
| verifyAndSaveButton | Checks and saves in one click, a little faster. It takes less room on the page. |
You need only one of them, because verifyAndConfirm holds both buttons. A third component, verifyAndConfirmEnrichment, is for use with TAF support only.
1. **Open a test Account. Click the gear icon at the top right. Click Edit Page.**
The Lightning App Builder opens. Components sit in the left panel, the page sits in the middle, and the settings of the item you click sit in the right panel.
2. **Drag verifyAndConfirm onto the page.**
`verifyAndConfirm`
Type `verifyAndConfirm` in the search box of the left panel. Find it under **Custom - Managed**. Drop it at the top of a column, for example the right column.
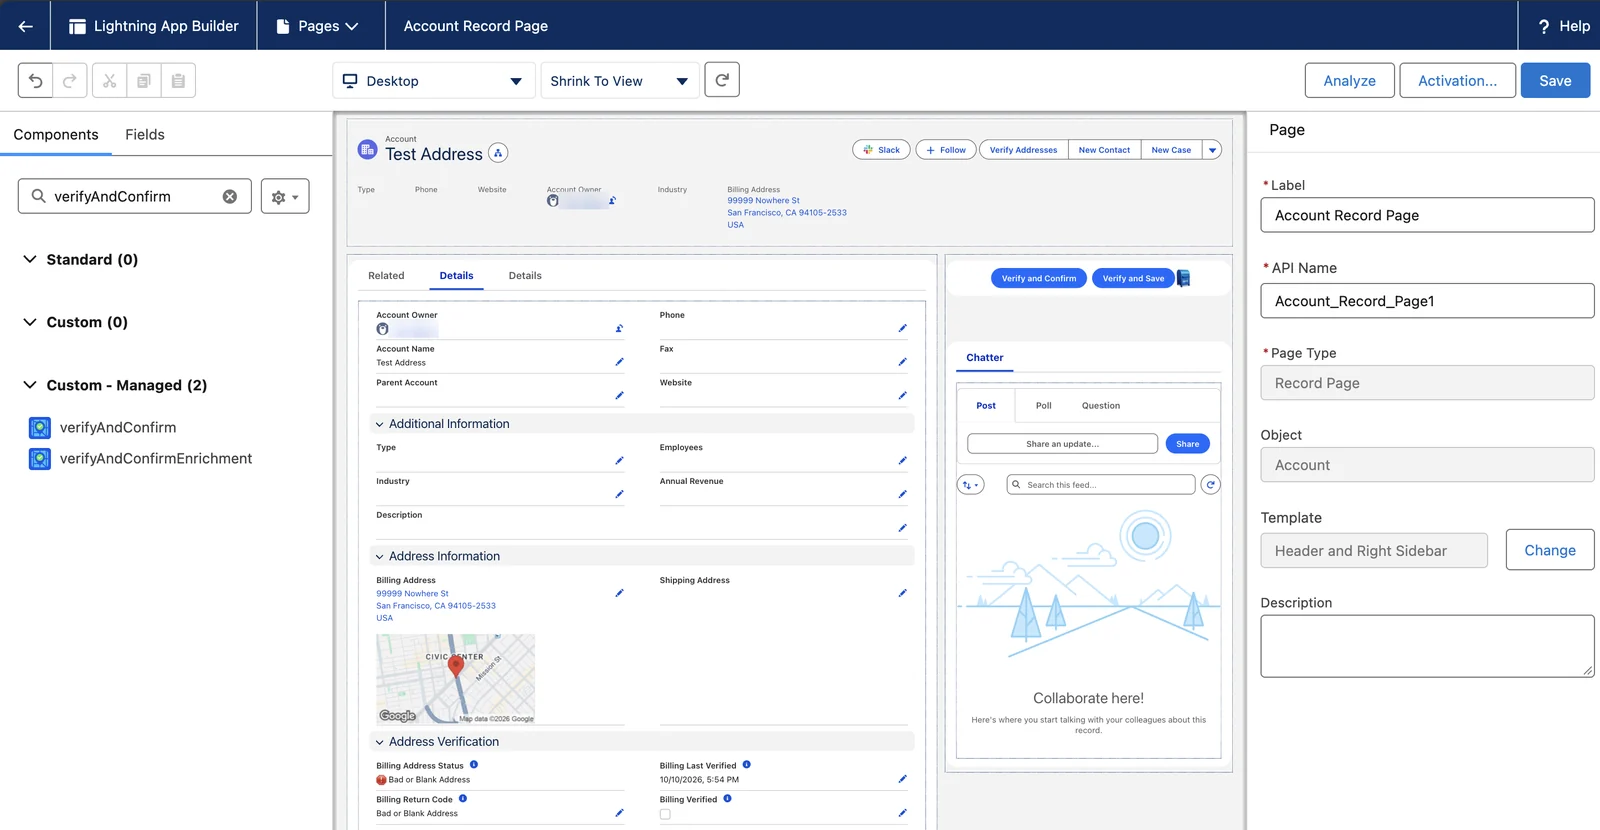
3. **Click the component. Set its two options.**
| Option | What it does |
| --- | --- |
| Hide Verify And Save | No shows the Verify and Save button too. Yes hides it, so users always see the changes first. |
| Always Display Addresses | Yes shows the addresses on the component, also after the check. |
4. **Click Save. Activate the page, if Salesforce asks.**
Salesforce asks only when the page is not active yet. Click **Activate**. Click **Assign as Org Default**. Choose **Desktop**. Click **Next**. Salesforce shows a review of the assignment. Click **Save**.
5. **Click Back. Click Verify and Confirm.**
Back is the arrow (←) at the top left of the Lightning App Builder. The record opens. Click **Verify and Confirm**. The component shows the result for each address, with each changed value in red.
This check uses a lookup only for an address that is not verified yet. To see a change in red, first edit the test address. For example, change the street to `415 mission street` and save. Then click Verify and Confirm.
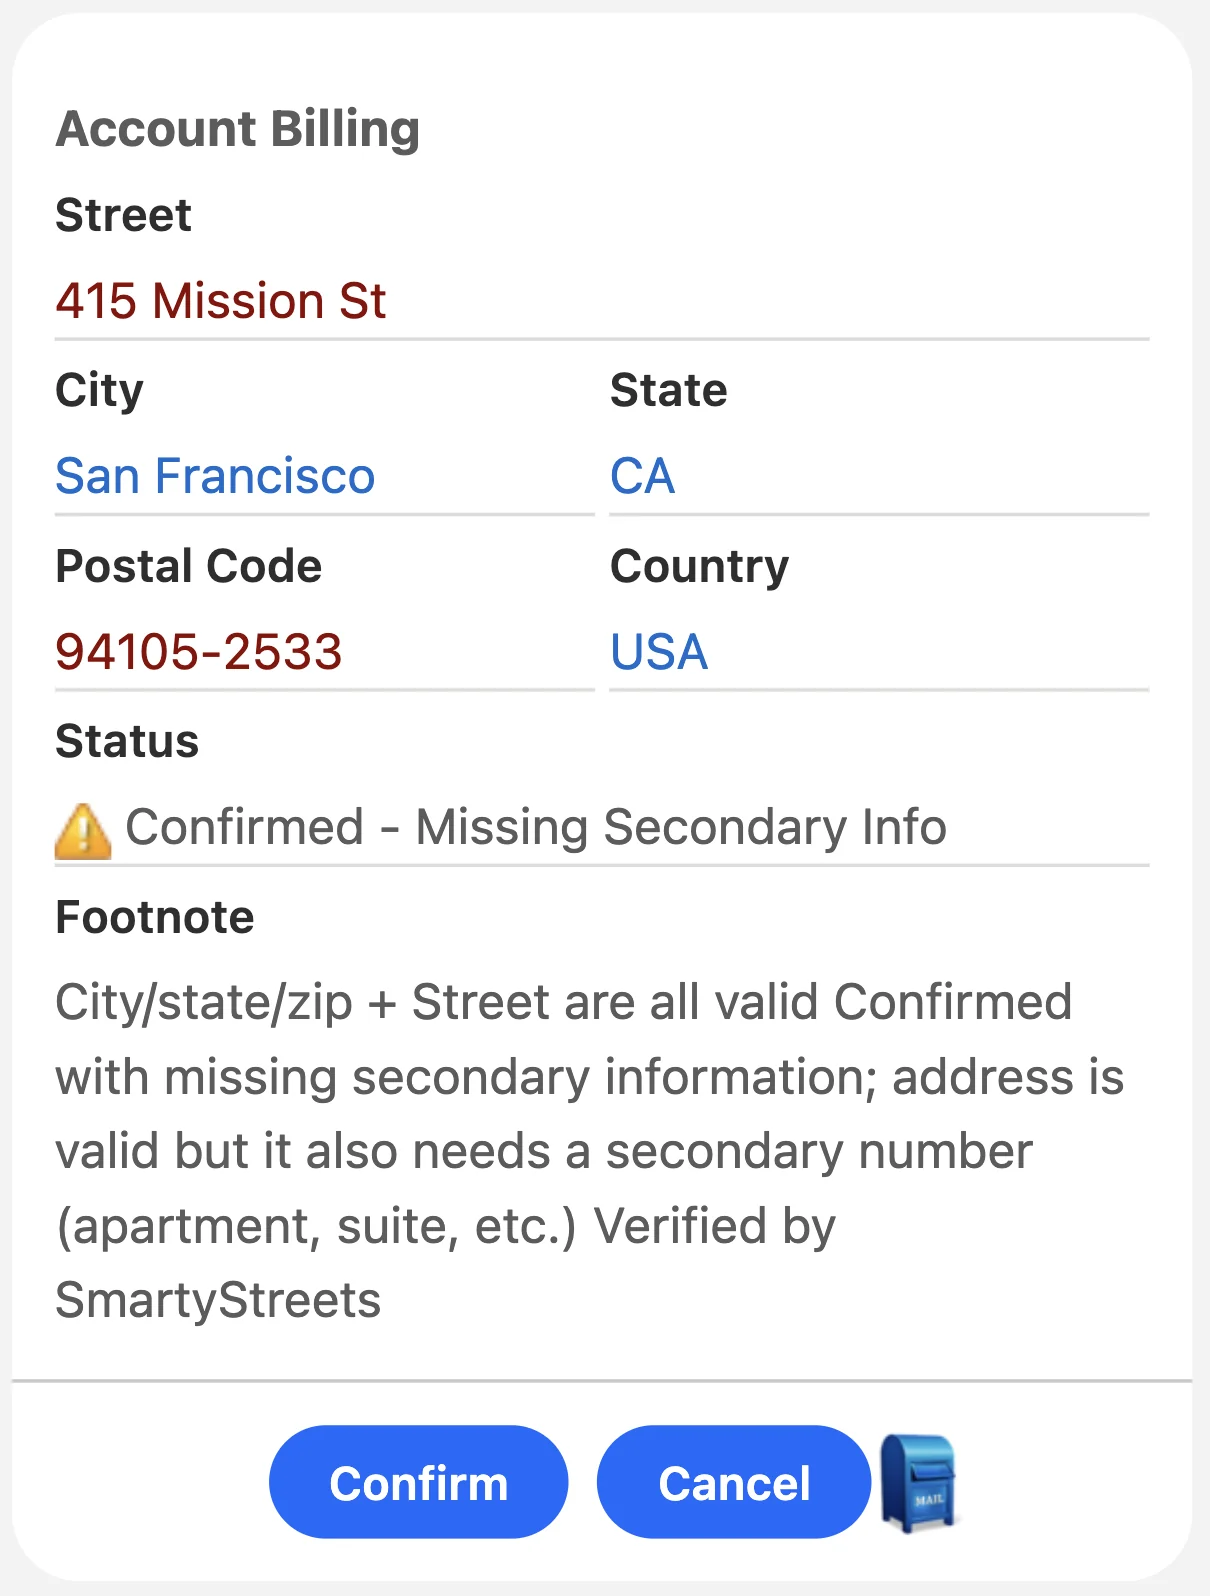
6. **Click Confirm.**
Address Verification saves the result to the record. With Cancel, nothing changes on the record, but the check still used a lookup.
## 10. Keep the results when a Lead converts
*Only for orgs that verify Lead addresses.*
When a verified Lead converts, Salesforce makes an Account and a Contact. Map the Address Verification fields of the Lead, so the new records arrive verified and do not need a second lookup.
1. **Open Lead in Object Manager. Click Fields & Relationships.**
Open Setup. Click **Object Manager**. Click **Lead**. Click **Fields & Relationships**.
2. **Click Map Lead Fields.**
The page **Custom Fields** opens. It has a tab for each object: **Account**, **Contact** and **Opportunity**. Each tab lists the custom fields of the Lead. Beside each one, a list offers the fields of that object.
3. **Map the Address Verification fields. Then click Save.**
Map as many as you can. Map at least these three Lead fields. For example, on the Contact tab:
| Lead field | Contact field |
| --- | --- |
| Address Verified | Mailing Verified |
| Address Return Code | Mailing Return Code |
| Address Last Verified | Mailing Last Verified |
To keep the result on the Account too, map the same Lead fields to the Billing fields on the Account tab.
> **More options: chapters 11 to 24.** These chapters are optional. Use the ones your org needs. They do not count in the setup progress. Without them, go on at chapter 25.
## 11. Verify addresses on a custom object
*Only for orgs that keep addresses on a custom object.*
Address Verification works on custom objects too. You make the result fields on the object, add an entry on the Data Mapping tab and make a Verify action. Then a Flow marks a changed address, in the next chapter.
Do this in a sandbox first. The examples use an object named Location.
1. **Make the required fields on your object.**
Open Setup. Click **Object Manager**. Click your object. Click **Fields & Relationships**. For each field in the table, click **New**. Pick the type. Click **Next**.
Type the label. For a text field, type the length. For a number, type the length and the decimal places, for example 12 and 6 for Number(12, 6). Click **Next**.
Keep the field visible for the profiles that work with addresses. Click **Next**. Click **Save**.
| Example label | Type | What it holds |
| --- | --- | --- |
| Street | Text(255) | Most objects already have it. |
| City | Text(128) | Most objects already have it. |
| State | Text(20) | Most objects already have it. |
| Zip Code | Text(20) | Most objects already have it. |
| Country | Text(64) | Most objects already have it. |
| Address Verified | Checkbox | Ticked when the address is verified. Verify skips an address whose box is ticked. |
| Address Last Verified | Date/Time | The date and time of the last check. |
| Address Return Code | Text(40) | The result of the check. See [Read the results](https://www.toafinish.com/support/guides/address-verification/#results). |
| Footnotes | Long Text Area | Notes about the check. |
If the object holds more than one address, make a set of fields for each one. Start each label with the name of the address, for example Site Street and Site Address Verified.
2. **Optional: make fields for more data.**
Address Verification can fill many more fields, for example County, Latitude and Time Zone. See [Optional fields for an address](https://www.toafinish.com/support/guides/address-verification/#custom-optional) below. Make only the ones you need.
A Lookup field has one more page, **Related To**. For Verified By, pick **User** there.
3. **On the Data Mapping tab, click Add Supported Object, if your object is new to Address Verification.**
Open the Address Verification setup page. Click the **Data Mapping** tab. Click **Add Supported Object**. A window named **New Supported Object** opens.
| Field | Value |
| --- | --- |
| Label | The name of your object, for example `Location` |
| Active | On |
| API Name | The API name of your object, for example `Location__c` |
| Verify Addresses, Verify Phones, Verify Emails | Off. These turn on checks in the background, and each check uses a lookup. |
Leave the other fields as they are. Click **Save**. Reload the page. Your object now shows in the **Select an Object** list of a new entry, and on the **Automation** tab.
Skip this step if your object already shows in the **Select an Object** list.
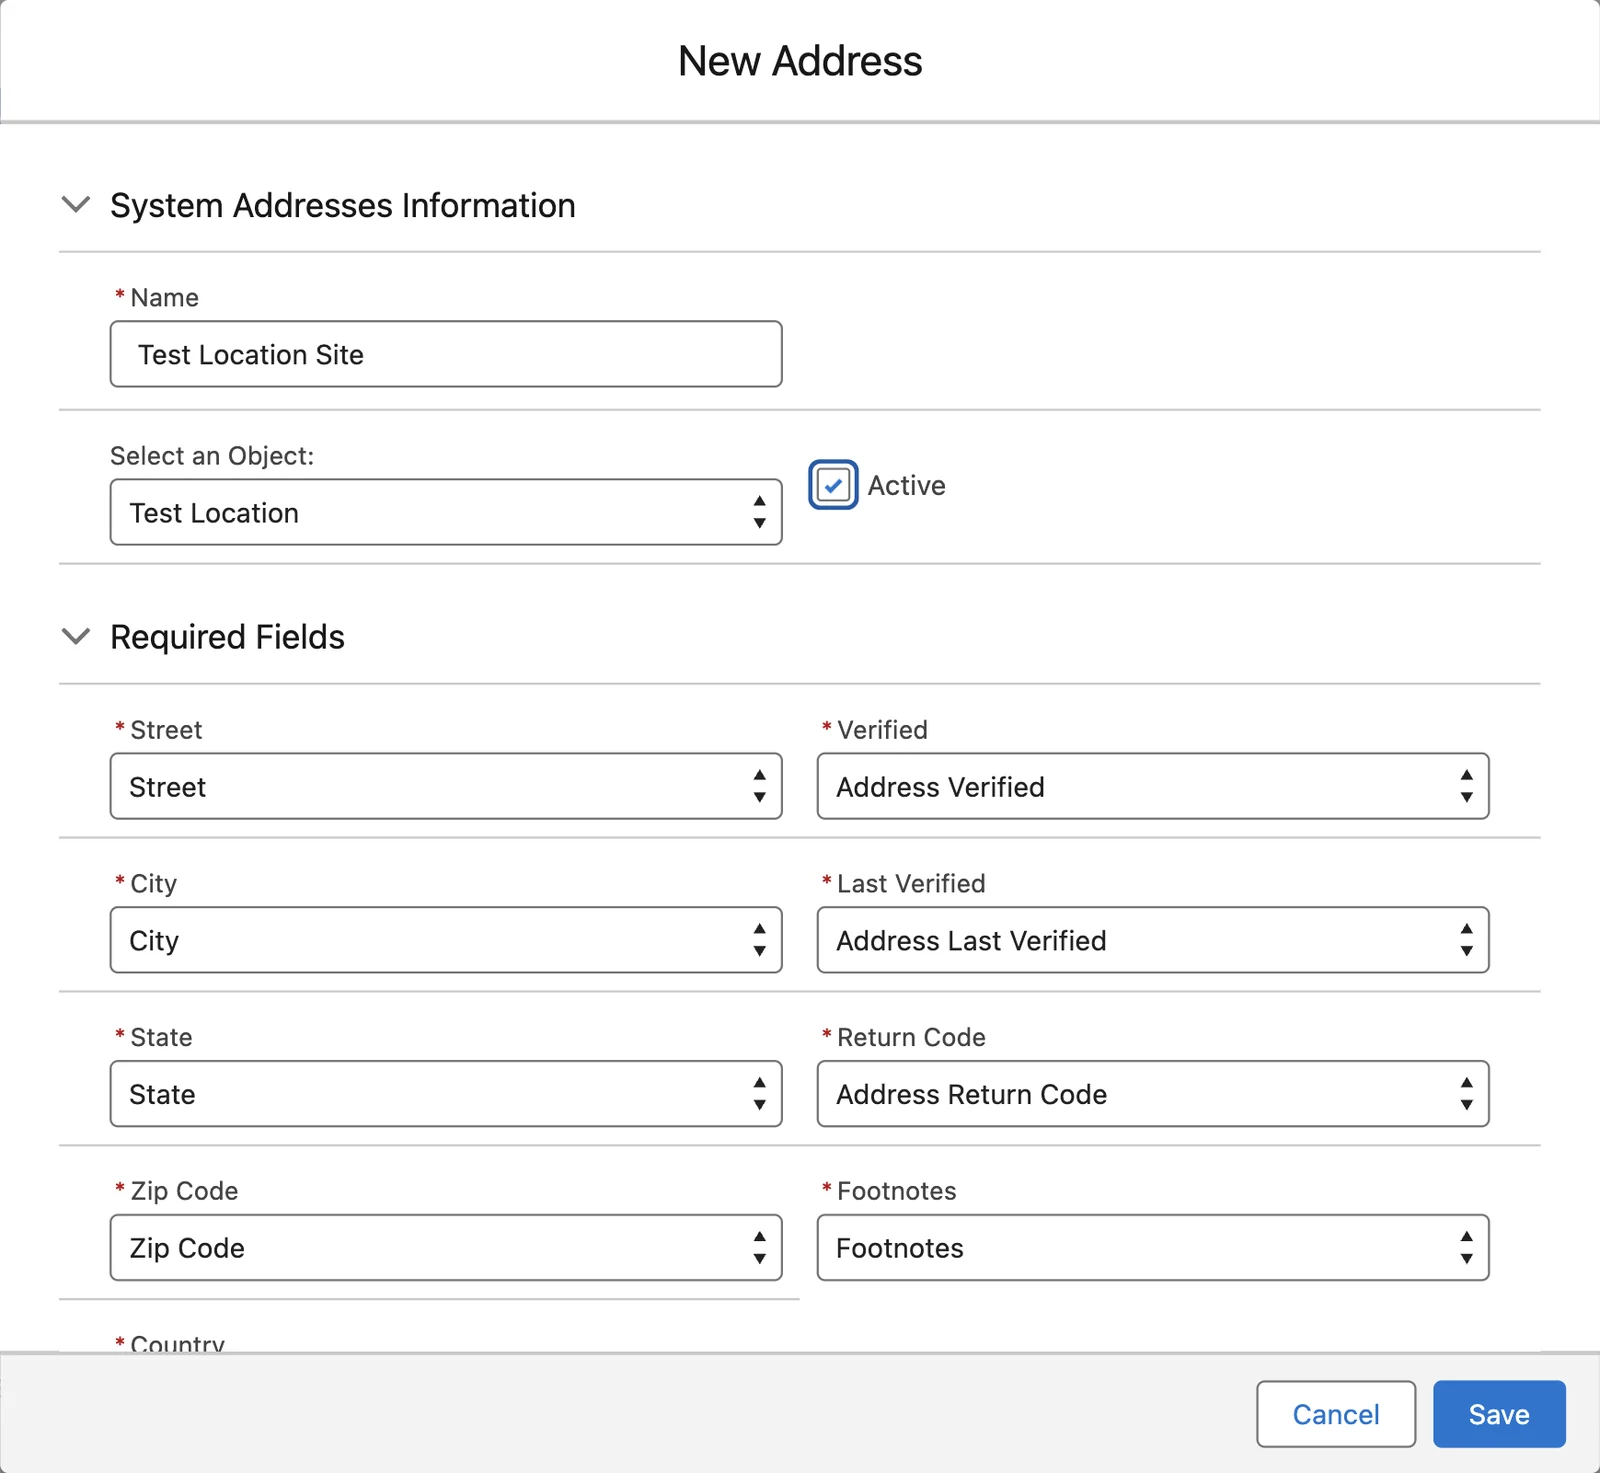
4. **Click New Address. Fill in the entry. Then click Save.**
Type a **Name** that starts with the object name, for example `Location Site`. Select your object. Tick **Active**.
Under **Required Fields**, pick the fields from step 1: Street, City, State, Zip Code, Country, Verified, Last Verified, Return Code and Footnotes. Map the optional fields you made in step 2.
Some optional fields have short names in the entry, for example **DST** for Daylight Savings. The options at the bottom work as for the standard addresses. See [Address options](https://www.toafinish.com/support/guides/address-verification/#address-options).
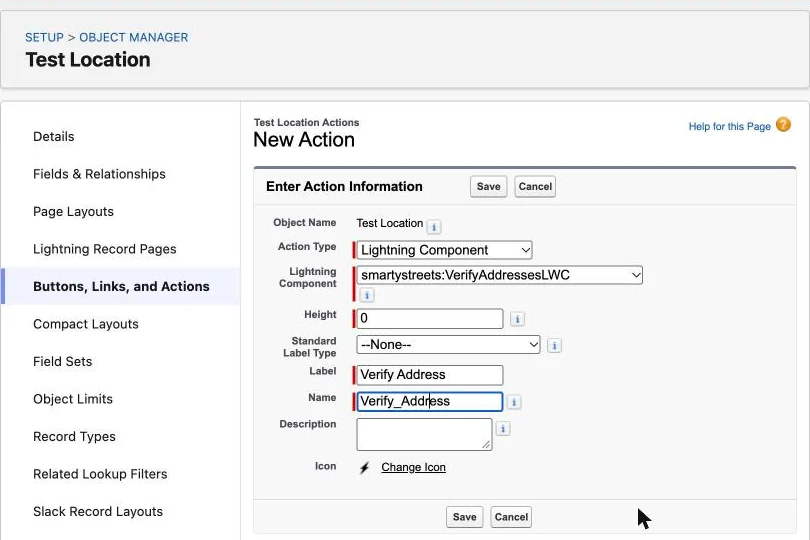
5. **Make a Verify action for your object.**
Go back to your object in Object Manager. Click **Buttons, Links, and Actions**. Click **New Action**. Fill in the form:
| Field | Value |
| --- | --- |
| Action Type | Lightning Component |
| Lightning Component | `smartystreets:VerifyAddressesLWC` |
| Height | `0` |
| Label | `Verify Address` |
Click **Save**.
6. **Add Verify Address to the page layout.**
Click **Page Layouts**. Open the layout your users work with. In the palette, click **Mobile & Lightning Actions**. Drag **Verify Address** into the **Salesforce Mobile and Lightning Experience Actions** section. Click **Save**.
If the section asks you to override the predefined actions, click the link first. Do the same on each layout that needs the button.
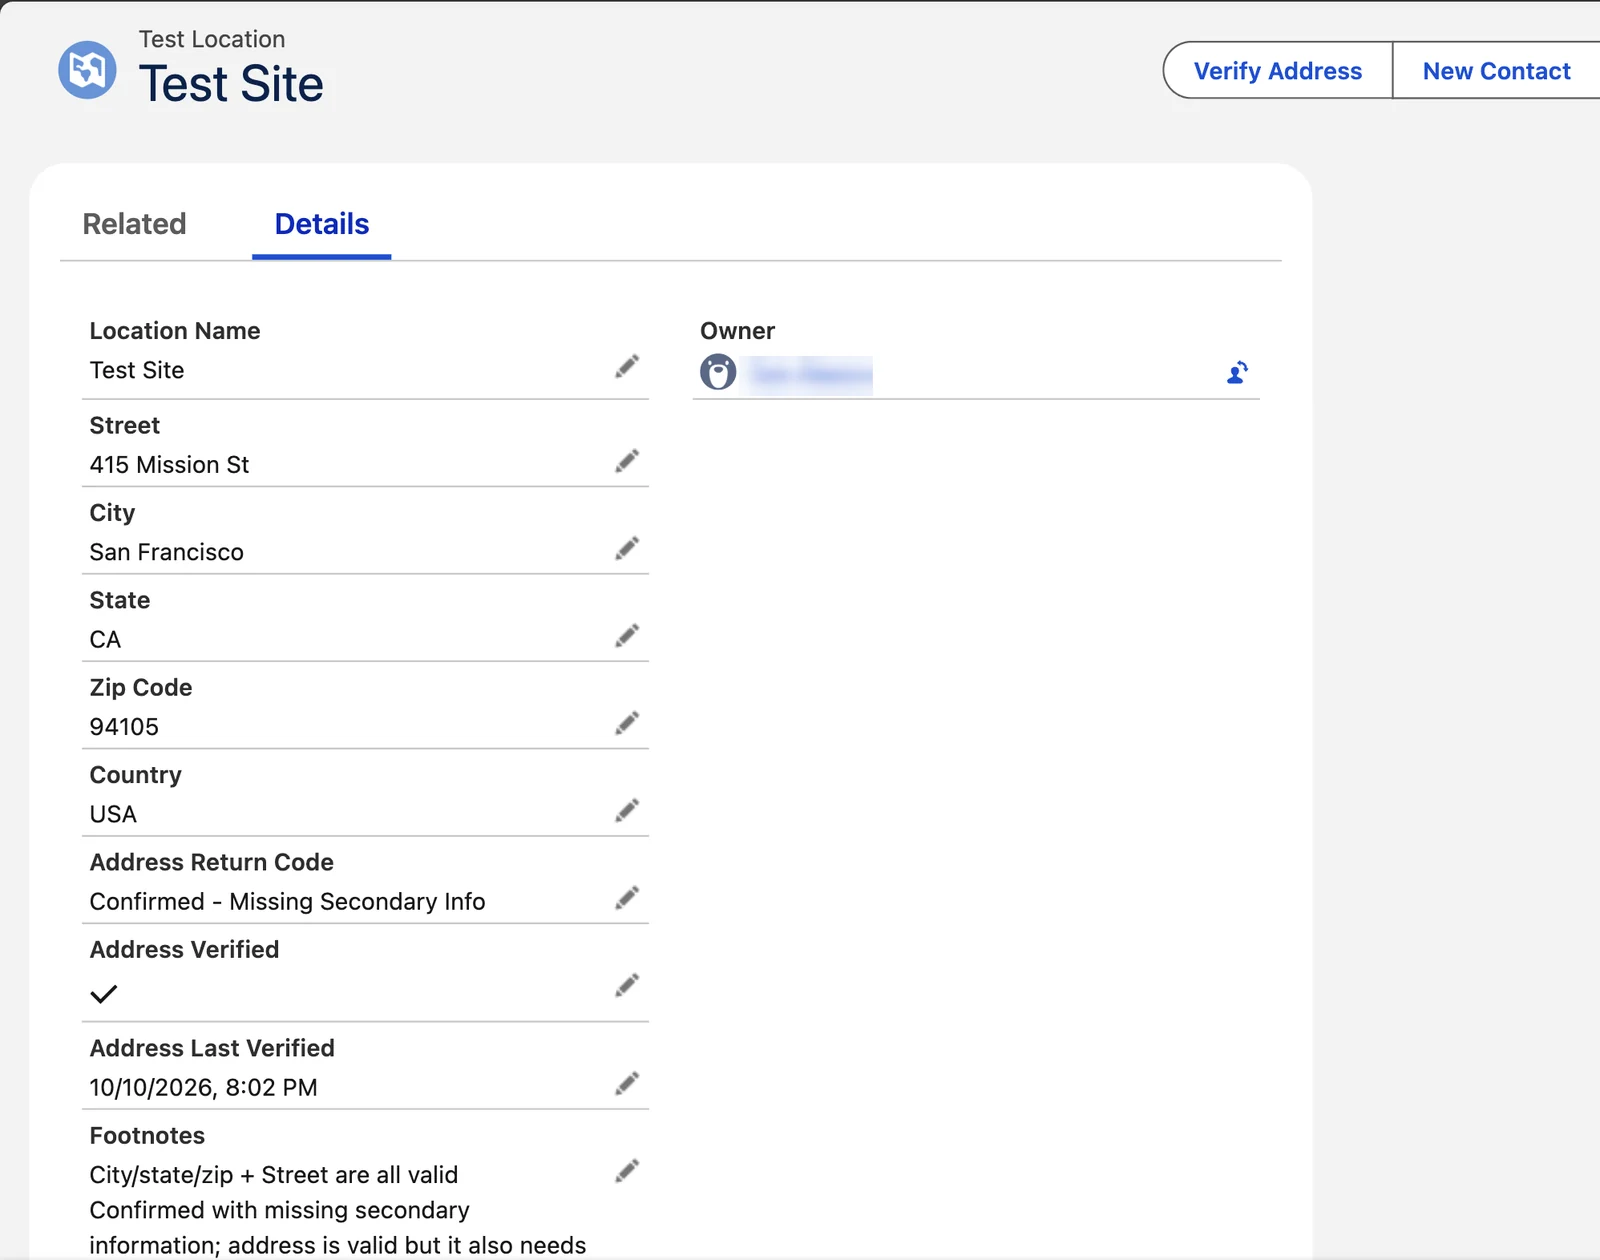
7. **Open a record with a US address. Click Verify Address.**
A small **Verify Address** window opens for about three seconds, with a **Cancel** button. Then it closes. A message reads **Record Updated**, with the result, for example **Addresses Partially Verified.** The page then shows the result. The check uses one lookup.
If you mapped Zip Plus 4, the four extra digits of the ZIP Code go there, and Zip Code keeps five digits.
> **Add the Flow from the next chapter**
>
> On a custom object, nothing unticks Address Verified when the address changes. Verify then skips the changed address. Build the Flow in [Mark changed addresses on a custom object](https://www.toafinish.com/support/guides/address-verification/#unverify).
The Verify and Confirm component and the Verify and Save button work on a custom object too. See [Add the Verify and Confirm button](https://www.toafinish.com/support/guides/address-verification/#confirm-button).
To see who changed an address, turn on field history for each address field: Street, City, State, Zip Code and Country. See [Track address changes](https://www.toafinish.com/support/guides/address-verification/#history).
> **Address Enrichment**
>
> Address Enrichment brings in more data about an address from Smarty, for example property data. It needs its own Smarty plan. This guide does not cover its setup. To buy it and set it up, email [sales@toafinish.com](mailto:sales@toafinish.com).
### Optional fields for an address
Make the ones you need, with the type shown. Then map each one in the address entry.
| Example label | Type | What it holds |
| --- | --- | --- |
| Barcode | Text(32) | The barcode value. A formula can show it as a picture. See [Formula fields](https://www.toafinish.com/support/guides/address-verification/#custom-formulas). |
| Carrier Route | Text(4) | The carrier route code of the post office. |
| City Nickname | Long Text Area(3,000) | Informal names of the city, if Smarty has them. |
| Clean Street | Text(255) | A short, standard form of the street. Address Verification uses it to update addresses it verified before. |
| Congressional District | Text(2) | The code of the congressional district. |
| County | Text(64) | The name of the county. |
| County FIPs Code | Text(32) | The federal code of the county. |
| County Nickname | Long Text Area(1,000) | Informal names of the county. It needs the County field too. |
| Daylight Savings | Checkbox | Ticked when the address uses daylight saving time. The entry calls it DST. |
| Do Not Verify | Checkbox | Tick it to keep the address out of future checks. Mostly for background checks. |
| Is Active | Checkbox | From the USPS. Ticked when the address gets mail now. |
| Is Vacant | Checkbox | From the USPS. Ticked when nobody picked up the mail for some time. |
| Island | Text(100) | The name of a Hawaiian or Spanish island. Smarty seldom has it. |
| Latitude, Longitude | Number(12, 6) | The location of the address on a map. |
| Match Details | Text(100) | How Smarty matched the address, for example postal-match or missing-secondary. |
| RDI | Text(32) | From the USPS. Residential or Commercial. |
| Record Type | Text(1) | A one-letter code for the type of address: F (Firm), G (General Delivery), H (High-Rise), P (P.O. Box), R (Rural Route) or S (Street). |
| Smarty Key | Text(100) | The ID of the address at Smarty. Address Enrichment needs it, so TAF advises to map it. |
| State Nickname | Long Text Area(1,500) | Informal names of the state. |
| Street 2 | Text(128) | The second line of the street. Without this field, the second line stays in Street. |
| Street 3, Street 4 | Text(128) | More lines of the street. Seldom used, and never for a US address. |
| Time Zone | Text(48) | The name of the time zone. |
| Unit | Text(64) | The apartment, suite or unit number. |
| Urbanization | Text(64) | The urbanization, a part of some Puerto Rico addresses. The entry says it does not apply with Enhanced Matching. |
| UTC Offset | Number(16, 2) | The hours between the time zone of the address and UTC, the world standard time. |
| Verification Used | Picklist | The service that checked the address: Smarty, Google Maps or UPS. |
| Verified By | Lookup(User), or Text(18) | The user who verified the address. The entry calls it Verified By User. |
| Zip Plus 4 | Text(4) | The last four digits of the ZIP Code. With this field mapped, Zip Code keeps five digits. |
### Fields for international addresses
Make these fields only if you verify addresses outside the US. See [International addresses](https://www.toafinish.com/support/guides/address-verification/#international).
| Example label | Type | What it holds |
| --- | --- | --- |
| Address Format | Text(255) | The order of the address parts for mail to that country. |
| Address Precision | Text(255) | How exact the check was. From best to worst: Delivery Point (the building entrance), Premise (the property), Thoroughfare (the street), Locality (the city), Administrative Area (the state or province), None. |
| Administrative Area | Text(255) | The main division of the country, for example a region. |
| Complete Address | Text Area | The whole address, in the order of Address Format. |
| Dependent Locality | Text(64) | More detail about the city, for example a neighborhood. |
| Dependent Locality Name | Text(64) | The name of the dependent locality, if it has one. |
| Geocode Precision | Text(255) | How exact the latitude and longitude are. Same values as Address Precision. |
| Organization | Text(255) | The name of the company at the address. Seldom filled. |
| Post Box | Text(64) | The type and number of a post office box. |
| Premise | Text(64) | The house or building number. |
| Premise Extra | Text(64) | More detail about the premise. It may help, but it is not official. |
| Sub Building Number | Text(64) | The number of a part of the building. |
| Sub Building Type | Text(64) | The type of that part, for example a floor or a unit. |
| Super Administrative Area | Text(255) | The largest division of the country. The entry calls it Super Admin. Area. |
| Thoroughfare (Complete) | Text(255) | The whole street name, for example N Main St SW. |
| Thoroughfare Name | Text(255) | The name part of the street, for example Main. |
### Formula fields that show the result
These formula fields show the data in a form that is easy to read. Make each one as a **Formula** field with the return type **Text**. Paste the formula.
Replace each word in capitals with the API name of your field, for example RETURNCODE with `Address_Return_Code__c`. Click **Check Syntax**. Then save the field.
**Address Status** shows the result with an icon. Replace RETURNCODE with your Return Code field.
```
If(RETURNCODE = "Confirmed", IMAGE("/img/msg_icons/confirm16.png", "Confirmed", 16, 16) & " Confirmed",
If(RETURNCODE = "Partial", IMAGE("/img/msg_icons/warning16.png", "Confirmed - Partially", 16, 16) & " Confirmed - Partially",
If(left(RETURNCODE,9) = "Confirmed", IMAGE("/img/msg_icons/warning16.png", RETURNCODE, 16, 16) & " " & RETURNCODE,
If(RETURNCODE = "Bad or Blank Address", IMAGE("/img/msg_icons/error16.png", "Blank Address", 16, 16) & " Bad or Blank Address",
If(RETURNCODE = "Not Submitted", IMAGE("/img/msg_icons/error16.png", "Not Submitted", 16, 16) & " Not Submitted",
If(RETURNCODE = "Not Confirmed", IMAGE("/img/msg_icons/error16.png", "Not Confirmed", 16, 16) & " Not Confirmed",
IMAGE("/img/msg_icons/info16.png", "Not Yet Verified", 16, 16) & " Not Yet Verified"))))))
```
**Geolocation Link** shows the latitude and longitude with a link to Google Maps. Replace LAT with your Latitude field. Replace LONG with your Longitude field.
```
if ( not ( isBlank ( LAT ) ), text( LAT )+" "+text( LONG ) + " " +
HYPERLINK("https://www.google.com/maps/place/"+text( LAT )+","+text( LONG ), "map", "_blank"), "" )
```
**Record Type Description** shows the word for the code in Record Type. Replace RECORDTYPE with your Record Type field.
```
If(RECORDTYPE = "F", "Firm",
If(RECORDTYPE = "G", "General Delivery",
If(RECORDTYPE = "H", "High-Rise",
If(RECORDTYPE = "P", "P.O. Box",
If(RECORDTYPE = "R", "Rural Route",
If(RECORDTYPE = "S", "Street", "" ) ) ) ) ) )
```
**Barcode Image** shows the barcode as a picture. Replace BARCODE with your Barcode field. The picture comes from barcodesinc.com, an outside web site.
```
if ( not ( isblank ( BARCODE ) ), IMAGE("https://www.barcodesinc.com/generator/image.php?code=" + BARCODE +
"&style=196&type=C128B&width=206&height=50&xres=1&font=3", "Address Barcode" ), "" )
```
**Current Time** shows the time at the address now, for US addresses only. Replace HOUROFFSET with your UTC Offset field. Replace DAYLIGHTSAVINGS with your Daylight Savings field.
```
IF(ISBLANK(HOUROFFSET), "",
IF (AND( DAYLIGHTSAVINGS,
TODAY() >=
CASE(MOD(DATE(YEAR(TODAY()),3,8) - DATE(1900,1,7),7),
0, DATE(YEAR(TODAY()),3,8),
1, DATE(YEAR(TODAY()),3,8)+6,
2, DATE(YEAR(TODAY()),3,8)+5,
3, DATE(YEAR(TODAY()),3,8)+4,
4, DATE(YEAR(TODAY()),3,8)+3,
5, DATE(YEAR(TODAY()),3,8)+2,
DATE(YEAR(TODAY()),3,8)+1),
TODAY() <
CASE(MOD(DATE(YEAR(TODAY()),11,1) - DATE(1900,1,7),7),
0, DATE(YEAR(TODAY()),11,1),
1, DATE(YEAR(TODAY()),11,1)+6,
2, DATE(YEAR(TODAY()),11,1)+5,
3, DATE(YEAR(TODAY()),11,1)+4,
4, DATE(YEAR(TODAY()),11,1)+3,
5, DATE(YEAR(TODAY()),11,1)+2,
DATE(YEAR(TODAY()),11,1)+1)),
/* CALCULATE FOR IT BEING CURRENTLY DST */
MID( TEXT( NOW()+ (HOUROFFSET +1) /24 ), 6, 2 ) & "/" &
MID( TEXT( NOW()+ (HOUROFFSET +1) /24 ), 9, 2 ) & "/" &
LEFT( TEXT( NOW()+ (HOUROFFSET +1) /24 ), 4 ) & " " &
TEXT( IF( OR(
VALUE( MID( TEXT( NOW()+ (HOUROFFSET +1) /24 ), 12, 2 ) ) = 0,
VALUE( MID( TEXT( NOW()+ (HOUROFFSET +1) /24 ), 12, 2 ) ) = 12), 12,
VALUE( MID( TEXT( NOW()+ (HOUROFFSET +1) /24 ), 12, 2 ) ) -
IF( VALUE( MID( TEXT( NOW()+ (HOUROFFSET +1) /24 ), 12, 2 ) ) < 12, 0, 12 )))
&":"& MID( TEXT( NOW()+ (HOUROFFSET +1) /24 ), 15, 2 ) &" "&
IF( VALUE( MID( TEXT( NOW()+ (HOUROFFSET +1) /24 ), 12, 2 ) ) < 12, "AM", "PM"
),
/* CALCULATE FOR IT NOT BEING CURRENTLY DST */
MID( TEXT( NOW()+ HOUROFFSET /24 ), 6, 2 ) & "/" &
MID( TEXT( NOW()+ HOUROFFSET /24 ), 9, 2 ) & "/" &
LEFT( TEXT( NOW()+ HOUROFFSET /24 ), 4 ) & " " &
TEXT( IF( OR(
VALUE( MID( TEXT( NOW()+ HOUROFFSET /24 ), 12, 2 ) ) = 0,
VALUE( MID( TEXT( NOW()+ HOUROFFSET /24 ), 12, 2 ) ) = 12), 12,
VALUE( MID( TEXT( NOW()+ HOUROFFSET /24 ), 12, 2 ) ) -
IF( VALUE( MID( TEXT( NOW()+ HOUROFFSET /24 ), 12, 2 ) ) < 12, 0, 12 )
)
)
&":"& MID( TEXT( NOW()+ HOUROFFSET /24 ), 15, 2 ) &" "&
IF( VALUE( MID( TEXT( NOW()+ HOUROFFSET /24 ), 12, 2 ) ) < 12, "AM", "PM"
)))
```
**Verified By** shows the user who verified the address, with the date and time. Give it a **Field Name** other than the one of your Verified By field, for example `Verified_By_Info`. Two fields cannot share a field name. The label can be the same. Replace VERIFIEDUSERID with your Verified By field. Replace VERIFIEDUSERNAME with the name of that user, for example `Verified_By__r.FirstName & " " & Verified_By__r.LastName`. Replace LASTVERIFIED with your Last Verified field.
The formula shows the time 5 hours behind UTC. For another time zone, change each `5/24`.
```
if ( not ( isblank ( VERIFIEDUSERID ) ),
HYPERLINK("/" & VERIFIEDUSERID, VERIFIEDUSERNAME, "_Top") &
IF( ISBLANK( LASTVERIFIED ), "", ", " &
TEXT(MONTH(DATEVALUE(LASTVERIFIED)))+"/" +TEXT(DAY(DATEVALUE(LASTVERIFIED)))+"/"
+TEXT(YEAR(DATEVALUE(LASTVERIFIED))) & " " &
IF(OR(VALUE( MID( TEXT( LASTVERIFIED - (5/24) ), 12, 2 ) ) = 0,
VALUE( MID( TEXT( LASTVERIFIED - (5/24) ), 12, 2 ) ) = 12), "12",
TEXT( VALUE( MID( TEXT( LASTVERIFIED - (5/24) ), 12, 2 ) ) -
IF(VALUE( MID( TEXT( LASTVERIFIED - (5/24) ), 12, 2 ) ) < 12, 0,12))) & ":" &
MID( TEXT( LASTVERIFIED - (5/24) ), 15, 2 ) & " " &
IF( VALUE( MID( TEXT( LASTVERIFIED - (5/24) ), 12, 2 ) ) < 12, "AM","PM")), "")
```
## 12. Mark changed addresses on a custom object
*Only for addresses on a custom object. Accounts, Contacts and Leads get this from the app.*
Verify skips an address whose Verified box is ticked, so it does not use a lookup twice. On a custom object, nothing unticks the box when the address changes. A record-triggered Flow does it.
On Accounts, Contacts and Leads, the triggers of Address Verification untick the box. They run for each object whose Active box is ticked on the Automation tab. A new install has Active ticked for all three.
This chapter builds the Flow for the address from [Verify addresses on a custom object](https://www.toafinish.com/support/guides/address-verification/#custom-addresses). The examples use the field labels from that chapter.
> **Keep this Flow on its own**
>
> Do not add these steps to a Flow that verifies records. This Flow must run as Fast Field Updates.
1. **Open Setup. Open Flows. Click New Flow.**
In the Quick Find box, type **Flows**. Click **Flows**. Click **New Flow**. Flow Builder opens in a new browser tab.
2. **Click Record-Triggered Flow.**
A window named **New Automation** opens. Under **Frequently Used**, click **Record-Triggered Flow**. The Flow opens at once.
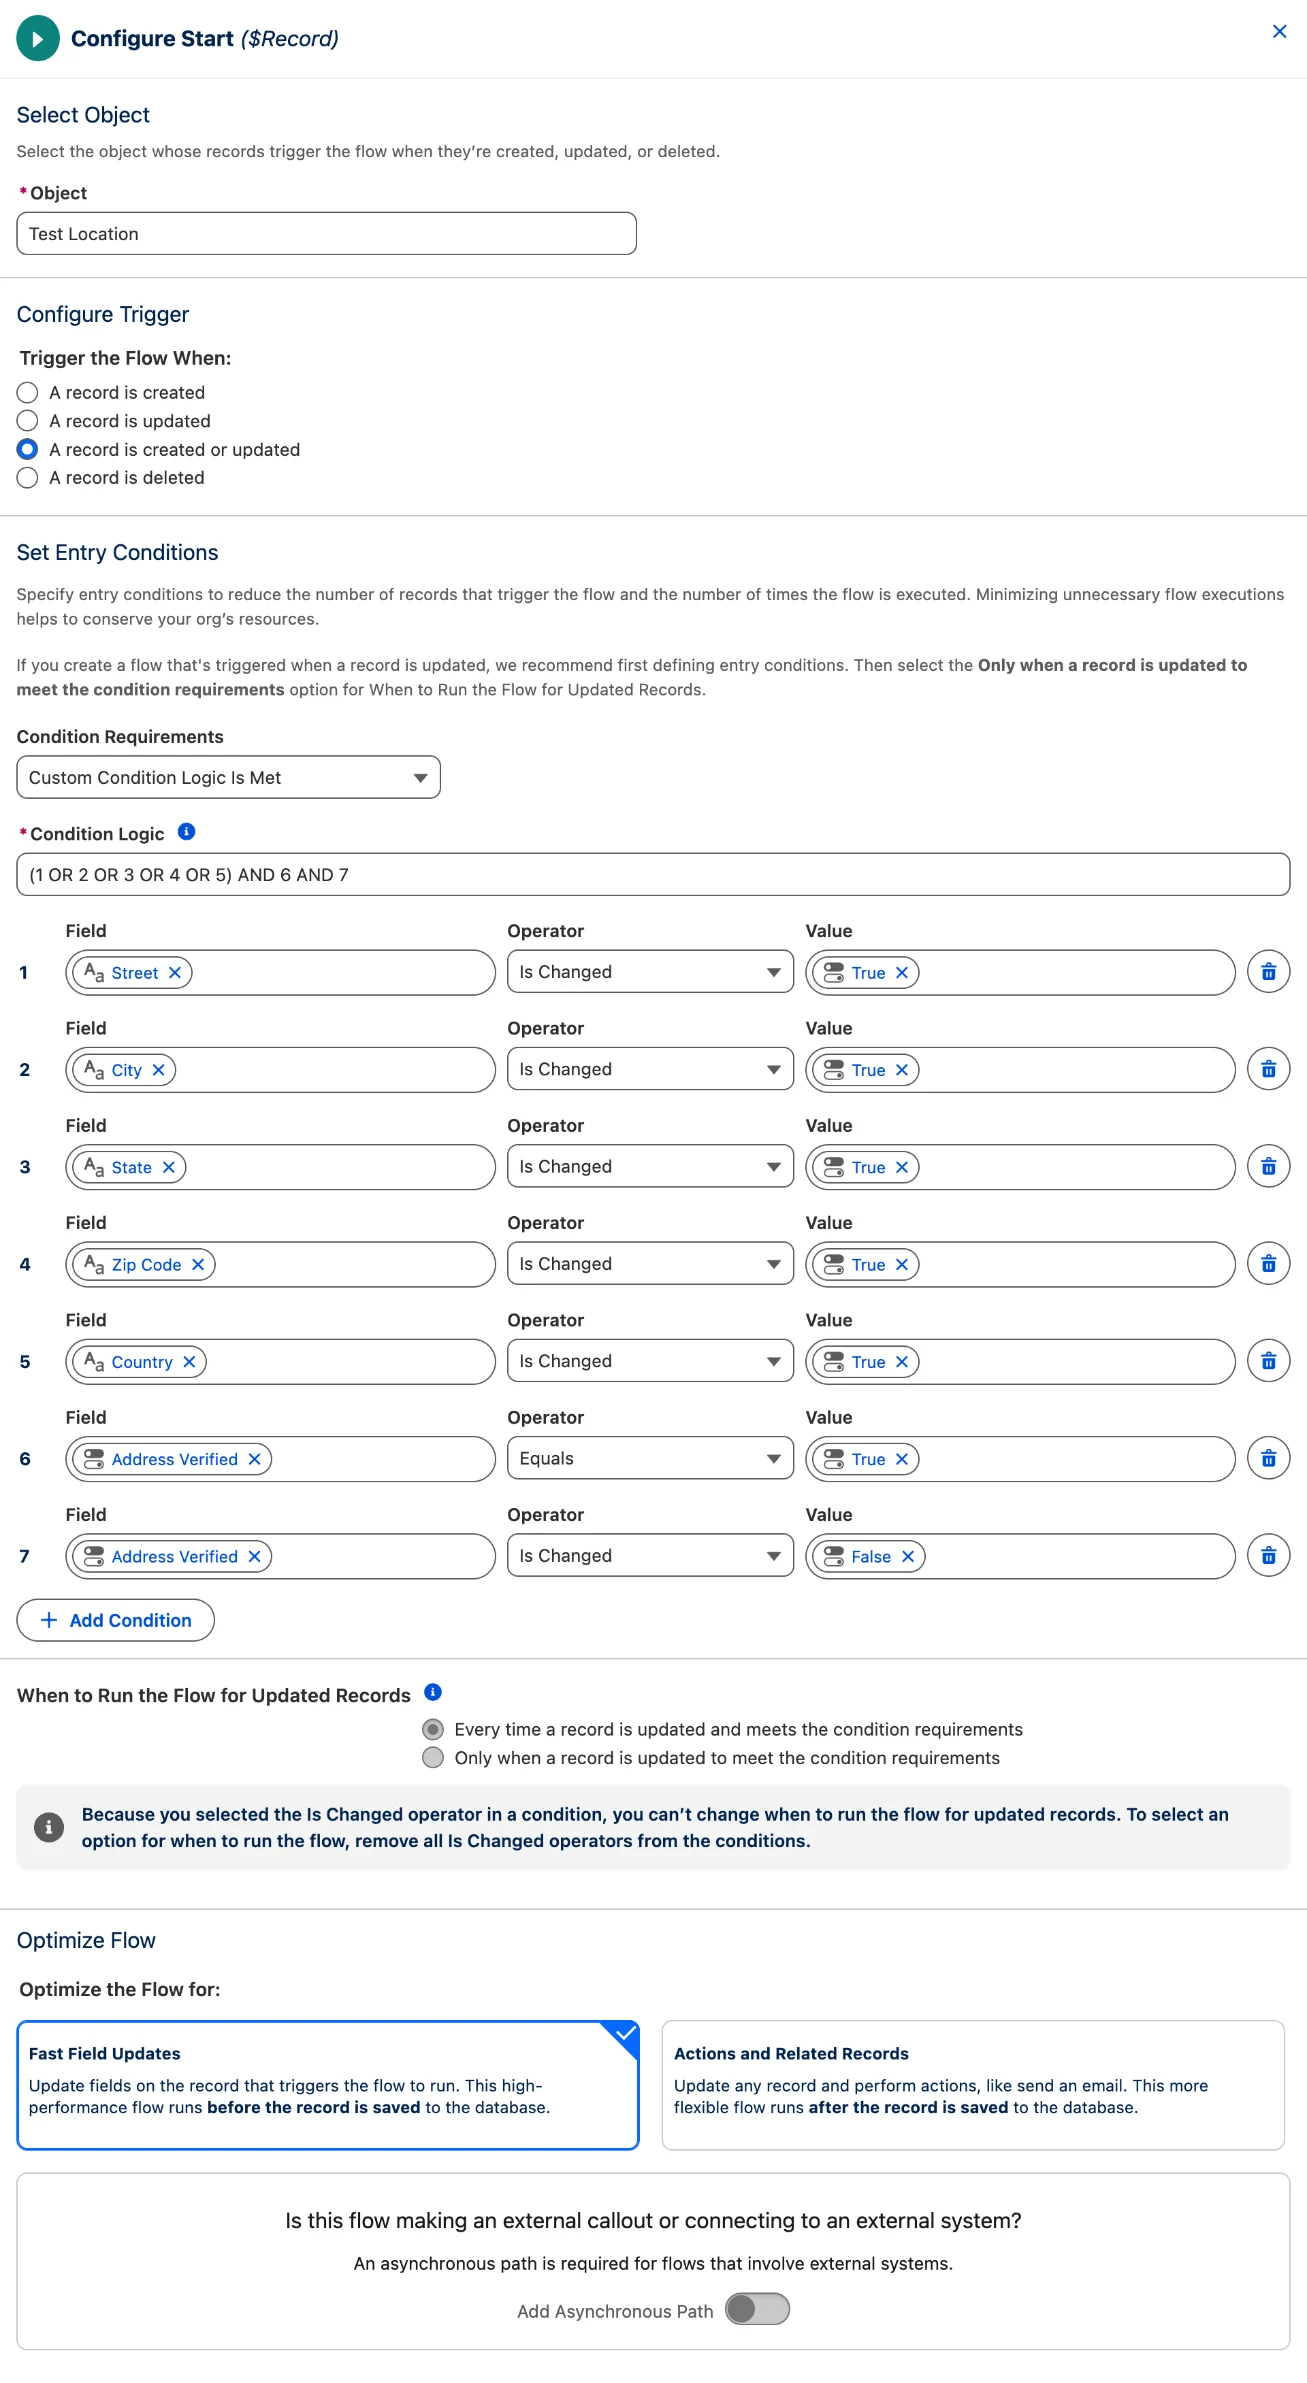
3. **Set the object and the trigger.**
A panel named **Configure Start** opens. **Trigger the Flow When** starts at A record is created, so change it.
| Setting | Value |
| --- | --- |
| Object | Your object, for example Location |
| Trigger the Flow When | A record is created or updated |
| Condition Requirements | Custom Condition Logic Is Met |
4. **Add the seven conditions.**
Click **Add Condition** for each new row. For True or False, pick the value under Global Constants.
| Row | Field | Operator | Value |
| --- | --- | --- | --- |
| 1 | Street | Is Changed | True |
| 2 | City | Is Changed | True |
| 3 | State | Is Changed | True |
| 4 | Zip Code | Is Changed | True |
| 5 | Country | Is Changed | True |
| 6 | Address Verified | Equals | True |
| 7 | Address Verified | Is Changed | False |
Row 7 matters. When Smarty corrects an address, Address Verification writes the new street and ticks Address Verified in one save. Without row 7, the Flow unticks the box at once, and Verify fails.
5. **Type the condition logic.**
The **Condition Logic** box sits above the conditions. It starts with 1. Replace it with:
`(1 OR 2 OR 3 OR 4 OR 5) AND 6 AND 7`
The Flow goes on when any address field changes on a verified record, and the same save does not change Address Verified.
6. **Check When to Run. Pick Fast Field Updates.**
Under **When to Run the Flow for Updated Records**, Salesforce sets **Every time a record is updated and meets the condition requirements**. It greys the choice out, because of the Is Changed conditions.
Under **Optimize the Flow for**, click the **Fast Field Updates** card. The other card is the default. The Flow does not work without Fast Field Updates.
Leave **Add Asynchronous Path** off, at the bottom of the panel.
7. **Click + under the start. Under Shortcuts, pick Update Triggering Record.**
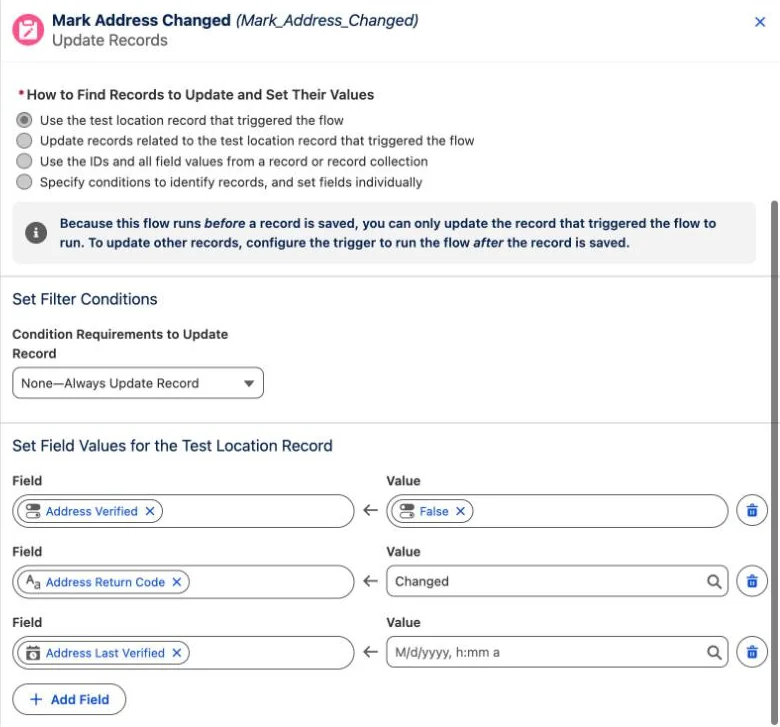
A panel named **Update Records** opens. Type a **Label**, for example `Mark Address Changed`. Keep the preset choices for the record and the filter.
8. **Set two field values.**
Click **Add Field** for each row. For Changed, type the word in the Value box.
| Field | Value |
| --- | --- |
| Address Verified | False |
| Address Return Code | `Changed` |
Optional: add Address Last Verified with no value, to clear the date. Some orgs keep the date of the last check.
9. **Click Save. Name the Flow. Click Activate.**
Type a **Flow Label**, for example `Location Address Changed`. Click **Save**. Click **Activate**.
10. **Test the Flow on a verified record.**
Open a record whose address is verified. Change the street. Save. Address Verified is no longer ticked, and the Return Code reads **Changed**.
Click **Verify Address** to check the new address. It uses one lookup. Address Verified is ticked again, with the new result.
An Apex trigger can do the same job. It needs a sandbox and test code. For help with it, open a case.
## 13. Check email addresses and phone numbers
*Only with the email or phone add-on from TAF.*
Address Verification checks phone numbers and email addresses through a TAF service. To buy the add-on, email [sales@toafinish.com](mailto:sales@toafinish.com).
Each phone or email field needs its own result fields and its own entry on the Data Mapping tab. No email entry exists at first. A Contact Mobile entry exists, but it is not active, and it maps only the phone field.
1. **Make the result fields for each phone number.**
Make them on the object of the phone field, as in [step 1 of Verify addresses on a custom object](https://www.toafinish.com/support/guides/address-verification/#custom-1). The labels are examples for a phone field named Mobile.
| Example label | Type | What it holds |
| --- | --- | --- |
| Mobile | Phone | The phone number. Most objects already have it. |
| Mobile Verified | Checkbox | Ticked when the number is verified. Verify skips a number whose box is ticked. |
| Mobile Country | Text(40) | The two-letter code of the country of the number, for example US. When it is empty, Address Verification uses US. |
| Mobile Last Verified | Date/Time | The date and time of the last check. |
| Mobile Return Code | Text(40) | The result of the check. See [Return codes for phone numbers](https://www.toafinish.com/support/guides/address-verification/#phone-codes). |
| Mobile API Response | Long Text Area | The whole answer from the service. It is not for display. |
Make these fields for the Contact Mobile entry too. Contact has no result fields for phones or emails at first.
2. **Make the result fields for each email address.**
| Example label | Type | What it holds |
| --- | --- | --- |
| Email | Email | The email address. Most objects already have it. |
| Email Verified | Checkbox | Ticked when the address is verified. Verify skips an address whose box is ticked. |
| Email Last Verified | Date/Time | The date and time of the last check. |
| Email Return Code | Text(40) | The result of the check. See [Return codes for email addresses](https://www.toafinish.com/support/guides/address-verification/#email-codes). |
For more data, see [Optional fields for phone and email](https://www.toafinish.com/support/guides/address-verification/#ep-optional) below.
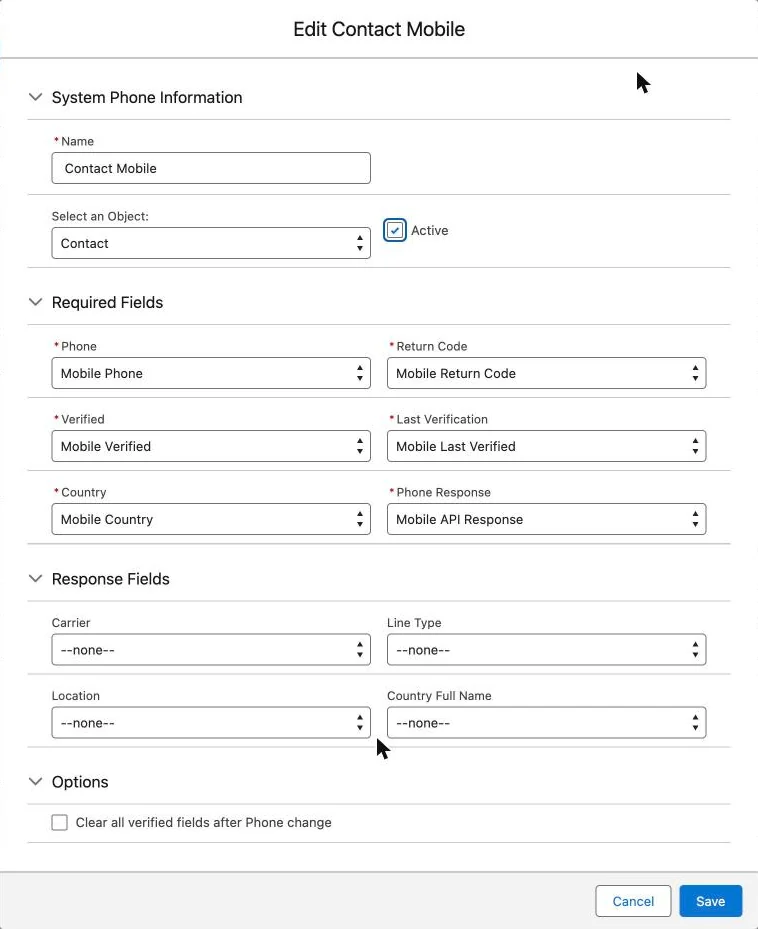
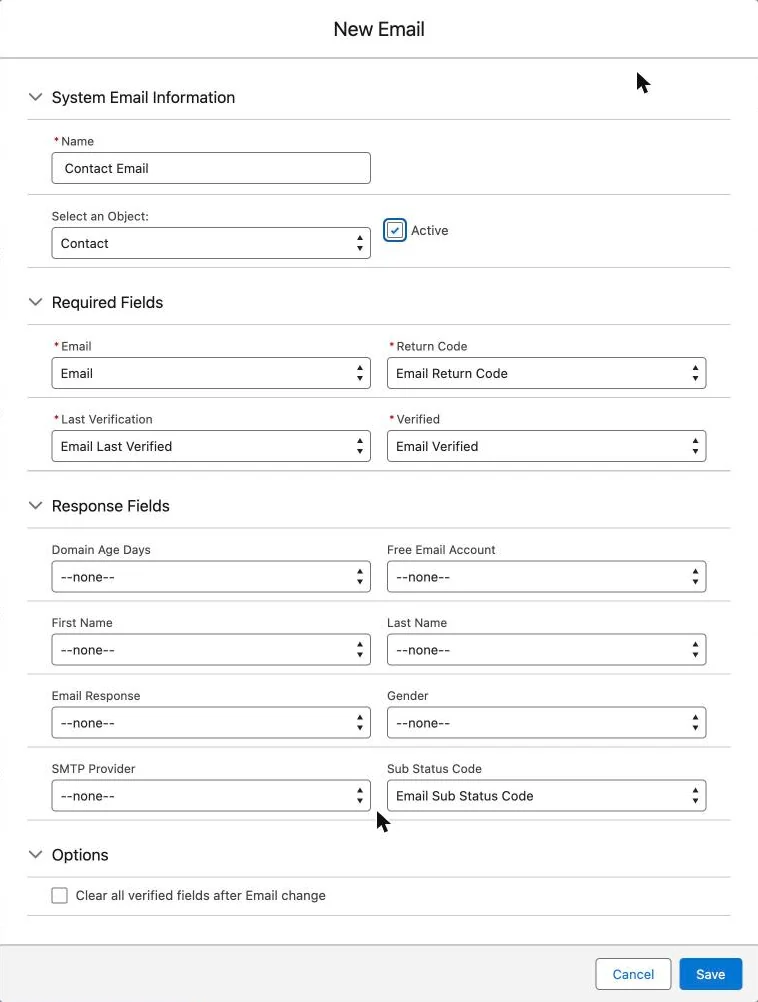
3. **On the Data Mapping tab, click New Phone. Fill in the entry. Then click Save.**
To use the default entry, click **Edit** beside **Contact Mobile** instead.
Type a **Name** that starts with the object name. Select the object. Tick **Active**. Pick the fields for **Phone**, **Verified**, **Country**, **Return Code**, **Last Verification** and **Phone Response**. Map the optional fields you made.
The optional fields sit under **Response Fields**. With **Clear all verified fields after Phone change** ticked, a new number clears every mapped field. Without it, a new number unticks Verified and clears Return Code.
4. **Click New Email. Fill in the entry. Then click Save.**
Type a **Name** that starts with the object name. Select the object. Tick **Active**. Pick the fields for **Email**, **Verified**, **Last Verification** and **Return Code**. Map the optional fields you made.
The **Return Code** list offers every text field of the object. Pick your Return Code field with care.
With **Clear all verified fields after Email change** ticked, a new email address clears every mapped field. Without it, only Verified and Return Code change.
5. **Add the Verify action for phones or emails to the page layout.**
Add it as in [step 4 of Add the Verify button](https://www.toafinish.com/support/guides/address-verification/#button-4). In the palette, each label shows twice: as a Quick Action and as a Custom Button for Classic. Point at each one to see its name. Use the Quick Action. Its name starts with the object name and a dot, for example `Lead.smartystreets__VerifyEmails`. The table leaves out that start.
| Object | Action label | Quick Action name |
| --- | --- | --- |
| Contact | **Verify Phones** | `smartystreets__Verify_Phone_Lightning_Contact` |
| Contact | **Verify Emails** | `smartystreets__Verify_Emails` |
| Lead | **Verify Phones** | `smartystreets__Verify_Phone_Lightning_Lead` |
| Lead | **Verify Emails** | `smartystreets__VerifyEmails` |
Do not use the Custom Buttons for Classic, or the actions marked Deprecated.
On a custom object, make a new action as in [step 5 of Verify addresses on a custom object](https://www.toafinish.com/support/guides/address-verification/#custom-5). Use the component `smartystreets:VerifyPhone` for phone numbers, or `smartystreets:VerifyEmail` for email addresses.
6. **Open a record with a phone number or an email address. Click the Verify action.**
A message reads **Record Updated**, with **Phone Verified.** or **Email Verified.** The message shows for every result, also a bad one.
Reload the page. The Return Code field shows the result. The Verified box stays empty when the result is not valid. Each check uses one lookup from your add-on.
See [Return codes for phone numbers](https://www.toafinish.com/support/guides/address-verification/#phone-codes) and [Return codes for email addresses](https://www.toafinish.com/support/guides/address-verification/#email-codes).
7. **On a custom object, add a Flow that marks a changed number or email.**
Build it as in [Mark changed addresses on a custom object](https://www.toafinish.com/support/guides/address-verification/#unverify), with two conditions. Row 1: the phone or email field, Is Changed, True. Row 2: its Verified field, Equals, True. Use the logic `1 AND 2`. Set the Verified field to False and the Return Code to Changed.
On Contact and Lead, the triggers of Address Verification do this, when Active is ticked for the object on the Automation tab.
### Optional fields for phone and email
Make the ones you need. Then map each one in the entry.
| Field in the entry | Example label | Type | What it holds |
| --- | --- | --- | --- |
| Carrier | Mobile Carrier | Text(255) | The phone company. |
| Line Type | Mobile Line Type | Text(40) | The type of line, for example mobile or landline. |
| Location | Mobile Location | Text(100) | The city or place of the owner, if known. Often where the phone was bought. |
| Country Full Name | Mobile Full Country Name | Text(100) | The full name of the country in the Country field. |
| Domain Age Days | Email Domain Age Days | Number | The days since the domain of the email was registered. Divide by 365 for years. |
| Free Email Account | Email Free Account | Checkbox | Ticked for a throwaway address, made only for a short time. TAF advises never to email it. |
| First Name, Last Name | Email Owner First Name, Email Owner Last Name | Text(100) | The name of the owner, if known. |
| Email Response | Email Verification Response | Long Text Area | The whole answer from the service. |
| Gender | Email Owner Gender | Text(40) | The gender of the owner, if known. |
| SMTP Provider | Email SMTP Provider | Text(100) | The email host. |
| Sub Status Code | Email Sub Status Code | Text(100) | More detail about the result. See [Sub codes for email addresses](https://www.toafinish.com/support/guides/address-verification/#email-sub-codes). |
### Formula fields for phone and email
Make them as in [Formula fields that show the result](https://www.toafinish.com/support/guides/address-verification/#custom-formulas). Replace RETURNCODE with your Return Code field.
**Phone Status** shows the result of a phone check with an icon.
```
If(RETURNCODE = "Valid", IMAGE("/img/msg_icons/confirm16.png", "Valid", 16, 16) & " Valid",
If(RETURNCODE = "Error", IMAGE("/img/msg_icons/error16.png", "Error", 16, 16) & " Error",
IMAGE("/img/msg_icons/info16.png", "Not Verified", 16, 16) & " Not Verified"))
```
**Email Status** shows the result of an email check with an icon.
```
If(RETURNCODE = "valid", IMAGE("/img/msg_icons/confirm16.png", "Valid", 16, 16) & " Valid",
If(RETURNCODE = "catch-all", IMAGE("/img/msg_icons/warning16.png", "Accept all (Unverifiable)", 16, 16) & " Accept all (Unverifiable)",
If(RETURNCODE = "do_not_mail", IMAGE("/img/msg_icons/warning16.png", "Do Not Mail", 16, 16) & " Do Not Mail",
If(RETURNCODE = "invalid", IMAGE("/img/msg_icons/error16.png", "Invalid", 16, 16) & " Invalid",
If(Or(RETURNCODE = "disposable", RETURNCODE = "spamtrap"), IMAGE("/img/msg_icons/error16.png", "Disposable", 16, 16) & " Disposable",
If(RETURNCODE = "unknown", IMAGE("/img/msg_icons/error16.png", "Unknown", 16, 16) & " Unknown",
IMAGE("/img/msg_icons/info16.png", "Not Verified", 16, 16) & " Not Verified"))))))
```
## 14. Verify many records from a list
*Optional. For a cleanup of records that are already in Salesforce.*
A list button checks up to 200 selected records at once. Each address, email or phone number on each record uses its own lookup. One exception: when two address fields of a record hold the same address, for example Billing and Shipping, the check uses one lookup.
### On Accounts, Contacts and Leads
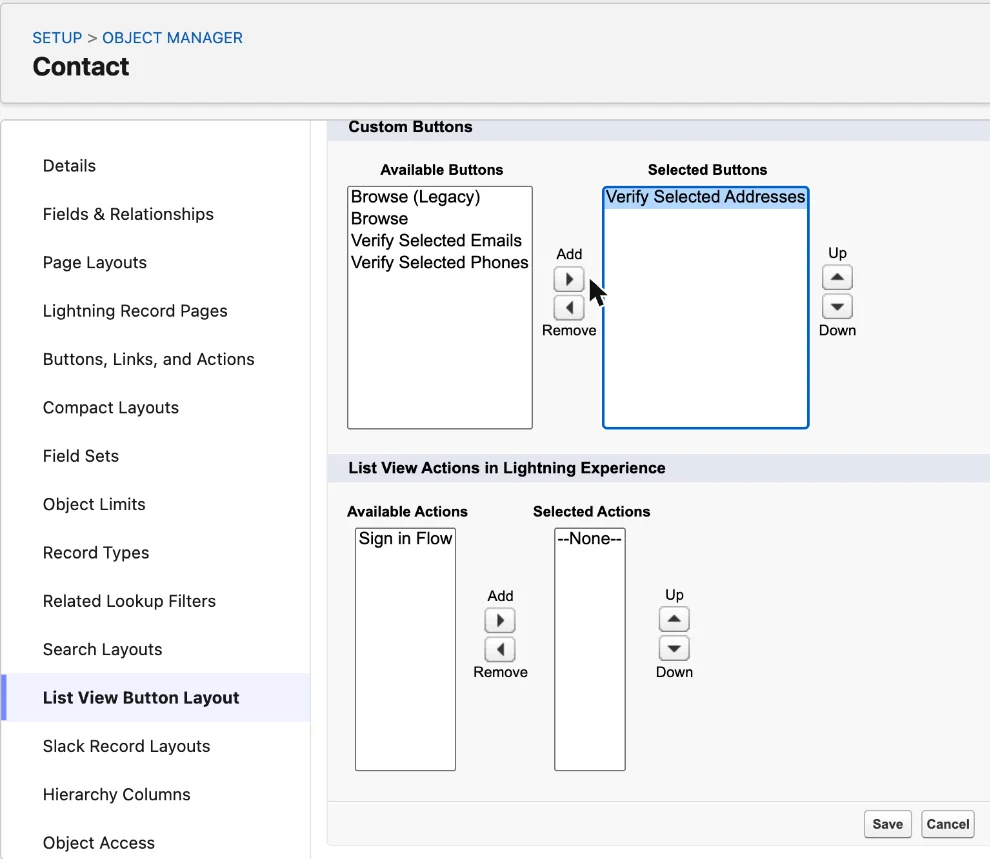
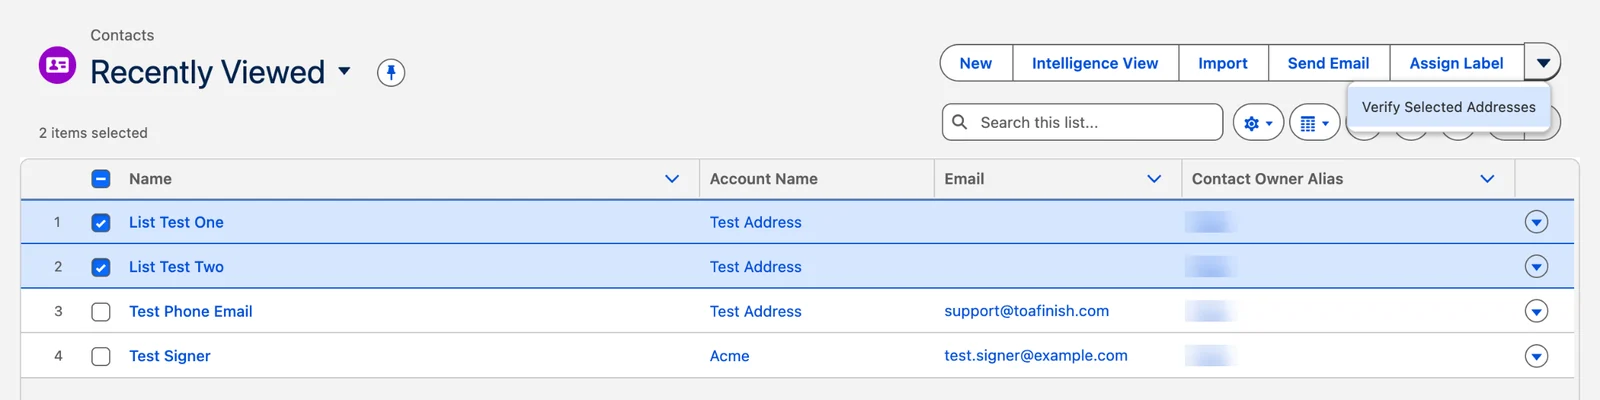
The buttons come with the app. This part uses Lead. Account and Contact work the same way. The pictures show Contact.
1. **Open Lead in Object Manager. Click List View Button Layout.**
Open Setup. Click **Object Manager**. Click **Lead**. Click **List View Button Layout**.
2. **In the List View row, click the arrow at the end of the row. Click Edit.**
3. **Move Verify Selected Addresses to Selected Buttons. Then click Save.**
Under **Custom Buttons**, click **Verify Selected Addresses** in Available Buttons. Click the **Add** arrow. For emails and phone numbers, add **Verify Selected Emails** or **Verify Selected Phones** too.
Lead also offers **Verify All List Leads**. It checks the Leads of the whole list view, not only the ticked ones. Each address uses a lookup, so add it only if you need it.
4. **Open a Lead list view. Tick the records. Click Verify Selected Addresses.**
Tick up to 200 records. The button sits at the top right of the list, or in the menu under the arrow.
A blank page with a spinner shows for a few seconds. Then the list shows again, with no message. Open a record to see the result.
If Salesforce shows an error for long addresses, tick fewer records and try again.
### On a custom object
A custom object needs a Visualforce page and a list button that opens it.
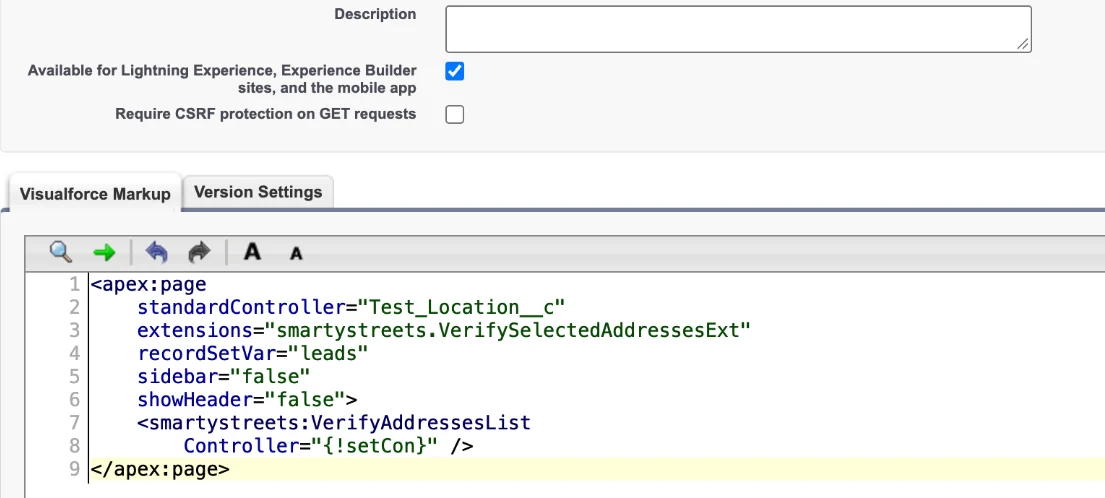
1. **Make a Visualforce page with the code below.**
Open Setup. In the Quick Find box, type **Visualforce Pages**. Click **Visualforce Pages**. Click **New**. Type a **Label**, for example `Verify Location Addresses`.
Salesforce copies the Label into **Name**, with spaces. A name with spaces fails on Save. Type underscores in place of the spaces, for example `Verify_Location_Addresses`.
Tick **Available for Lightning Experience, Experience Builder sites, and the mobile app**.
Paste the code. The editor adds its own indents. They do no harm. Replace Object\_Name\_\_c with the API name of your object. Click **Save**.
```
```
For email addresses or phone numbers, make one more page with one of these:
```
```
```
```
TAF's older samples for these pages use another extension. It does not work in version 7.3, so use the code above.
2. **Make a list button that opens the page.**
Open your object in Object Manager. Click **Buttons, Links, and Actions**. Click **New Button or Link**.
| Field | Value |
| --- | --- |
| Label | `Verify Selected Addresses` |
| Display Type | List Button |
| Display Checkboxes (for Multi-Record Selection) | Ticked. The box shows after you pick List Button. It is ticked at first. |
| Behavior | Display in existing window without sidebar or header |
| Content Source | Visualforce Page |
| Content | The page from step 1 |
Click **Save**. For email addresses or phone numbers, make one more button for each page.
3. **Add the button to the list view layout of the object.**
Click **List View Button Layout**. In the List View row, click the arrow at the end of the row. Click **Edit**. Move your button to Selected Buttons. Click **Save**.
If your object has no List View Button Layout, see [A custom object has no List View Button Layout](https://www.toafinish.com/support/guides/address-verification/#no-list-layout).
4. **Open a list view of your object. Tick the records. Click the button.**
The button sits in the row of buttons at the top of the list. As on Lead, a blank page shows for a few seconds, then the list. Open a record to see the result. Each address uses its own lookup.
The email page shows **Records Verified Successfuly** with a Back button, then the list. The email and phone pages also check records that are verified already. Each one uses a lookup.
## 15. Verify records in the background
*Optional. For records that come in through imports, integrations or other automation.*
Address Verification can check a record each time someone makes it, or changes its address. Accounts, Contacts and Leads use the triggers that come with the app. Each check uses a lookup.
> **The check runs a few seconds after the save**
>
> Salesforce cannot call Smarty during a save, so the check runs in the background just after it. A user who stays on the record sees the old values until the page reloads. The [Background Verification Tracker](https://www.toafinish.com/support/guides/address-verification/#tracker) helps.
> **Test with a few records first**
>
> A data import with background checks on uses a lookup for each address of each record.
1. **On the setup page, click the Automation tab. Click Edit beside the object.**
Under **Object Setup**, the tab lists Account, Contact, Contact Point Address and Lead, and each object you added with Add Supported Object.
2. **Tick Verify Addresses.**
**Verify Addresses** sits in the right column, above **Verify Phones** and **Verify Emails**. For emails and phone numbers, tick **Verify Emails** or **Verify Phones** too. Keep **Active** ticked. For the other options, see [The options of an object](https://www.toafinish.com/support/guides/address-verification/#automation-options) below.
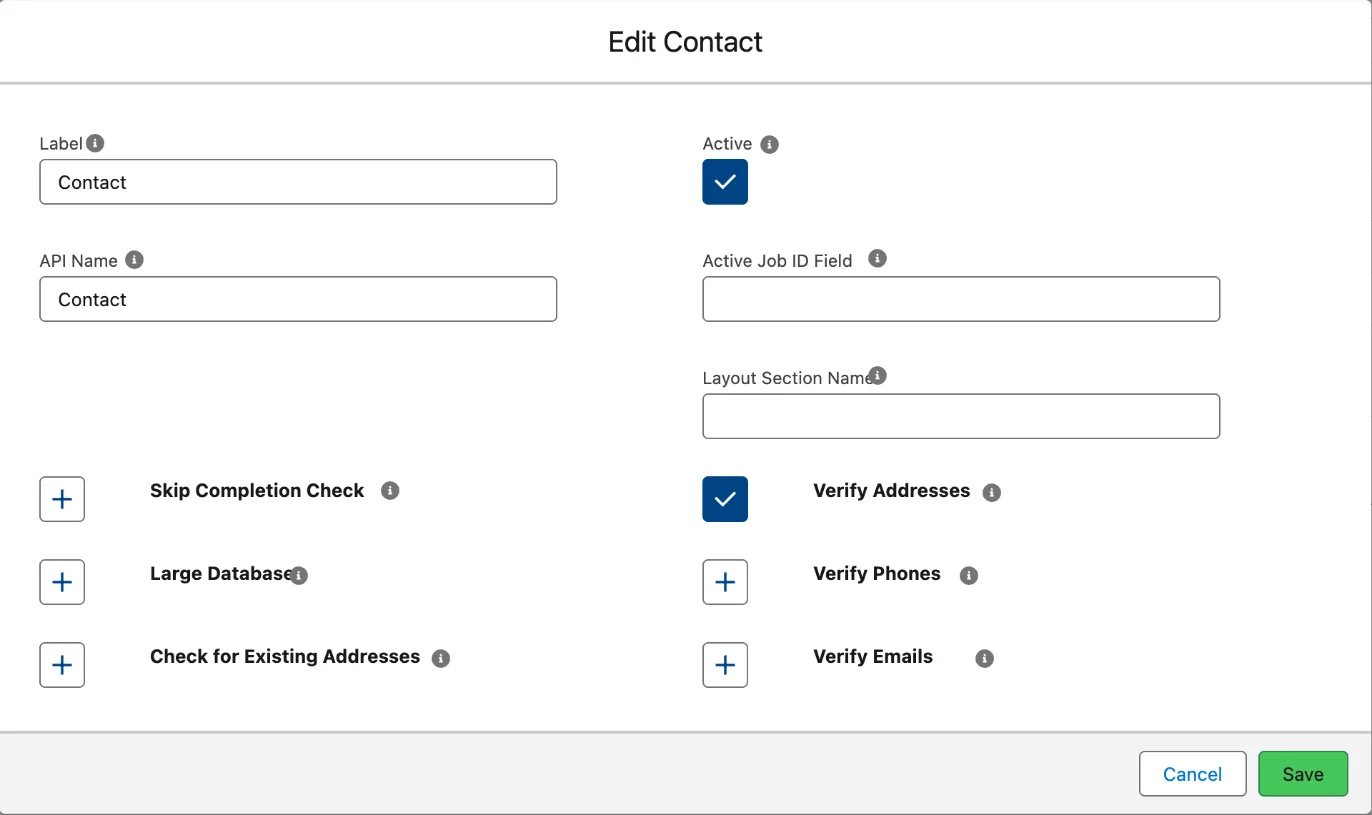
3. **Click Save.**
The window closes. No message shows.
4. **Test with one record.**
Change the street of a test record. Save. Wait a few seconds. Reload the page. The fields show the result of the check.
### The options of an object
| Option | What it does |
| --- | --- |
| Label | Any name for the object. |
| Active | Turns on the trigger of the object. It unticks Verified when an address, email or phone number changes. It does not verify anything by itself. |
| API Name | The API name of the object. |
| Active Job ID Field | The API name of a Text field with a length of at least 18. Batch jobs need it. See [Verify records with a batch job](https://www.toafinish.com/support/guides/address-verification/#batch). |
| Layout Section Name | The name of the section of the record page that holds the address fields. When it is empty, Address Information is used. |
| Verify Addresses, Verify Emails, Verify Phones | Turn on the background checks for that kind of data. |
| Skip Completion Check | For the autocomplete components only. Lets a user save a blank or incomplete address. |
| Large Database | For an object with more than 200,000 records. It helps to stay under the Salesforce limits, but it slows a small object down. |
| Check for Existing Addresses | Physical addresses only. See [Reuse earlier checks of the same address](https://www.toafinish.com/support/guides/address-verification/#existing). |
### Show background checks on the record page
The Background Verification Tracker sits on the record page. For about 5 seconds after a save, it looks for a background check. When it finds one, it refreshes the page and shows a message, for example **Addresses Verified.** It does not catch every check. It works for physical addresses only.
1. **Open a record of the object. Click the gear icon. Click Edit Page.**
2. **Add BackgroundVerificationTracker at the bottom of a column.**
`BackgroundVerificationTracker`
Type the name in the search box of the **Components** list. Find it under **Custom - Managed**. Drag it to the bottom of a column. If the drag does not work, click the **+** at the bottom of the column. Then click the component.
You cannot see it on the page most of the time. It shows as an empty box in the builder.
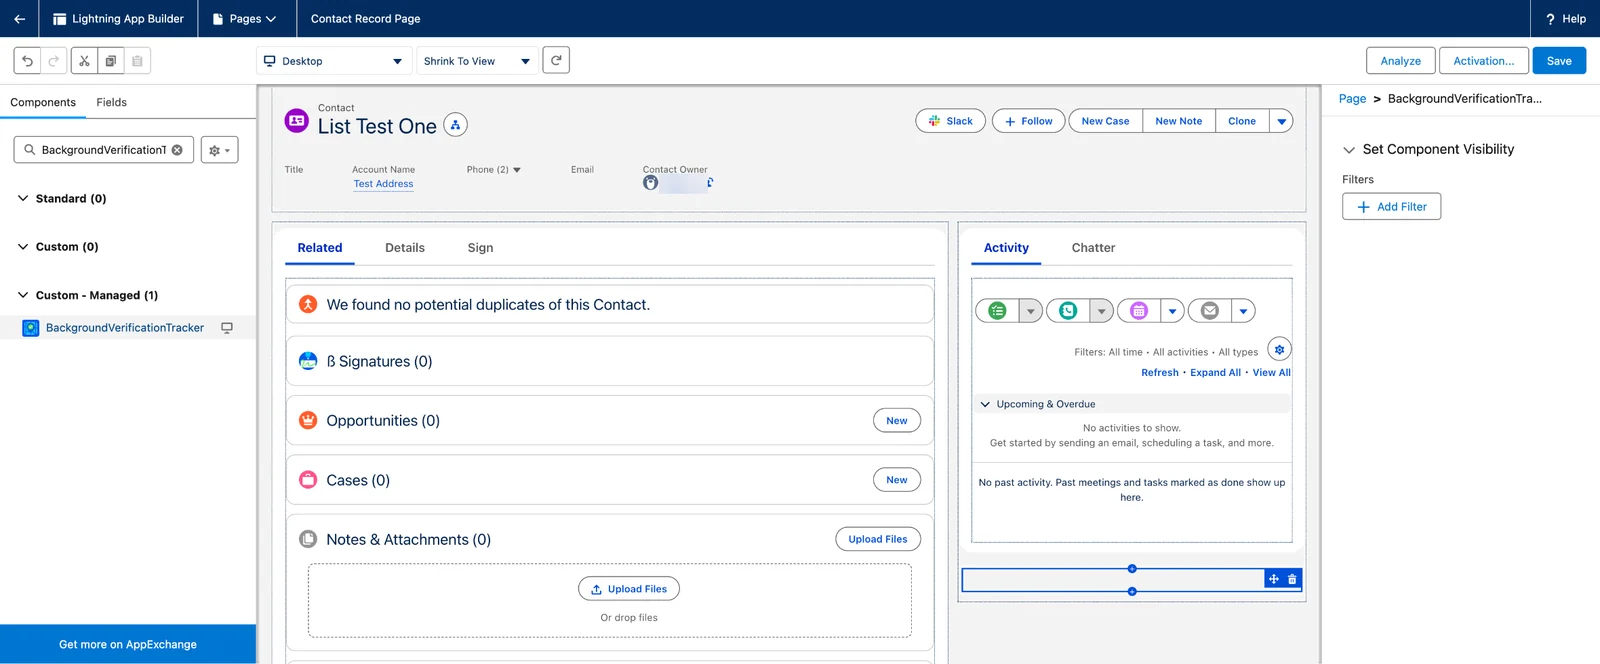
3. **Click Save. Activate the page, if Salesforce asks.**
A message reads **Changes saved.**
Activate it as in [step 4 of Add the Verify and Confirm button](https://www.toafinish.com/support/guides/address-verification/#confirm-4).
4. **Click the back arrow at the top left.**
### Reuse earlier checks of the same address
**Check for Existing Addresses** looks for a verified record with the same address in the same object, before it calls Smarty. A match saves a lookup. The search makes each check a little slower, so TAF advises it only for a small Smarty plan.
- It looks only at records of the same object. A new Lead does not find a verified Account.
- Above about 200,000 records in the object, it can fail. Open a case before you turn it on.
- A reused result looks the same as a new check. Nothing on the record shows which one it was.
1. **Map a Clean Street field in each address entry.**
On the Data Mapping tab, click **Edit** beside the entry. Pick a field for **Clean Street**. If the object has no such field, make a Text(255) field first.
Tick **Clean Address Prior to Verification** in the entry too. Without it, the checks leave Clean Street empty. Click **Save**.
Address Verification matches the clean street, the city and the state.
2. **On the Automation tab, edit the object. Tick Active, Verify Addresses and Check for Existing Addresses. Click Save.**
3. **Optional: fill Clean Street on older records.**
Without this step, the match works only for records saved from now on. To fill older records, verify them again, which uses lookups. Or a developer can run Apex in the Developer Console, for example this sample, which cleans 100 Leads:
```
List leadlist = [select Id, Street, CleanStreet__c
from Lead
where Street != null
and CleanStreet__c = null
and isConverted = false
limit 100];
for(Lead l:leadlist) {
l.CleanStreet__c = SmartyStreets.Clean.AddressCleanse(l.Street);
}
update leadlist;
```
Replace CleanStreet\_\_c with the API name of your Clean Street field. For help, open a case.
### Background checks on a custom object
A custom object needs its own Apex trigger. TAF's sample is the file verifyTrigger.java in the trigger folder of the [Address Verification repository on GitHub](https://github.com/ToAFinish/addressverification). Replace each Object\_Name\_\_c with the API name of your object:
```
trigger verifyTrigger on Object_Name__c (before insert, before update, after insert, after update) {
new smartystreets.AutoVerificationServices().HandleAutoVerify('Object_Name__c'); // for PHYSICAL ADDRESSES
//new smartystreets.AutoVerificationServicesEmails().HandleAutoVerify('Object_Name__c'); // for EMAIL ADDRESSES
//new smartystreets.AutoVerificationServicesPhone().HandleAutoVerify('Object_Name__c'); // for PHONE NUMBERS
}
```
The line that ends in PHYSICAL ADDRESSES checks addresses. To check email addresses or phone numbers too, remove the // at the start of the line that ends in EMAIL ADDRESSES or PHONE NUMBERS.
The same folder holds verifyTriggerTests.java, a sample test class. Build the trigger in a sandbox and deploy it to production, with test code if no test class covers the object. Only an admin who writes Apex should do this. Then tick Active and Verify Addresses for the object on the Automation tab.
Without code, a record-triggered Flow does the same job. See [Verify records with a Flow](https://www.toafinish.com/support/guides/address-verification/#vflow).
### Turn off all background checks
On the Options tab, tick **Turn OFF All Triggers**. Then click **Save Settings**. This stops the triggers on Account, Contact and Lead. Flows still run.
Use it to find a problem, or before a large data load. To keep checks without the triggers, use Flows: [Mark changed addresses on a custom object](https://www.toafinish.com/support/guides/address-verification/#unverify) and [Verify records with a Flow](https://www.toafinish.com/support/guides/address-verification/#vflow).
### Keep a log of each check
On the Options tab, tick **Log Responses**. Then click **Save Settings**. Address Verification then saves each call to Smarty in the **√ Verification Log** object. Without it, only errors are saved. The object can grow very large.
The app has no tab for the object. To see the logs, make a tab for it. Open Setup. In the Quick Find box, type **Tabs**. Click **Tabs**. Under **Custom Object Tabs**, click **New**.
Pick the object **√ Verification Log**. Pick any **Tab Style**; it is required. Click **Next** twice. Click **Save**. A user also needs access to the object and its fields.
The tab opens on Recently Viewed. Pick the list view **All** to see every log. In TAF's test, phone checks made no log record.
## 16. Verify records with a Flow
*Optional. A way without code to verify records on any object.*
A record-triggered Flow can run the **Verify Address** action after a save. This chapter uses the custom object from [Verify addresses on a custom object](https://www.toafinish.com/support/guides/address-verification/#custom-addresses).
> **Two Flows on one object**
>
> The Flow from [Mark changed addresses on a custom object](https://www.toafinish.com/support/guides/address-verification/#unverify) unticks Address Verified when the address changes. This Flow then verifies the new address. Each change of an address uses a lookup.
1. **Open Flows. Click New Flow. Click Record-Triggered Flow.**
In the Quick Find box, type **Flows**. Click **Flows**. Click **New Flow**. Flow Builder opens in a new browser tab. Under **Frequently Used**, click **Record-Triggered Flow**.
2. **Set the object and the trigger.**
| Setting | Value |
| --- | --- |
| Object | Your object, for example Location |
| Trigger the Flow When | A record is created or updated |
| Condition Requirements | Custom Condition Logic Is Met |
3. **Add the six conditions.**
Click **Add Condition** for each new row. For True or False, pick the value under Global Constants.
| Row | Field | Operator | Value |
| --- | --- | --- | --- |
| 1 | Address Verified | Equals | False |
| 2 | Street | Is Null | False |
| 3 | City | Is Null | False |
| 4 | State | Is Null | False |
| 5 | Zip Code | Is Null | False |
| 6 | Address Return Code | Does Not Equal | `Bad or Blank Address` |
4. **Type the condition logic.**
The **Condition Logic** box sits above the conditions. Replace its value with:
`1 AND 2 AND ((3 AND 4) OR 5) AND 6`
The Flow goes on when the address is not verified, Street is filled, and City and State, or Zip Code, are filled. With row 6, the Flow does not send a bad address to Smarty again and again.
5. **Pick Every time a record is updated. Keep Actions and Related Records.**
Under **When to Run the Flow for Updated Records**, pick **Every time a record is updated and meets the condition requirements**. Under **Optimize the Flow for**, keep **Actions and Related Records**, the default. This Flow runs after the save.
Leave **Add Asynchronous Path** off, at the bottom of the panel.
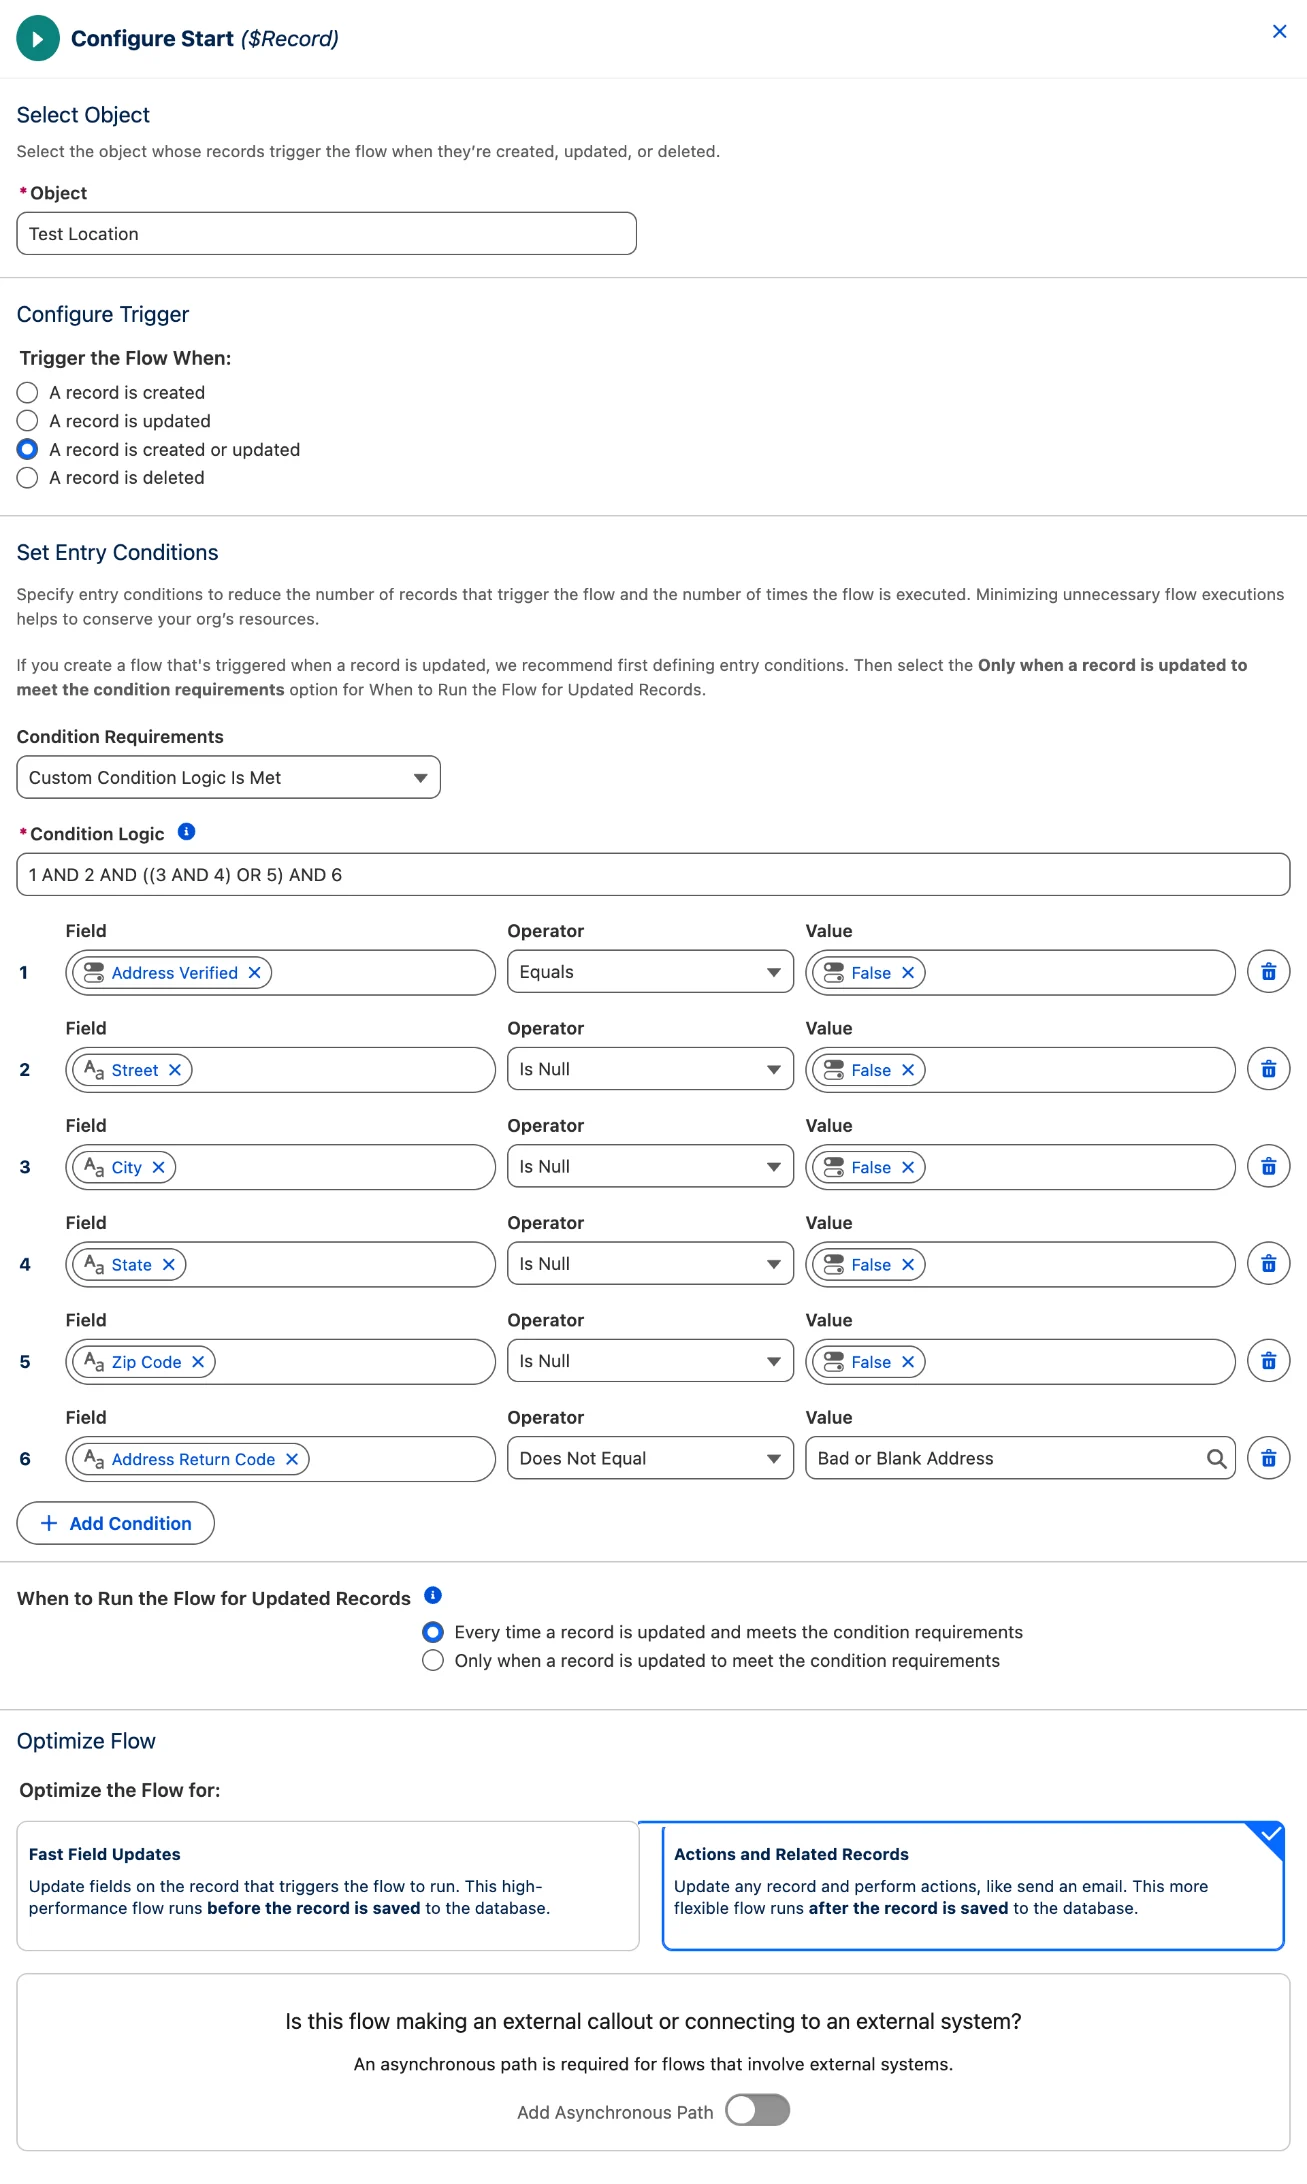
6. **Click + under the start. Click Action. Search for Verify. Pick Verify Address.**
The list shows **Verify Address**, **Verify Email** and **Verify Phone**. For email addresses, pick Verify Email. For phone numbers, pick Verify Phone.
7. **Type a Label. Set recordIds to the ID of the record.**
Type a **Label**, for example `Verify`. Under **Set Input Values**, click the **recordIds** box. Pick **Triggering** and your object, then **Record ID**. The box shows the value as a pill, for example Triggering Location\_\_c > Record ID.
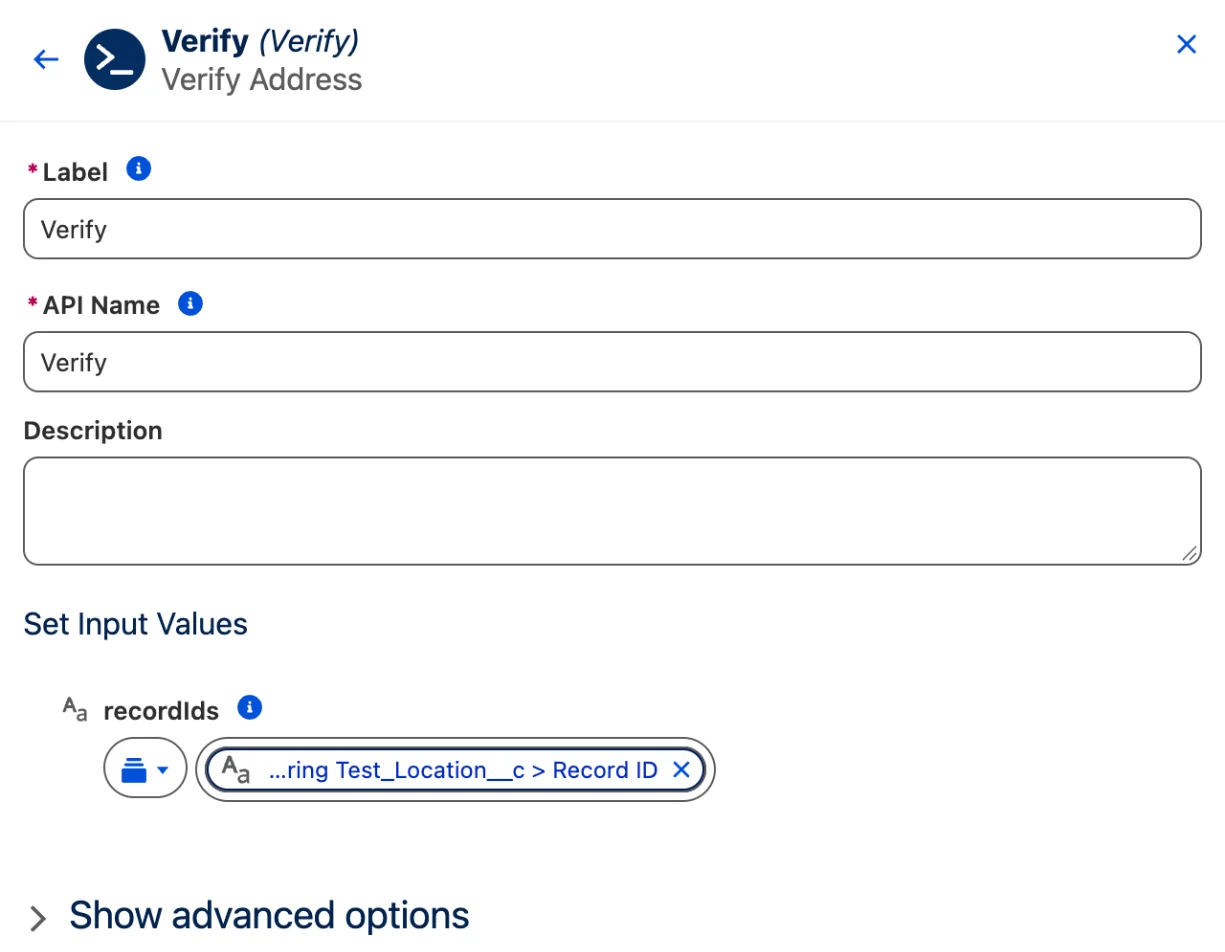
8. **Click Save. Name the Flow. Click Activate.**
Type a **Flow Label**, for example `Location Verify Address`. Click **Save**. Click **Activate**.
9. **Test the Flow with a new record.**
Make a record with a US address. Save. Wait a few seconds. Reload the page. The fields show the result. The check uses one lookup.
## 17. Verify records with a batch job
*Optional. For a first cleanup of all records, or a new check from time to time.*
A batch job checks records on a schedule, up to 50 records in each batch. A large job can take a long time, because Salesforce runs Apex jobs slowly on purpose. Most orgs run one after the install to clean up old records, then use background checks or Flows.
> **A batch job uses many lookups**
>
> It uses a lookup for each address it checks. Test the filter with a small limit first.
1. **Set the Active Job ID Field for the object.**
Make a Text field with a length of at least 18 on the object, for example `AV Job ID`. On the last page of the field wizard, untick the page layouts. The users who run the job need read and write access to it.
On the Automation tab, click **Edit** beside the object. Type the API name of the field in **Active Job ID Field**. Click **Save**. Reload the page.
2. **On the Automation tab, open Batch Jobs. Click New Job.**
3. **Fill in the job.**
| Field | Value |
| --- | --- |
| Job Name | Optional. Any name. |
| Verification Type | Physical Addresses, Emails or Phone Numbers. Each kind needs its own job. |
| Object Name | Your object. If it is not in the list, add it with Add Supported Object. |
| Job Start Time | Empty to run the job now. With a time, the job runs every day at that time. |
| Enable Advance Job Schedule | For another schedule than every day. |
| Email when Job Complete | Optional. It emails the current user when the job verified records. Do not use it on large jobs, because it slows them down. |
| Email(s) | The addresses that get the email, with commas between them. |
| Job Size | The number of records in each batch. Keep 10, the value that shows. |
| Expire Validations > X days | 0, or a number of days. A record verified longer ago than that is checked again. With 0, the job never checks a verified record again. |
If a red message says that the Active Job ID text field is required, close the window and do step 1.
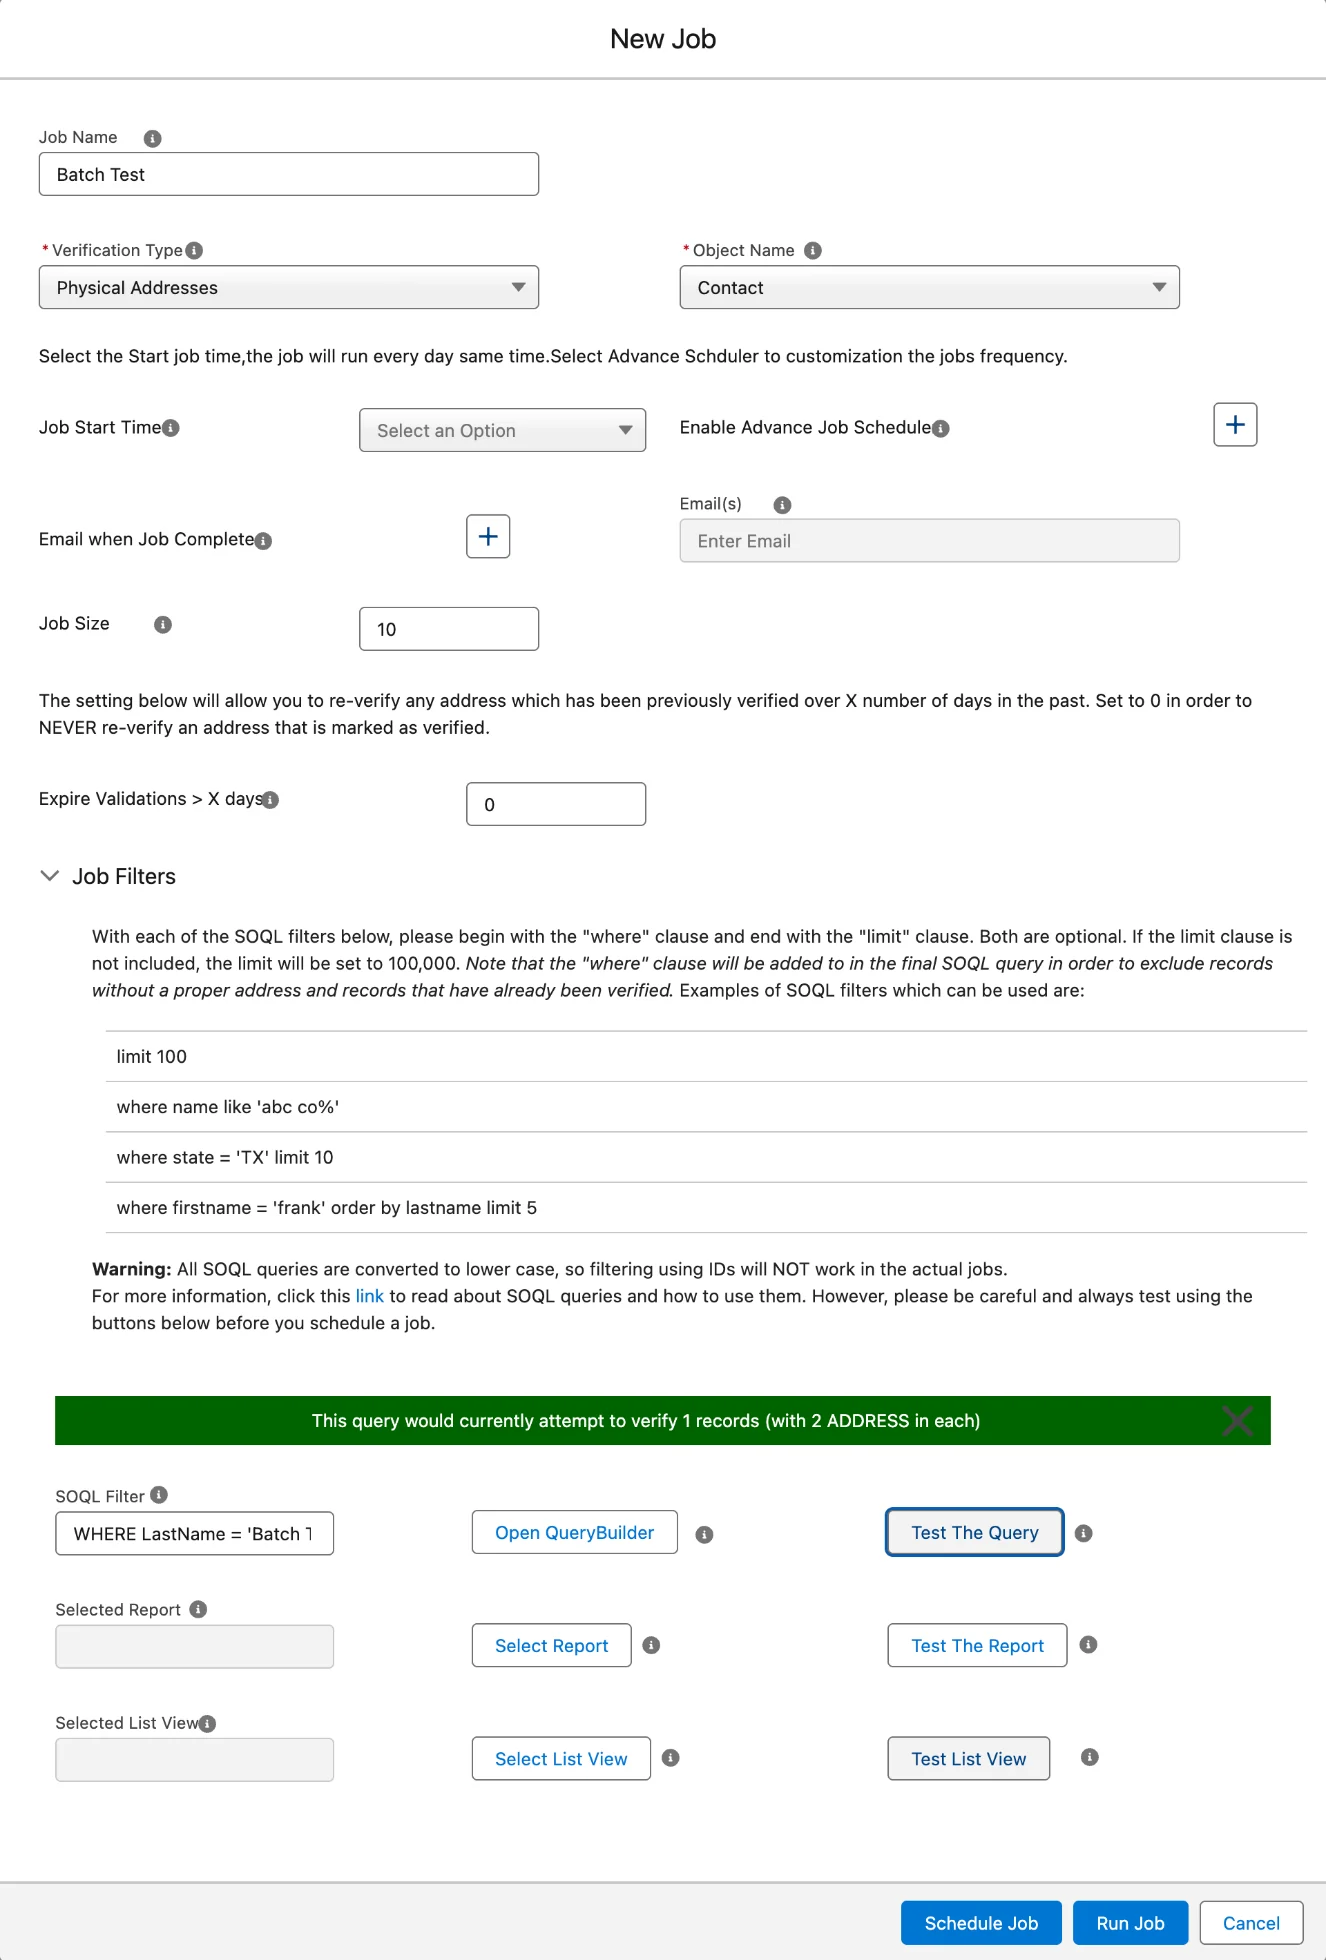
4. **Under Job Filters, pick the records.**
Use one of three ways: a report from the **Address Verification** report folder, a list view of the object, or a **SOQL Filter**. **Open QueryBuilder** helps to write the filter. Click **Validate**, then **Use Query**.
SOQL is the query language of Salesforce. A SOQL filter starts with WHERE, for example:
`WHERE State = 'TX' LIMIT 5`
- For a first test, add `LIMIT 5` at the end of the filter. A filter can also be `LIMIT 5` alone.
- Without LIMIT, the job takes up to 100,000 records.
- Do not filter on a record ID, not even an 18-character one. The job changes the filter to lower case, so an ID does not match.
- A filter can end with ORDER BY and LIMIT, for example `WHERE State = 'TX' ORDER BY LastName LIMIT 5`. With LIMIT, ORDER BY sets which records the job takes.
- If Test The Query shows Query Failed, see [Test The Query shows Query Failed](https://www.toafinish.com/support/guides/address-verification/#query-failed).
- The first time you use a list view, you must add a remote site setting. See [Address Verification cannot reach Smarty](https://www.toafinish.com/support/guides/address-verification/#remote-sites).
5. **Click Test The Query.**
A green bar shows how many records the job can touch, for example **This query would currently attempt to verify 1 records (with 2 ADDRESS in each)**. The count also holds records that are empty or verified already.
If it reads **No object is selected for query, please select object first !!!**, pick the object in Object Name again.
For a report or a list view, click **Test The Report** or **Test List View**.
6. **Click Run Job, or Schedule Job.**
**Run Job** runs the job once, now. **Schedule Job** runs it on the schedule you set.
7. **Watch the job.**
Click **Go to Apex Jobs** for a job that runs now, or **Go to Scheduled Jobs** for a later one. If the button does nothing, open Setup and type **Apex Jobs** in the Quick Find box. To see or delete a job, use View or Delete in the Batch Jobs list. Do not abort a job in Apex Jobs.
In the Batch Jobs list, the Status of the job reads Completed at the end. A job that found no record to check ends with an empty Status.
8. **Schedule the weekly cleanup of Deputy records.**
Batch jobs leave records in a hidden object named Deputy. A scheduled job deletes them. Open Setup. In the Quick Find box, type **Apex Classes**. Click **Apex Classes**. Click **Schedule Apex**.
| Field | Value |
| --- | --- |
| Job Name | `Address Verification Batch Cleanup` |
| Apex Class | `DeputyRecordDeletionBatch` |
| Frequency | Weekly. Tick one day. For a daily cleanup, tick every day. |
| Start, End | Salesforce fills in an End date one month ahead. Set it years ahead, or the cleanup stops. |
| Preferred Start Time | Out of work hours, after your batch jobs |
Click **Save**.
## 18. Verify records sent by email
*Optional. For records that a site guest user or another system makes.*
A guest user of a Salesforce Site often lacks the rights to verify a record. An email service solves this. Address Verification sends an email with the record ID to a Salesforce email address. Salesforce then verifies the record as a user who has an Address Verification permission set.
It also helps when a Flow runs as a user who lacks the rights. The email service moves the check to a user who has them.
1. **Open Setup. Open Email Services. Click New Email Service.**
In the Quick Find box, type **Email Services**. Click **Email Services**. Click **New Email Service**.
2. **Fill in the email service. Then click Save and New Email Address.**
| Field | Value |
| --- | --- |
| Email Service Name | Any name, for example `Address Verification` |
| Apex Class | `AddressVerificationForSiteRecords` |
| Accept Attachments | None |
| Advanced Email Security Settings | Off |
| Accept Email From | Empty, or the one address that sends the emails |
| Active | Ticked |
The error routing below is optional. It helps you see emails that fail.
3. **Fill in the email address. Then click Save.**
| Field | Value |
| --- | --- |
| Email Address Name | Letters, numbers and underscores, no spaces. For example `Address_Verification` |
| Email address | Any value, for example `address_verification` |
| Active | Ticked |
| Context User | Salesforce fills in your name. Pick a user with Address Verification (Admin) or Address Verification (User). |
| Accept Email From | Salesforce fills in your email address. Clear it, or type the one address that sends the emails. |
4. **Copy the email address that Salesforce makes.**
The record shows a long email address that ends in apex.salesforce.com. Copy all of it. Keep it private. Anyone who has it can start checks in your org, and each check uses a lookup.
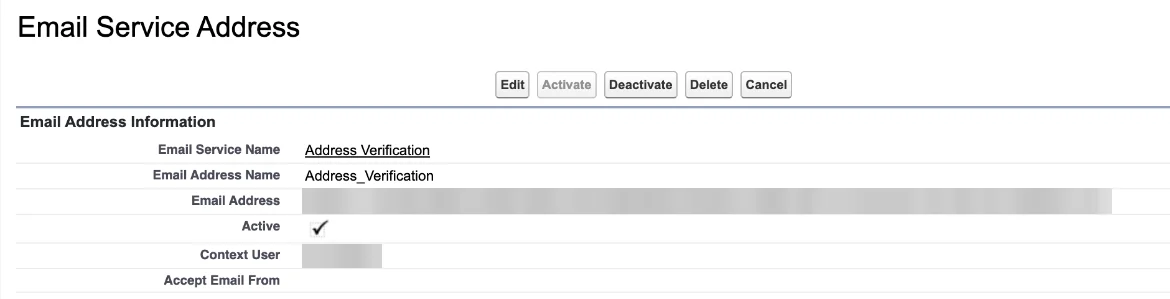
5. **Send a test email to that address.**
Send it from any address, or from the address in Accept Email From, if you set one. Use any subject. As the body, paste this text:
```
{
"vType":"Address",
"sObjectName":"Object Name",
"recordIds":[
"Record Id"
],
"isRecheck":false
}
```
Replace Object Name with the API name of the object, for example `Location__c`. Replace Record Id with the ID of a test record that is not verified. For more records, add more IDs with commas between them.
To check email addresses, type `Email` in place of `Address`.
6. **Wait a minute. Check the test record.**
The record shows the result of the check, for example Confirmed. It used one lookup.
7. **Paste the address into Email Service Address. Then click Save All Settings.**
On the setup page, open the **Authentication** tab. Under **Optional Settings**, paste the address into **Email Service Address**. Click **Save All Settings**.
If a button floats over the box, see [A button on the setup page covers a field](https://www.toafinish.com/support/guides/address-verification/#floating-buttons).
From now on, records with an address from a guest user with Address Verification (Guest User) get verified through the email service.
> **The guest user must be able to send email**
>
> Set and verify these email addresses. For help, open a case.
>
> - The guest user of the site: in Setup, open Digital Experiences, All Sites, Workspaces, Administration, Pages, Go to Force.com, Public Access Settings, Assigned Users, Guest User.
> - The Experience Cloud site: in Workspaces, open Administration, Emails, Email Address.
> - If needed, an organization-wide email address for the guest user: in Setup, open Organization-Wide Addresses.
## 19. Add autocomplete to New and Edit
*Optional. Needs a Smarty plan with autocomplete.*
Autocomplete shows a list of addresses while a user types in Street. A click on one address fills the other address fields. It works in the New and Edit windows of an object, for physical addresses only.
> **Save uses a lookup**
>
> The list of suggestions comes from the autocomplete part of your Smarty plan. Save then sends a normal check to Smarty, and that check uses one lookup.
1. **Check that your Smarty plan includes autocomplete.**
Autocomplete uses the default Smarty keys on the Authentication tab. If autocomplete runs on another Smarty account, paste its keys in **Autocomplete Domestic**. The fields are **Auth-Id (only for AutoComplete)** and **Auth-Token (only for AutoComplete)**. Then click **Save All Settings**.
Do this in each sandbox and in production.
2. **Put the address fields in their own section on each page layout.**
Open Setup. Click **Object Manager**. Click your object. Click **Page Layouts**. Open each layout that your users work with.
The address fields must sit in a section named **Address Information**, with no other fields in it. If you set a **Layout Section Name** for the object on the Automation tab, use that name. See [The options of an object](https://www.toafinish.com/support/guides/address-verification/#automation-options).
If the layout has no such section, drag **Section** from the palette onto the layout. Name it Address Information. Move the address fields into it. Salesforce can put the new section at the top of the layout.
Click **Save**.
3. **Check the address entry on the Data Mapping tab.**
The address must have an entry. If it has none, add one. See [Set up the addresses](https://www.toafinish.com/support/guides/address-verification/#addresses), or [step 4 of Verify addresses on a custom object](https://www.toafinish.com/support/guides/address-verification/#custom-4).
Country must be mapped, also when you verify US addresses only. The Country field must sit in the section from step 2.
For more lines of the street, map Street 2. Then tick **Use Street 2** at the bottom of the entry. Street 3 and Street 4 work the same way.
To block the save of a bad address, tick **Stop record creation on bad addresses**. It removes the Use as it is button. See [Address options](https://www.toafinish.com/support/guides/address-verification/#address-options).
4. **Override the New button, the Edit button, or both.**
Override New for autocomplete on new records. Override Edit for autocomplete when a user changes a record.
In Object Manager, click your object. Click **Buttons, Links, and Actions**. Click the arrow at the end of the **New** row. Click **Edit**.
Under **Lightning Experience Override**, pick **Lightning component**. Pick this component. Click **Save**.
`smartystreets:AutoCompleteNew`
Salesforce then opens Fields & Relationships. For the **Edit** row, click **Buttons, Links, and Actions** again. Do the same with this component:
`smartystreets:AutoCompleteEdit`
With the Edit override, Salesforce turns off inline editing on the object. Many orgs make an action that opens AutoCompleteEdit in place of the override.
To remove an override later, click **Edit** on its row. Under Lightning Experience Override, pick **Use the Salesforce Classic override**. Click **Save**. Click **OK**.
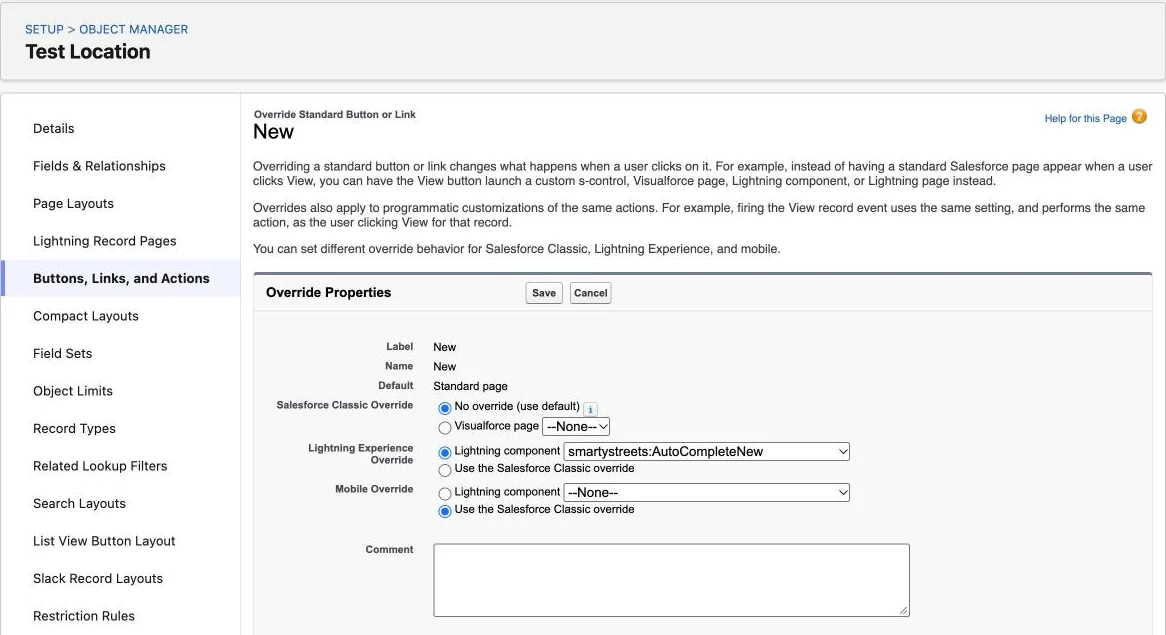
5. **Wait 10 seconds. Open the tab of the object. Click New, or open a record and click Edit.**
Scroll to the address section. It looks a little different. If it looks the same, reload the page. Lightning can take a few reloads to show the new window.
You can also untick **Enable secure and persistent browser caching to improve performance** in Setup, Session Settings. Tick it again after the window shows.
The window can show no fields, with the red line **Named credential is not configured.** Then do [Set up the Named Credential for autocomplete](https://www.toafinish.com/support/guides/address-verification/#named-credential) first. The window then also shows **Please add Section Address Information In the layout**, even when the section is there.
6. **Type a street in Street. Click an address in the list. Click Save.**
A list of addresses opens as you type. It shows street addresses, not the names of buildings. While it is open, Save is greyed out.
After the click, Street, City and State fill in. Save checks the address with Smarty and uses one lookup. The check fills in Zip Code and the other result fields.
Country stays empty unless **Fixed Name for USA Verifications** is set. See [Options on the Authentication tab](https://www.toafinish.com/support/guides/address-verification/#authentication-options).
When Smarty cannot verify an address, a window reads **YOU ENTERED AN UNVERIFIED ADDRESS**. Click **Go Back** to fix the address, or **Use as it is** to save it anyway. The record then shows Bad or Blank Address.
Stop record creation on bad addresses removes the Use as it is button.
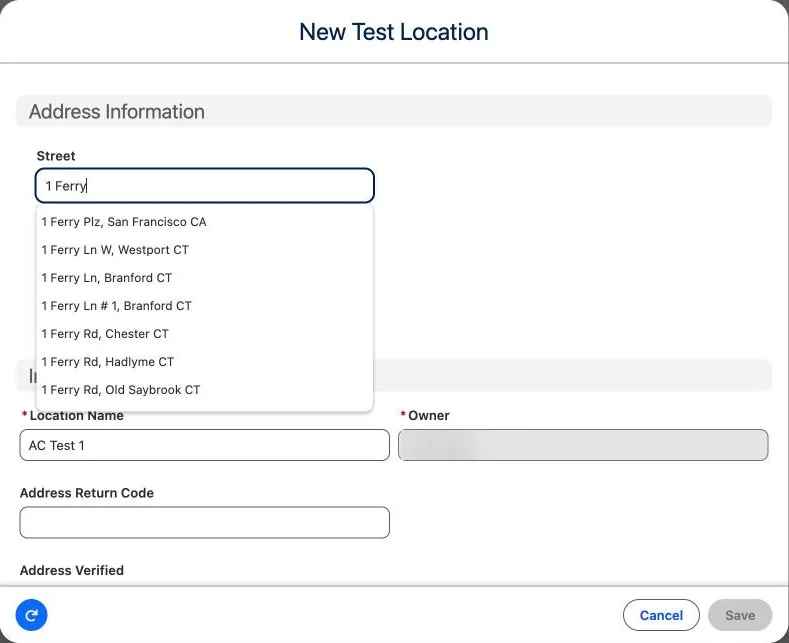
### Users who cannot build the window
The first time a user opens the window, it takes a little longer. It builds a copy of the screen for later use. For that, the user needs the permissions **Customize Application** and **API Enabled**, from the profile or a permission set. The Address Verification permission sets do not give them.
For users who cannot have these permissions, an admin copies the screen to their profile:
1. **As an admin, open the New or Edit window of the object once.**
2. **On the setup page, click the More... tab.**
3. **Under Page Layout Sync, pick the Object and the Profile.**
Pick the profile of the users who lack the two permissions.
4. **Click Sync Page Assignment.**
An Apex job copies the screen to that profile.
> **Sync again after each layout change**
>
> The copy does not follow the page layout. After each change to the layout, do these steps again.
## 20. Set up the Named Credential for autocomplete
*Needed when autocomplete shows the message Named credential is not configured. TAF's test org needed it.*
Autocomplete reads the page layout through the Salesforce API. In some orgs, that call needs a **Named Credential**: a saved sign-in that Salesforce uses for a call to a web address.
The setup has three parts. An **Auth. Provider** tells Salesforce how to sign in. An **External Client App**, the newer form of a connected app, gives the rights. The Named Credential then joins them.
> **Technical steps that change often**
>
> Do these steps as an admin. Keep the Consumer Key and the Consumer Secret private.
1. **Make an Auth. Provider.**
Open Setup. In the Quick Find box, type **Auth Providers**, with no dot. Click **Auth Providers**. Click **New**.
| Field | Value |
| --- | --- |
| Provider Type | Salesforce |
| Name, URL Suffix | Any name, for example `AV_Autocomplete`. URL Suffix fills itself. |
| Consumer Key, Consumer Secret | `NA` in both. Step 6 replaces them. |
| Default Scopes | `refresh_token full` |
| Use Proof Key for Code Exchange (PKCE) Extension | Ticked. It is ticked at first. |
| Include Consumer Secret in SOAP API Responses | Ticked. It is ticked at first. |
Click **Save**.
2. **Copy the Callback URL.**
The saved Auth. Provider shows the **Callback URL** under **Salesforce Configuration**, at the bottom of the page. Keep it for step 4.
3. **Make an External Client App.**
In the Quick Find box, type **External Client App Manager**. Click it. Click **New External Client App**.
| Field | Value |
| --- | --- |
| External Client App Name | Any name, for example `AV Autocomplete` |
| Contact Email | Your email address |
| Contact Phone | Your phone number |
| Distribution State | Local |
4. **Turn on OAuth for the app. Then click Create.**
Open the section **API (Enable OAuth Settings)**. Tick **Enable OAuth**. In **Callback URL**, paste the URL from step 2.
Under **OAuth Scopes**, move these three to the selected list:
- Manage user data via APIs (api)
- Full access (full)
- Perform requests at any time (refresh\_token, offline\_access)
Lower down, under **Flow Enablement**, find **Security**. Tick **Require secret for Web Server Flow** and **Require secret for Refresh Token Flow**. Leave the greyed boxes as they are.
Click **Create**. A message reads **Success! External Client App created successfully**.
5. **Copy the Consumer Key and the Consumer Secret.**
Click the **Settings** tab. Open **OAuth Settings**. Under App Settings, click **Consumer Key and Secret**. It opens in a new window. Salesforce can send a code to your email first. Copy both values to a safe place.
6. **Put the key and the secret in the Auth. Provider.**
Open the Auth. Provider from step 1. Click **Edit**. Replace NA in **Consumer Key** and **Consumer Secret**. Click **Save**.
7. **Switch to Salesforce Classic.**
The next step does not work in Lightning. Click your profile picture. Click **Switch to Salesforce Classic**.
8. **Make a Named Credential.**
Open Setup. In the Quick Find box, type **Named Credentials**. Click **Named Credentials**. Click **New Named Credential**. Leave the entry old\_CallMeBack as it is. It comes with the app.
| Field | Value |
| --- | --- |
| Label, Name | `CallMeBack`. The app looks for this name when Name Of Named Credential is empty. |
| URL | The address of your org up to salesforce.com/, from the address bar in Classic. For example https://yourcompany.my.salesforce.com/ |
| Identity Type | Named Principal |
| Authentication Protocol | OAuth 2.0 |
| Authentication Provider | The Auth. Provider from step 1 |
| Scope | `refresh_token full` |
| Start Authentication Flow on Save | Ticked. It ticks itself. |
| Generate Authorization Header | Ticked. It is ticked at first. |
| Allow Merge Fields in HTTP Header | Ticked |
| Allow Merge Fields in HTTP Body | Ticked |
Authentication Provider and Scope show after you pick OAuth 2.0.
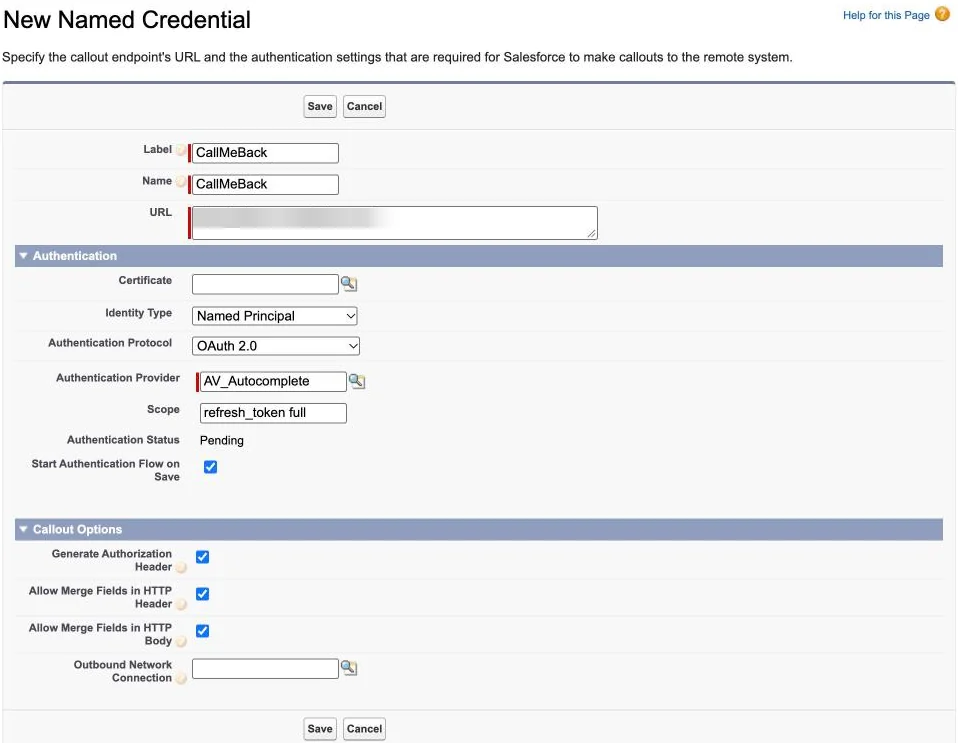
9. **Click Save. Sign in. Allow access on the two screens.**
Salesforce opens a login page. Sign in with your own user. Two screens ask you to allow access. Allow both. The Named Credential then shows **Authentication Status: Authenticated as** your user.
In a sandbox, the sign-in needs one change first. See [The Named Credential sign-in fails in a sandbox](https://www.toafinish.com/support/guides/address-verification/#nc-sandbox).
If **INSUFFICIENT PRIVILEGES** shows here, ask Salesforce support to turn on External Client Apps in your org.
10. **Paste the name in Name Of Named Credential. Click Save All Settings.**
Switch back to Lightning. On the setup page, open the **Authentication** tab. Scroll to the bottom. Type the Name from step 8 in **Name Of Named Credential**. Click **Save All Settings**. A message reads **Successfully saved the setting.**
If a button floats over the box, see [A button on the setup page covers a field](https://www.toafinish.com/support/guides/address-verification/#floating-buttons).
11. **Open the New window again. Type a street.**
The window shows its fields, and the list of addresses opens, with no red message.
## 21. Link a new child record to its parent
*Optional. For a new record made from a related list, for example a Contact from an Account.*
The autocomplete windows stand alone. A Contact made from an Account with AutoCompleteNew does not fill in the Account. The user must pick the Account again.
A small Lightning component of your own fixes this. It opens AutoCompleteNew from an action on the parent record, with the parent filled in. It cannot override the New button of the child object.
1. **Open the Developer Console.**
Click the gear icon at the top right. Click **Developer Console**. It opens in a new window.
Some orgs show **Web Console** in the menu in its place. Then type the address of your org in the browser, with this at the end:
`/_ui/common/apex/debug/ApexCSIPage`
2. **Click File, New, Lightning Component. Type a name. Click Submit.**
A window named **New Lightning Bundle** opens. Use a name that says what the component makes, for example `NewContactWithAddress`. Leave the boxes under Component Configuration unticked.
3. **Replace all the code with the code below.**
Delete all the code first. Then paste the code below. Do not type it, because the editor adds closing tags as you type.
This is the file child\_object\_create\_quick\_action in the lightning folder of the [Address Verification repository on GitHub](https://github.com/ToAFinish/addressverification). Take it from there for the newest version.
```
```
4. **Replace OBJECT-FIELD. Click File, Save.**
Type the API name of the child object, then a hyphen. After it, type the API name of the lookup field to the parent. For a Contact under an Account, type `Contact-AccountId`.
To keep the user on the parent record after the save, add `redirectTo="parent"` to the smartystreets:AutoCompleteConnector tag. This works from version 6.24.11.
Close the Developer Console.
5. **Make an action on the parent object.**
In Object Manager, click the parent object, for example Account. Click **Buttons, Links, and Actions**. Click **New Action**.
| Field | Value |
| --- | --- |
| Action Type | Lightning Component |
| Lightning Component | The component from step 2, for example c:NewContactWithAddress |
| Height | `0`. The box shows 250px at first. |
| Label | Any label, for example `New Contact` |
| Name | Any name, for example `New_Contact`. It fills itself. |
Click **Save**.
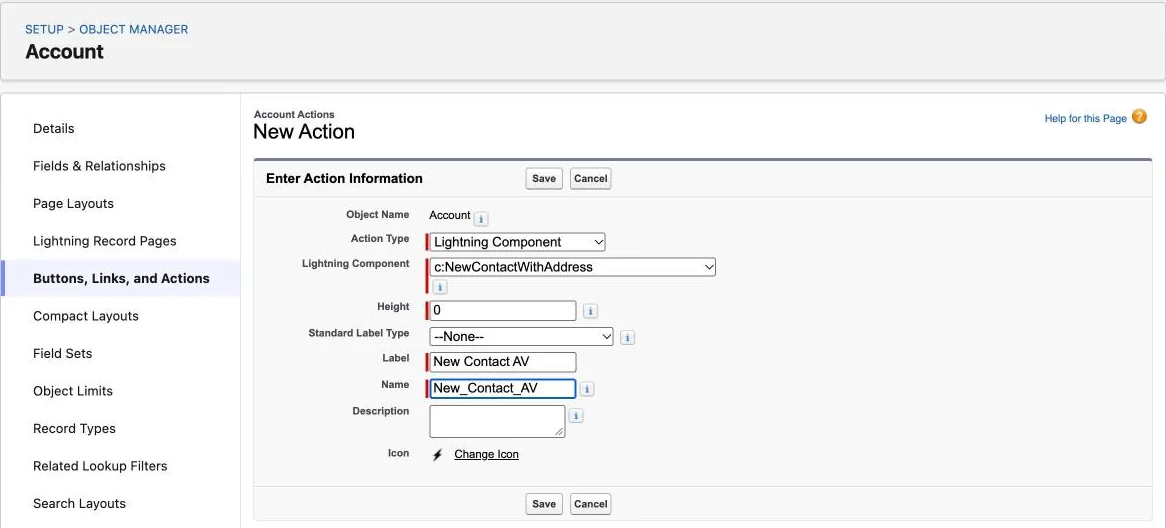
6. **Add the action to the page layout of the parent.**
Click **Page Layouts**. Open the layout. In the palette, click **Mobile & Lightning Actions**. Drag the action into the **Salesforce Mobile and Lightning Experience Actions** section.
If the section asks you to override the predefined actions, click the link first.
In the related list of the child object, remove the **New** button. Then users do not mix up the two buttons. This is optional, but TAF advises it.
Click **Save**. Do the same on each layout that needs the action.
7. **Open a parent record. Click the action.**
The action can sit in the menu under the arrow. The window for the new record opens after a few seconds, with the parent already filled in.
Street, City and State fill in from the list. Save opens the new record and uses one lookup.
## 22. Verify on the record page
*Optional. Edit and verify an address, an email or a phone number on the record page itself.*
Three components put an edit box with a check on a Lightning record page: **inlineVerifyAddress**, **inlineVerifyEmail** and **inlineVerifyPhone**.
### An address
The address component also works in Dynamic Forms, with some limits.
1. **Check that autocomplete works on the object.**
The address component needs autocomplete and the External Client App. See [Add autocomplete to New and Edit](https://www.toafinish.com/support/guides/address-verification/#autocomplete) and [Set up the Named Credential for autocomplete](https://www.toafinish.com/support/guides/address-verification/#named-credential).
2. **Open a record. Click the gear icon. Click Edit Page.**
3. **Add inlineVerifyAddress to a column.**
`inlineVerifyAddress`
Find it under **Custom - Managed**. Drag it onto a column. Salesforce lets you put it in some places only.
If the drag does not work, click a component in the column. Click the **+** above or below it. Then click inlineVerifyAddress.
4. **Click the component. Fill in its properties.**
Fill in all of them.
| Property | Value |
| --- | --- |
| Address Configuration Name | The address entry. The list shows only the entries of this object. |
| Object API Name | The API name of the object, for example `Location__c` |
| Street Field API Name, City Field API Name, State Field API Name, Country Field API Name, Postal Code Field API Name | The API name of each address field, not its label |
| Address Label | The name of the address on the page |
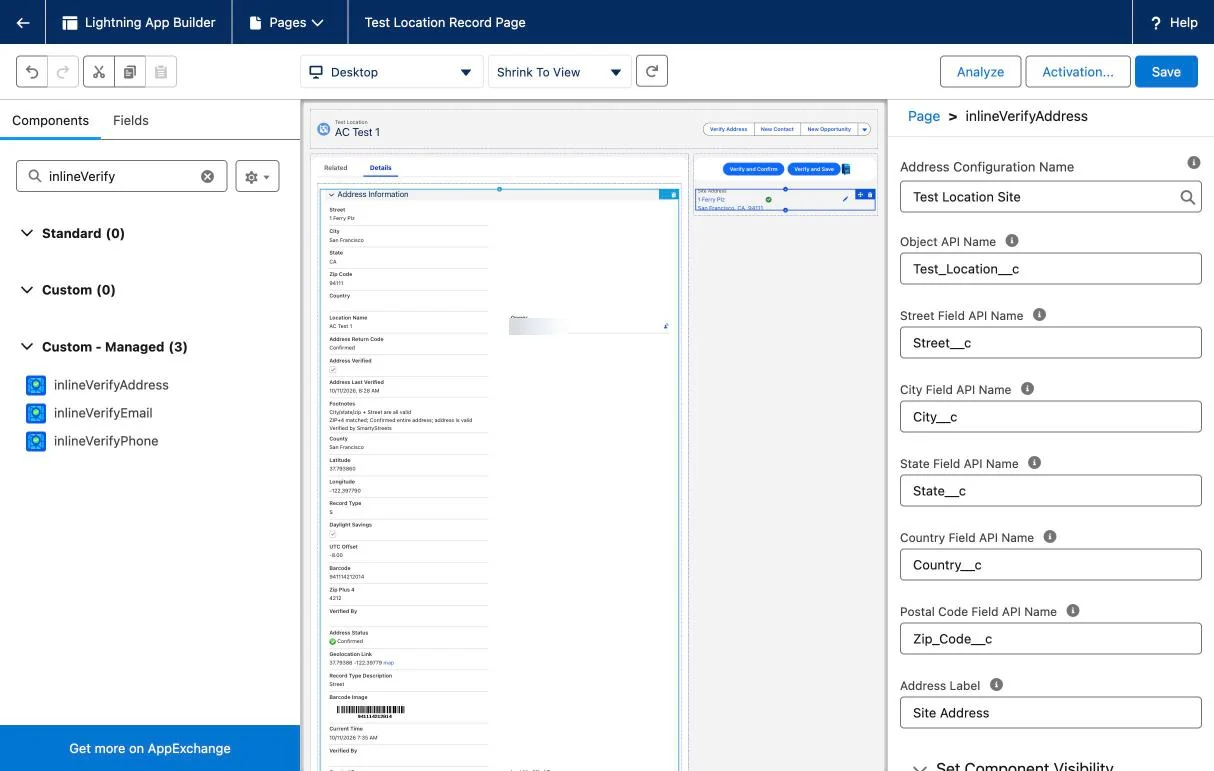
5. **Click Save. Activate the page, if Salesforce asks.**
If a window named **Inline edit disabled** shows, click **Save**. It shows when the Edit button has an override.
Activate it as in [step 4 of Add the Verify and Confirm button](https://www.toafinish.com/support/guides/address-verification/#confirm-4). Then click the back arrow.
6. **Click the pencil beside the address. Pick an address from the list. Click Save.**
The pencil opens Country, Street, City, State and Zip Code. Type the street with its type, for example `415 Mission St`, so the list finds it.
A green tick shows a confirmed address. Any other result shows an orange triangle and the message **Address Verification Failed**. This also happens when the record is verified, for example with Confirmed - Missing Secondary Info. Check Address Return Code for the result. The check uses one lookup.
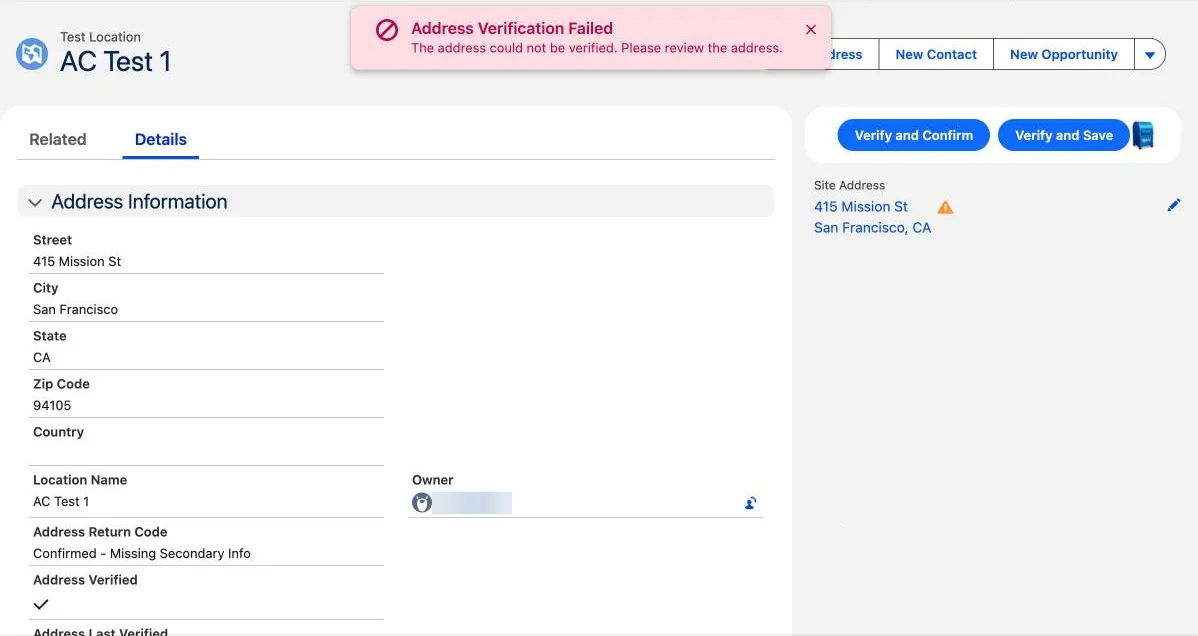
### An email address or a phone number
1. **Check that the email or phone entry works.**
TAF turns on the email or phone add-on after you buy it. The field also needs its entry on the Data Mapping tab. See [Check email addresses and phone numbers](https://www.toafinish.com/support/guides/address-verification/#email-phone).
2. **Open a record. Click the gear icon. Click Edit Page.**
3. **Add inlineVerifyEmail or inlineVerifyPhone to a column.**
Find it under **Custom - Managed**. Drag it onto a column. If the drag does not work, click a component in the column. Click the **+** above or below it. Then click the component.
4. **Click the component. Fill in its properties.**
| Property | Value |
| --- | --- |
| Email Configuration Name, or Phone Configuration Name | The email or phone entry. An empty list means the field has no entry yet. Make it first. |
| Object API Name | The API name of the object |
| Field API Name | The API name of the email or phone field |
5. **Click Save. Activate the page, if Salesforce asks.**
6. **Change the value in the component. Press Enter, or click Save.**
The component checks the value and fills in the result fields. The check uses one lookup from your add-on.
A valid result shows a green tick. Any other result shows a red message, for example **Email Verification Failed** for the result do\_not\_mail. Reload the page to see the result fields.
## 23. Improve checks with Google Search
*Optional. Not available at this time.*
> **Not available at this time**
>
> This problem comes from a change on Google's side. In 2025, Google changed its search pages so that they need JavaScript. Address Verification can no longer read the Did You Mean? text from them.
>
> With Use Google Search on, Verify fails for each address that Smarty cannot verify. The record gets no result, and the check uses two lookups.
>
> TAF is adapting Address Verification to Google's change and is working on a fix. Until the fix is out, leave Use Google Search off. The [Address Verification change log](https://www.toafinish.com/support/changes/address-verification/) will announce the fix. See also [Verify fails with Unexpected character](https://www.toafinish.com/support/guides/address-verification/#google-fails).
Google Search helps with an address that Smarty marks as bad, for example a street spelled in the local language.
Address Verification first sends the address to Smarty. If Smarty marks it as bad, the app searches Google for the address. If Google offers another spelling with **Did You Mean?**, the app sends that spelling to Smarty. When that check works, the address is verified. When it fails, the Footnotes say so.
Smarty fixes small spelling mistakes itself, so most addresses never go to Google.
> **A second lookup**
>
> The check of the Google spelling uses a second lookup.
> **Only for a click on Verify**
>
> Google Search works only when a user clicks a Verify action. It does not work in scheduled batch jobs.
1. **Add Google as a remote site.**
Open Setup. In the Quick Find box, type **Remote Site Settings**. Click **Remote Site Settings**. Click **New Remote Site**.
| Field | Value |
| --- | --- |
| Remote Site Name | Any name, for example `Google_Search` |
| Remote Site URL | `http://www.google.com` |
| Active | Ticked |
Click **Save**.
2. **On the Options tab, tick Use Google Search. Click Save Settings.**
A message reads **Setting is Saved Successfully**.
3. **Verify a test record with a hard address.**
Open a record whose address Smarty cannot verify. A small spelling mistake is not enough. Smarty fixes it itself, and the Footnotes end with **Verified by SmartyStreets**.
Click the Verify action. Read the Return Code and Footnotes fields of that address. The check uses one or two lookups.
At this time the check fails with **Verification Failed**. Untick Use Google Search again. See [Verify fails with Unexpected character](https://www.toafinish.com/support/guides/address-verification/#google-fails).
## 24. Verify an address in a Flow screen
*Optional. A job for a developer. Uses sample code from GitHub.*
Address Verification can also check an address inside a screen Flow. TAF's sample Lightning components sit in the flows folder of the [Address Verification repository on GitHub](https://github.com/ToAFinish/addressverification).
| Sample | What it does | Folder |
| --- | --- | --- |
| VerifyAnAddress | Lets a user type an address and see the verified address, with no record. The Flow gets no value back from it. | No\_Saving |
| UpdateAddressFromFlow | Checks and saves the addresses of an existing record. | Saving |
| GetAddressFromFlow and UpdateAddressAfterSave | Collect an address before the Flow makes the record, and check it after the save. They also need FlowFooter and navigateFlow from the Saving folder. The folder has its own README.md, and its own version of the Apex class. | saving2 |
> **A job for a developer**
>
> Each sample has an Apex class that calls Address Verification. A developer builds the classes and the components in a sandbox. The repository has no test classes, so the developer writes them too. Test the Flow in the sandbox before you deploy it to production.
The README.md file of the flows folder gives the Flow Builder steps. Address Verification must be version 5.0 or later. For help, open a case.
## 25. Read the results
Each check writes a result to the Return Code field of the address. It also writes the Footnotes and the Last Verified date. When the address is confirmed, the check ticks Verified.
### Return codes for addresses
| Return Code | What it means |
| --- | --- |
| Confirmed | The address is fully verified. |
| Confirmed - Address Truncated | The address is verified, or partly verified, but it is too long for one or more mapped fields. |
| Confirmed - By Dropping Secondary Info | The address is fully verified after Smarty dropped the apartment or suite number. |
| Confirmed - May be Undeliverable, or Confirmed - Partially | The address may exist, but it is not likely to get mail from the USPS. |
| Confirmed - Missing Secondary Info | The address is partly verified. It needs an apartment or suite number. |
| Not Submitted | Address Verification did not send the address. This is rare. |
| Changed | The address was verified, then changed, and it is not checked again yet. |
| Bad or Blank Address | The check failed, or the address was empty and was not sent. |
### Return codes for phone numbers
| Return Code | What it means |
| --- | --- |
| Valid | The phone number is valid. |
| Error | The phone number is unknown, or it is a known wrong number. |
### Return codes for email addresses
| Return Code | What it means | Send email to it? |
| --- | --- | --- |
| valid | A real address. | Yes. |
| invalid | Not a valid address. See the sub codes. | No. |
| disposable | A temporary address. | No. |
| catch-all | The domain accepts all mail, so the address cannot be checked. | Not for sales or marketing, unless it is on a private server. |
| do\_not\_mail | A real address, mostly for a role such as sales@. See the sub codes. | Not for sales or marketing. |
| abuse | A real address of a person who often reports mail as abuse. | Not for sales or marketing. |
| spamtrap | A known bad address. | No. |
| unknown | The mail server cannot be reached. See the sub codes. | No. |
### Sub codes for email addresses
| Return Code | Sub Code | What it means |
| --- | --- | --- |
| invalid | does\_not\_accept\_mail | The domain only sends mail. It does not take mail. |
| invalid | failed\_syntax\_check | The address breaks the rules for how an email address is written. |
| invalid | possible\_typo | The domain looks like a misspelled popular domain. |
| invalid | mailbox\_not\_found | The address is written well, but it does not exist. |
| invalid | no\_dns\_entries | The domain has no records, or incomplete records, on the internet. Mail cannot reach it. |
| invalid | mailbox\_quota\_exceeded | The mailbox is full and takes no mail. |
| invalid | unroutable\_ip\_address | The domain points to an address that mail cannot reach. |
| do\_not\_mail | global\_suppression | The address is on public lists of people who complain about mail, or who sue senders. |
| do\_not\_mail | possible\_trap | The address holds words that point to a spam trap, such as spam@. Check it before you send. |
| do\_not\_mail | role\_based | The address is for a role or a group, such as sales@ or info@. People report mail to these as spam more often. |
| do\_not\_mail | disposable | A temporary address. It lives from 15 minutes to about 6 months. |
| do\_not\_mail | toxic | The address is known for abuse or spam, or a program made it. |
| do\_not\_mail | role\_based\_catch\_all | A role address on a domain that accepts all mail. |
| unknown | antispam\_system | An anti-spam system blocked the check. |
| unknown | exception\_occurred | The check failed with an error. If this happens often, open a case. |
| unknown | failed\_smtp\_connection | The mail server does not allow a connection. Most of these addresses are invalid. |
| unknown | forcible\_disconnect | The mail server disconnects at once. Most of these addresses are invalid. |
| unknown | greylisted | The server cannot be checked now. A second check often works. |
| unknown | mail\_server\_did\_not\_respond | The mail server does not answer. Most of these addresses are invalid. |
| unknown | mail\_server\_temporary\_error | The mail server returns a temporary error. Most of these addresses are invalid. |
| unknown | timeout\_exceeded | The mail server answers very slowly. Most of these addresses are invalid. |
## 26. If something does not work
### Verify Addresses changes nothing
Address Verification skips an address whose Verified box is ticked. Change the address, or untick Verified, and click Verify Addresses again.
Also check that the address has an entry on the Data Mapping tab, and that the entry is Active. See [Set up the addresses](https://www.toafinish.com/support/guides/address-verification/#addresses).
### The check fails with Record failed to update
The message reads, for example: **Account Billing Record failed to update. Possibly due to a Duplicate or Validation Rule.**
If a bad address gets the result Bad or Blank Address, but a good address shows this message, the check worked and the save failed. In TAF's support cases, a wrong field in the mapping of the address caused it, not a duplicate rule or a validation rule.
To work around it, edit the address entry on the Data Mapping tab. Clear the optional fields you mapped, for example Geocode Precision. Click **Save**. Change the test address and verify it again. Then map the optional fields again, one at a time, and verify after each one. The last field you mapped before the error is the wrong one.
### Verify fails on a custom object after you add the Flow
The message reads, for example: **Location Site Record failed to update. Possibly due to a Duplicate or Validation Rule. (Changed)**
The Flow that marks changed addresses has only six conditions. TAF's PDF guide shows six. Add row 7 as in [step 4 of Mark changed addresses on a custom object](https://www.toafinish.com/support/guides/address-verification/#unverify-4), and the logic from step 5.
In an active Flow, click **Save As New Version**. Then click **Activate**. Change the address of a test record and verify it again.
### The check fails with Payment Required (402)
The message starts with **ERROR: Payment Required. Please log into Smarty.com and update your payment information.**
The Smarty plan has no lookups left. If you bought the plan through TAF, email [sales@toafinish.com](mailto:sales@toafinish.com) to add lookups. With your own Smarty account, contact Smarty.
If TAF sends new keys for international addresses, paste them in **Address Verification International** on the Authentication tab. Pick the license that TAF names, for example `international-cloud`. Then click Save All Settings.
### A verified address shows Changed
Someone changed the street, the city, the state or the ZIP Code after the check. Address Verification then unticks Verified. Click Verify Addresses again. Field history shows who made the change. See [Track address changes](https://www.toafinish.com/support/guides/address-verification/#history).
### International addresses are not checked
Verify International is off, so Address Verification skips every address whose Country is not empty and is not a form of USA. See [International addresses](https://www.toafinish.com/support/guides/address-verification/#international).
### Verify on the setup page fails
- Paste the Auth ID and the Auth Token again, with no space before or after them.
- Check the License. It must match your Smarty plan.
- Click Save All Settings before you click Verify.
### A new action or field does not show on the record page
Salesforce keeps a copy of record pages in the browser, so a change to a page layout can take a while to show. Log out of Salesforce and log in again. This clears the copy.
### An entry window does not close after Save
Click **Save** once more. Then reload the setup page and check the entry. If you cannot see the Save button, zoom out in the browser or scroll right.
### A button on the setup page covers a field
**Save All Settings** and **Reveal Encrypted Settings** float over the setup page. They can cover a button or a box, for example Verify or Email Service Address. Scroll up or down a little, so the field moves out from under them.
### A custom object has no List View Button Layout
On a new custom object, List View Button Layout can stay hidden until Allow Search is on. In Object Manager, open the object. Click **Details**. Click **Edit**. Tick **Allow Search**. Click **Save**.
### The Named Credential sign-in fails in a sandbox
A new Auth. Provider signs in at login.salesforce.com. A sandbox user signs in at test.salesforce.com. In a sandbox, open the Auth. Provider from the Named Credential chapter. Click **Edit**.
In **Authorize Endpoint URL** and **Token Endpoint URL**, replace login.salesforce.com with test.salesforce.com. Click **Save**. Then save the Named Credential again, and sign in.
### The autocomplete window does not close
In the New window, the first click on Cancel can only close the list of addresses. If more clicks do nothing, open the tab of the object again. Nothing is saved.
### Verify fails with Unexpected character
The message starts with **Verification Failed** and **Unexpected character**.
It shows when Use Google Search is on and Smarty cannot verify the address. The cause is a change on Google's side: since 2025, Google's search pages need JavaScript, so the app gets no Did You Mean? text. The check writes nothing to the record, and it uses two lookups. TAF is working on a fix.
On the Options tab, untick **Use Google Search**. Click **Save Settings**. Verify the record again. An address that Smarty cannot verify then gets Bad or Blank Address.
### Test The Query shows Query Failed
The message reads **Query Failed. Please try again.** Run Job then shows **Query Not Verified** and makes no job.
A filter fails when a quoted value holds the words order by, for example `WHERE LastName = 'Order By Test'`. Use LIKE with part of the value:
`WHERE LastName LIKE 'Order%' LIMIT 5`
### Nobody gets the error emails
Type an address in Admin Emails. See [step 7 of Connect Address Verification to Smarty](https://www.toafinish.com/support/guides/address-verification/#connect-7).
### Address Verification cannot reach Smarty
A new install adds these web sites in the third-party access window. An older install, or an install where the window was skipped, can lack some of them. Add each one you need as a remote site.
| For | Remote Site URL |
| --- | --- |
| Email and phone checks | `https://api.addressverificationapp.com` |
| Smarty services | `https://api.smartystreets.com` |
| International autocomplete | `https://international-autocomplete.api.smarty.com` |
| International autocomplete | `https://international-autocomplete.api.smartystreets.com` |
| International address checks | `https://international-street.api.smartystreets.com` |
| Google Maps checks | `https://maps.googleapis.com` |
| The Smarty status on the setup page | `https://status.smarty.com` |
| Autocomplete Pro | `https://us-autocomplete-pro.api.smartystreets.com` |
| Autocomplete | `https://us-autocomplete.api.smartystreets.com` |
| Address enrichment | `https://us-enrichment.api.smarty.com` |
| US address checks | `https://us-street.api.smartystreets.com` |
| ZIP Code checks with no street | `https://us-zipcode.api.smartystreets.com` |
Open Setup. In the Quick Find box, type **Remote Site Settings**. Click **New Remote Site**. Type any name. Paste the address into **Remote Site URL**. Make sure Active is ticked. Click **Save**. Skip the sites for services you do not use, for example international checks.
## 27. Update Address Verification
*For later. These steps do not count in the setup progress.*
TAF sometimes pushes a new version of Address Verification into every org. Some orgs are on an exclusion list and do not get these pushes. You can also install the newest version yourself at any time, from the install links on the change log. The AppExchange listing no longer updates an installed app.
> **Update before you report a bug**
>
> TAF works on bugs in the newest version only. Check your version before you open a case, and update if it is old.
1. **Check the version you have.**
Open Setup. In the Quick Find box, type **Installed Packages**. Find **√ Address Verification** and read the **Version Number** column.
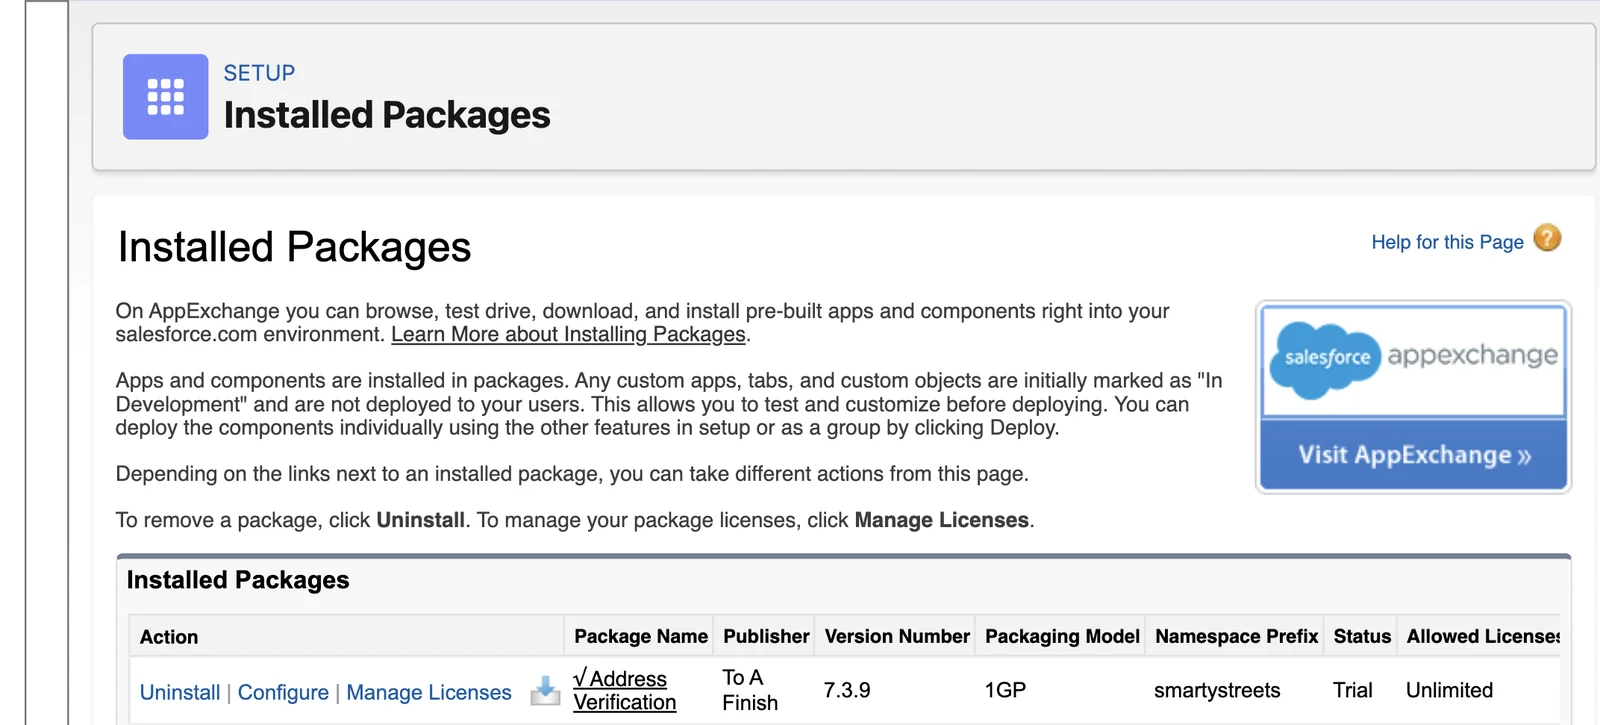
2. **Open the Address Verification change log.**
The newest version and its install links sit at the top of the [Address Verification change log](https://www.toafinish.com/support/changes/address-verification/#install-newest). If your version matches the newest one, stop here.
3. **Update a sandbox first.**
Click **Install in a sandbox**. Sign in to your sandbox and follow the install screens. The install page shows **Upgrade** in place of Install. If a screen asks who to install for, pick **Install for All Users**.
Salesforce installs the newer version over the one you have. Your keys, address entries and settings stay in place.
4. **Verify a test address in the sandbox.**
Follow [Verify a test address](https://www.toafinish.com/support/guides/address-verification/#first-check). Make sure the result is written to the record.
5. **Update production.**
Go back to the change log and click **Install in production**. Sign in to production and follow the same screens.
6. **Check the version again.**
Open Installed Packages again. The Version Number now matches the top of the change log.
> **You cannot go back to an older version**
>
> To go back, you must uninstall Address Verification and set it up again.
## 28. Get help
Open a case if a step does not work. Give the link to the step and paste the exact error text.
Before you report a bug, update to the newest version. TAF works on bugs in the newest version only. See [Update Address Verification](https://www.toafinish.com/support/guides/address-verification/#update).
[Open a case](https://www.toafinish.com/support/#open-a-case)[Give us access](https://www.toafinish.com/support/grant-access/)
Give TAF access to your org when you open a case, so the team can see the problem. See [Give us access](https://www.toafinish.com/support/grant-access/).
See what changed in each release in the [Address Verification change log](https://www.toafinish.com/support/changes/address-verification/). Sample code for lists, triggers and Flows sits in the [Address Verification repository on GitHub](https://github.com/ToAFinish/addressverification).
Found a mistake in this guide? [Email support](mailto:support@toafinish.com?subject=Address%20Verification%20guide%20feedback) with the link to the step.
### Rate Address Verification
If Address Verification helps you, [leave a review on the AppExchange](https://appexchange.salesforce.com/appxListingDetail?listingId=a0N300000059eEUEAY). If something is wrong, open a case first, so TAF can fix it with you.
---
To A Finish LLC. Open a case: https://www.toafinish.com/support/#open-a-case