**Ask an admin who knows Sites**
>
> A site and its sharing rules control what people outside your org can see. If you have not set up a Salesforce Site before, ask an experienced admin to help, or open a case.
1. **Open Sites. Click New.**
Open Setup. In the Quick Find box, type **Sites**. Under **Sites and Domains**, click **Sites**.
The first time, the page asks you to register a domain for your sites, for example `yourcompany.my.salesforce-sites.com`. Tick **I have read and accepted the Salesforce Sites Terms of Use**. Click **Register My Salesforce Site Domain**. The page then shows your site domain name.
Then click **New**.
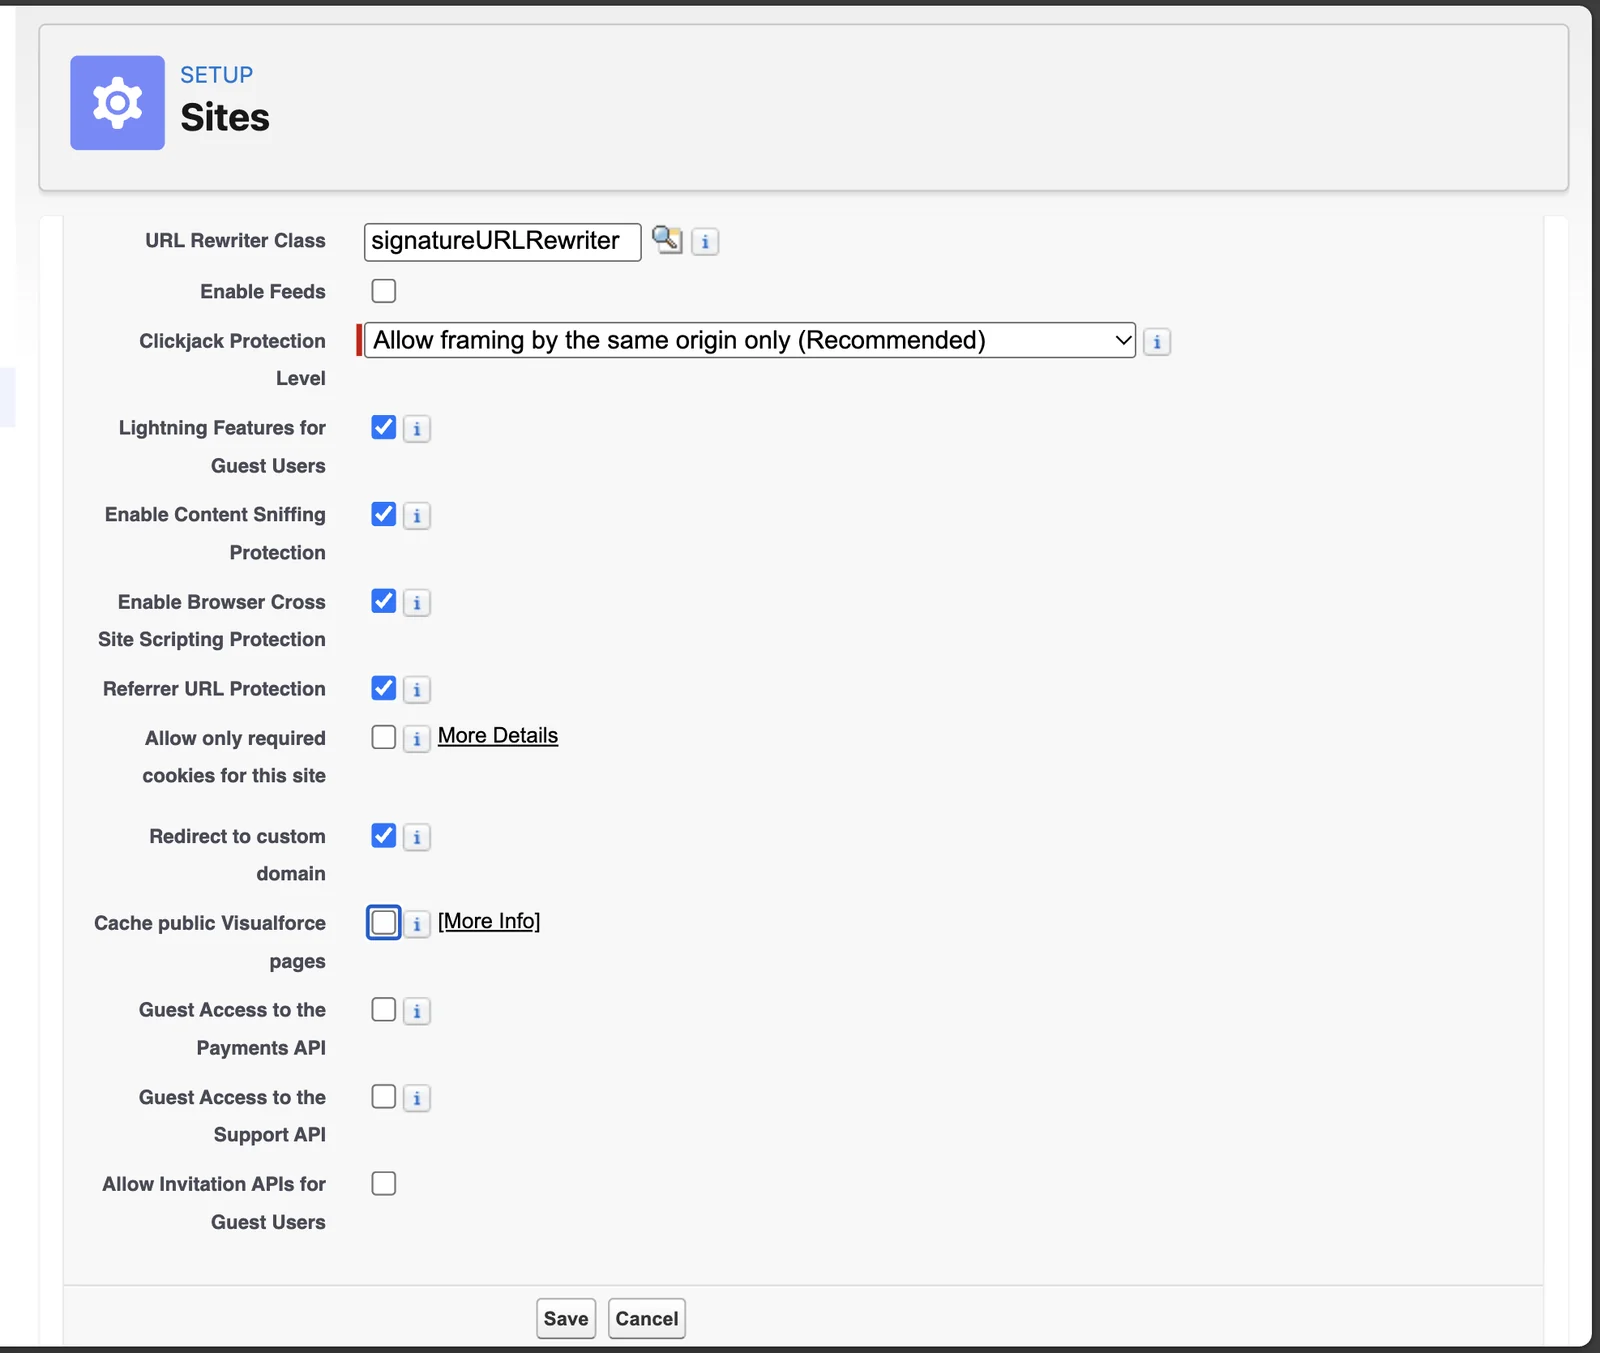
2. **Fill in the site as below. Then click Save.**
| Field | Value |
| --- | --- |
| Site Label | A name, for example `Signatures`. Salesforce fills in Site Name. |
| Site Contact | Salesforce fills in your name. Change it if another admin looks after the site. |
| Default Web Address | Type a short path in the box after the domain, for example `sign`. You can leave it empty if no other site uses the domain. |
| Active | Tick it. |
| Active Site Home Page | Pick `SiteSignature`, the signing page of Simple Signature. |
| URL Rewriter Class | Pick `signatureURLRewriter`. |
| Cache public Visualforce pages | Untick it. It is ticked at first. |
| Other fields | Leave them as they are. |
3. **Write down the site address. Keep it for the next chapter.**
The site page shows the address in two parts, in the **Custom URLs** list: **Domain Name** and **Path**. Put `https://` in front and join them, for example `https://yourcompany.my.salesforce-sites.com/sign`. Paste it into a text file.
4. **Add the two Simple Signature pages to the site.**
On the site page, find **Site Visualforce Pages**. Click **Edit**. The page **Enable Visualforce Page Access** opens. Make sure these two pages sit in **Enabled Visualforce Pages**. Click **Save**.
- `signature.SiteSignature`, the signing page. It is there already, because it is the home page.
- `signature.TrackEmail`, which records when the signer opens the email. Move it across.
5. **Assign Simple Signature (Guest) to the guest user of the site.**
Every site has a guest user. People outside your org work as this user on the site.
On the site page, click **Public Access Settings**. Click **View Users**. Click the guest user, for example **Signatures Site Guest User**. In **Permission Set Assignments**, click **Edit Assignments**. Add **Simple Signature (Guest)**. Click **Save**.
The permission set gives the signer access to the fields of the form, for example First Name, Last Name and Email.
6. **Share open Signature records with the guest user.**
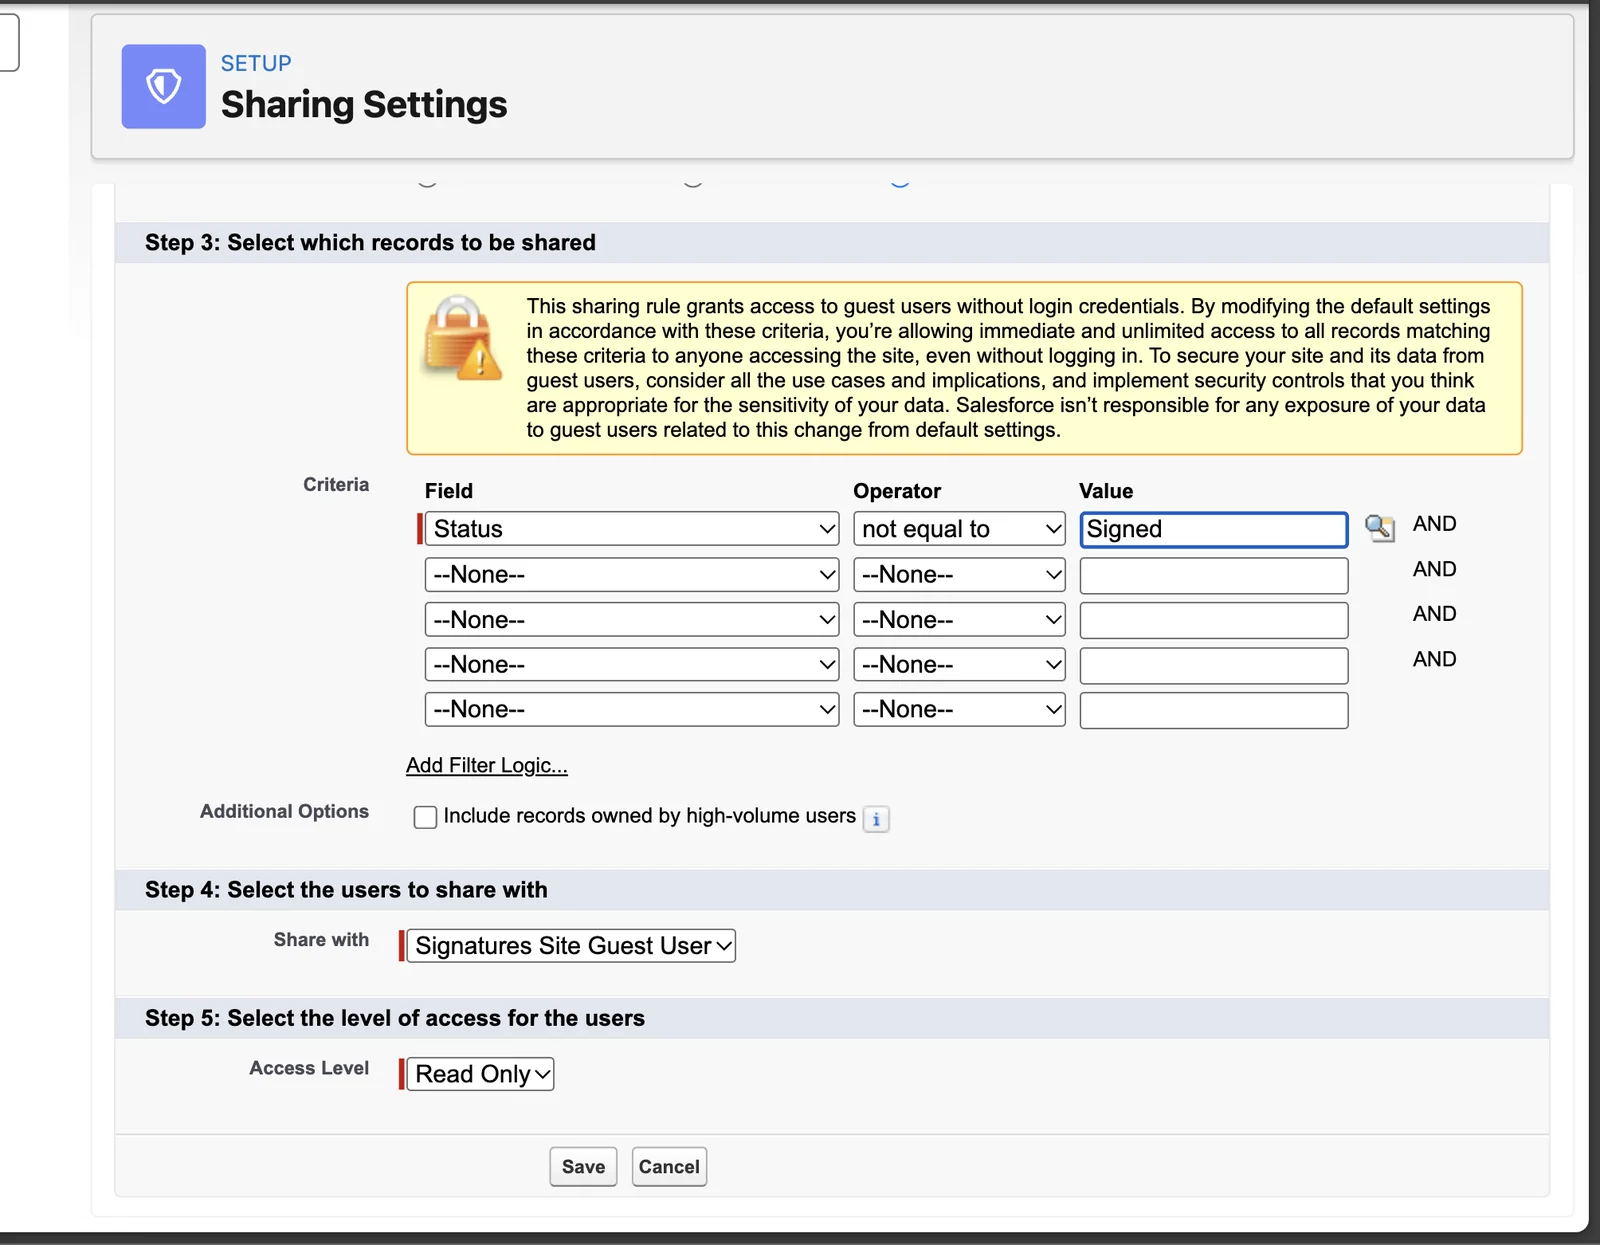
A guest user sees no records until a sharing rule shares them. Open Setup. In the Quick Find box, type **Sharing Settings**. Click **Sharing Settings**. Find **ß Signature Sharing Rules**. Click **New**.
| Field | Value |
| --- | --- |
| Label | A name, for example `Open requests for the site`. Salesforce fills in Rule Name. |
| Rule Type | Pick **Guest user access, based on criteria**. |
| Criteria | Field **Status**, Operator **not equal to**, Value `Signed`. Pick each list value with the mouse. The Enter key saves the form too early, with the error **Invalid or empty operator**. |
| Share with | Pick the guest user of your site. |
| Access Level | Read Only. It cannot change. |
The page shows a yellow warning about guest user access. This rule shares only open requests, and only to read. Click **Save**. Salesforce can take some minutes to apply the rule. After the signature, the guest user no longer needs the record. This is why the rule leaves out Signed records.
### Your own fields on the request form
Simple Signature (Guest) covers the standard fields of the form. You can add your own field to the field set. The signer then cannot see it or fill it in until you give the guest user access to it.
- On the site page, click **Public Access Settings**.
- With the new profile editor, click **Object Settings**, then **ß Signatures**. With the classic editor, find **Custom Field-Level Security** and click **View** beside ß Signature.
- Click **Edit**. Give Read and Edit access to your fields on the form. Click **Save**.
The form can show fields of another object, for example the Lead. Then add a sharing rule for that object too, the same way as step 6.
## 16. Connect the site to Simple Signature
*Paid version only. These steps do not count in the setup progress.*
Simple Signature needs a connection to your org to save the signatures that come in from the site. In this chapter you set the site address, make an External Client App and authorize the connection. An External Client App is the Salesforce record that lets an outside page connect to your org.
> **The user who authorizes holds the connection**
>
> Use an admin user with Simple Signature (Admin), with full access to ß Signature and to the objects you request signatures from. Simple Signature saves the signed PDF as this user. It also sends the email with the signed PDF as this user, unless you set a sender address. See [The sender of the emails](https://www.toafinish.com/support/guides/simple-signature/#request-sender).
1. **Open the Configure page. Click the Configuration tab.**
Open it the same way as in [step 2 of Turn on the paid version](https://www.toafinish.com/support/guides/simple-signature/#upgrade-2). Use Lightning Experience for steps 1 to 8.
2. **Paste the site address into Site URL for Signature Requests.**
End the address with a slash, for example `https://yourcompany.my.salesforce-sites.com/sign/`. The label on the page says so too: include final '/'.
3. **Turn on the three options below.**
- **Process Signatures in Batch Mode**. Simple Signature then processes every Signature record, however it is made. TAF advises it strongly.
- **Email Requested Signature with PDF Attachment**. The request email then carries the PDF to sign. The label ends with (please turn off workflow rule). The old Send Email workflow rules of Simple Signature must stay off.
- **Run PDF Automation on Save**, under the automation options. Without it, the signer signs, but Simple Signature makes no signed PDF and sends no second email.
In a new install, all three are off.
4. **Check Template VisualForce Page for PDF. Click Save Settings.**
Leave it empty to use the standard PDF of Simple Signature. To use a PDF page of your own, type its name with `c__` in front, for example `c__Signature_PDF`. See [Make a PDF page in Visualforce](https://www.toafinish.com/support/guides/simple-signature/#vf-pdf). Without `c__`, Simple Signature cannot find the page.
Click **Save Settings**. Reload the page and check that your values stayed.
5. **Click the Site Configuration tab. Add a remote site, if the tab asks for one.**
Under **Connected APP Configuration**, leave the option on **Default**. A change there resets the authorization.
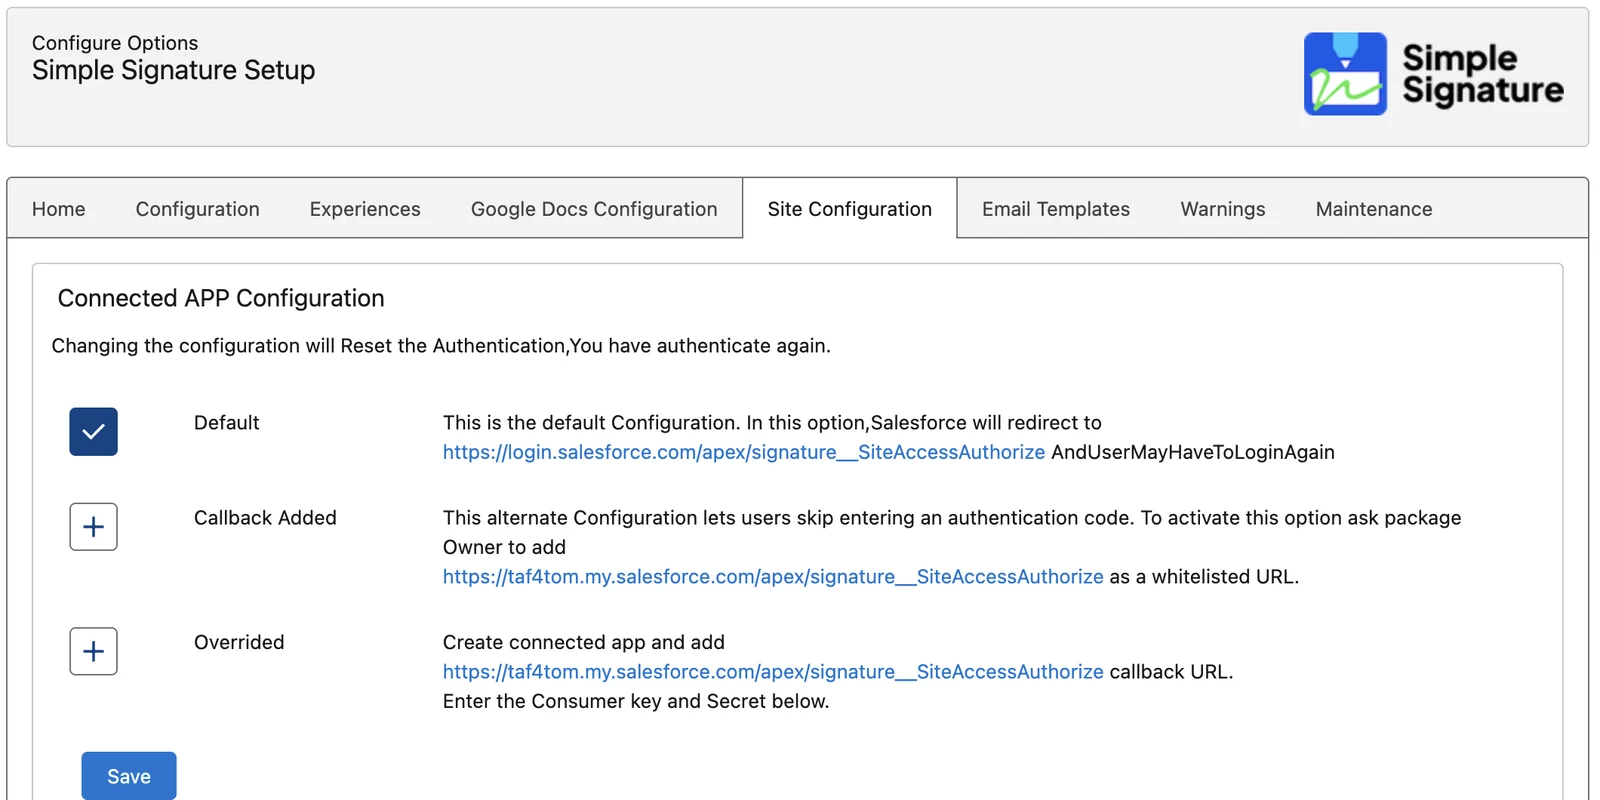
The Authorize Site box can ask you to add your org address to the remote site settings, for example `https://yourcompany.my.salesforce.com`. Copy the address from the message. Open Setup. In the Quick Find box, type **Remote Site Settings**. Click **New Remote Site**. Type a name, for example `SimpleSignatureSite`. Paste the address into **Remote Site URL**. Click **Save**.
6. **Open External Client App Manager. Click New External Client App.**
Open Setup. In the Quick Find box, type **External Client App Manager**. Click it.
7. **Fill in the app as below. Then click Create.**
| Section | Field | Value |
| --- | --- | --- |
| Basic Information | External Client App Name | A name, for example `Simple Signature Site`. Salesforce fills in API Name. |
| Basic Information | Contact Email | Your email address. It is required. |
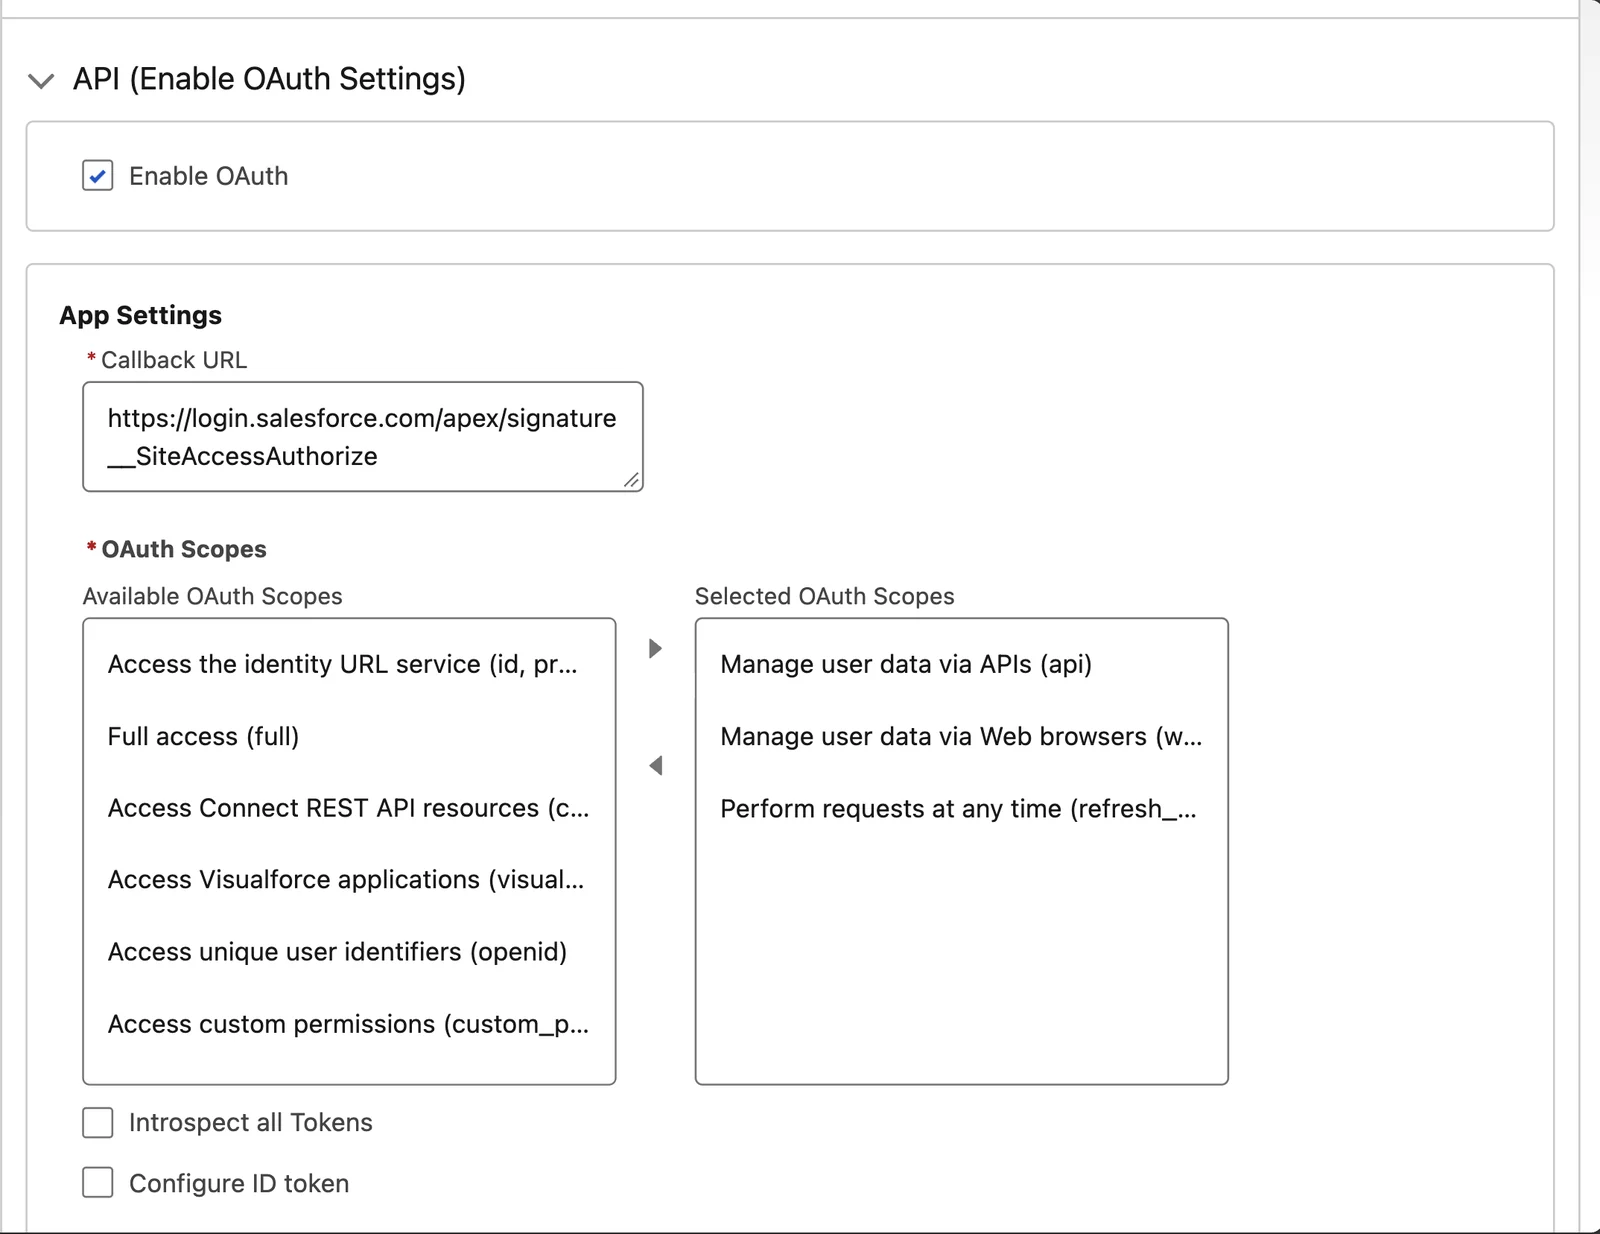
| API (Enable OAuth Settings) | Enable OAuth | Tick it. |
| App Settings | Callback URL, in production | `https://login.salesforce.com/apex/signature__SiteAccessAuthorize` |
| App Settings | Callback URL, in a sandbox | `https://test.salesforce.com/apex/signature__SiteAccessAuthorize` |
| App Settings | OAuth Scopes | Move these three scopes to Selected OAuth Scopes. Manage user data via APIs (api). Manage user data via Web browsers (web). Perform requests at any time (refresh\_token, offline\_access). |
| Security | Require Proof Key for Code Exchange (PKCE) extension for Supported Authorization Flows | Leave it ticked. Older guides said to untick it. Salesforce now requires it. |
| Other sections | | Leave them as they are. |
8. **Copy the Consumer Key and the Consumer Secret.**
After Create, the app opens on its **Policies** tab. Click the **Settings** tab. Click **OAuth Settings** to open that section. It is closed at first. Click **Consumer Key and Secret**. A new browser tab opens. Salesforce sends you a code to check your identity. Type the code.
Copy the two values into a text file. Keep them private. Anyone who has them can try to connect to your org.
If Salesforce shows Insufficient Privileges here, see [If something does not work](https://www.toafinish.com/support/guides/simple-signature/#eca-access).
9. **Switch to Salesforce Classic.**
Click your profile picture at the top right. Click **Switch to Salesforce Classic**.
The authorization works only in Classic. In Lightning it can fail with no message, or with the message **login.salesforce.com refused to connect**.
10. **Open the Configure page in Classic. Click the Site Configuration tab.**
Classic is the older look of Salesforce. Click **Setup** at the top right. If a window **Welcome to the Improved Setup!** opens, close it. In the Quick Find box, type **Installed Packages**. Click **Configure** beside ß Simple Signature.
11. **Paste the key and the secret. Click Save Settings.**
Under **External Client App Settings**, paste the Consumer Key into **Client Id**. Paste the Consumer Secret into **Client Secret**. Click **Save Settings**.
Always save before you authorize, also when you changed nothing.
12. **Click Authorize. Sign in and allow access.**
Sign in with the admin user from the note at the top of this chapter, if Salesforce asks. The page **Allow Access?** names your app and the access it asks for. Click **Allow**.
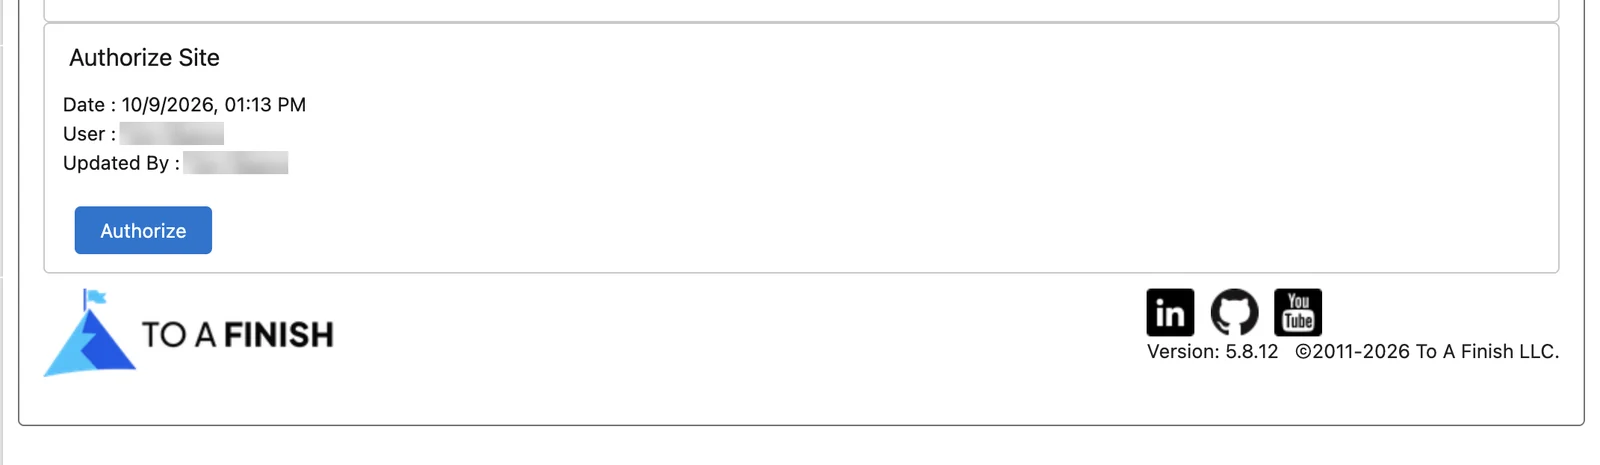
After a few seconds, the page shows **Date**, **User** and **Updated By** above the Authorize button. No date means no authorization. Then click **Authorize** again. In some orgs the first click fails. Later, the date changes each time the refresh job runs.
13. **Schedule the refresh job.**
In **Schedule Refresh Job Interval (Hours)**, type `1`. Click **Schedule Refresh Job**. The job renews the connection every hour. Without it, the connection can stop.
To check the job, open Setup and type **Scheduled Jobs** in the Quick Find box. The page **All Scheduled Jobs** lists **Refresh Token Job Simple Signature**.
14. **Switch back to Lightning Experience.**
Click **Switch to Lightning Experience** at the top of the page.
### Authorize the connection again
The connection can stop, for example after a Salesforce outage. The signer then sees the message **Site Configuration not done.Please ask Admin to Authorize.**
To fix it, do steps 9 to 12 again. Switch to Classic. Open the Site Configuration tab. Click Save Settings. Then click Authorize.
## 17. Send a signature request
*Paid version only. These steps do not count in the setup progress.*
A request starts when Salesforce gets a new ß Signature record with the Status Requested and an email address. Simple Signature then emails the signer a link to the site.
In this chapter you make a Request Signature button on Leads with a Salesforce action. The same steps work on Contacts and on other objects.
1. **Open Object Manager. Click Lead, then Buttons, Links, and Actions. Click New Action.**
Use Lightning Experience, with admin rights.
2. **Fill in the action as below. Then click Save.**
| Field | Value |
| --- | --- |
| Action Type | Pick **Create a Record**. |
| Target Object | Pick **ß Signature**. |
| Label | Type `Request Signature`. Salesforce fills in Name. |
| Success Message | Type `Signature Request Created`. |
| Other fields | Leave them as they are. |
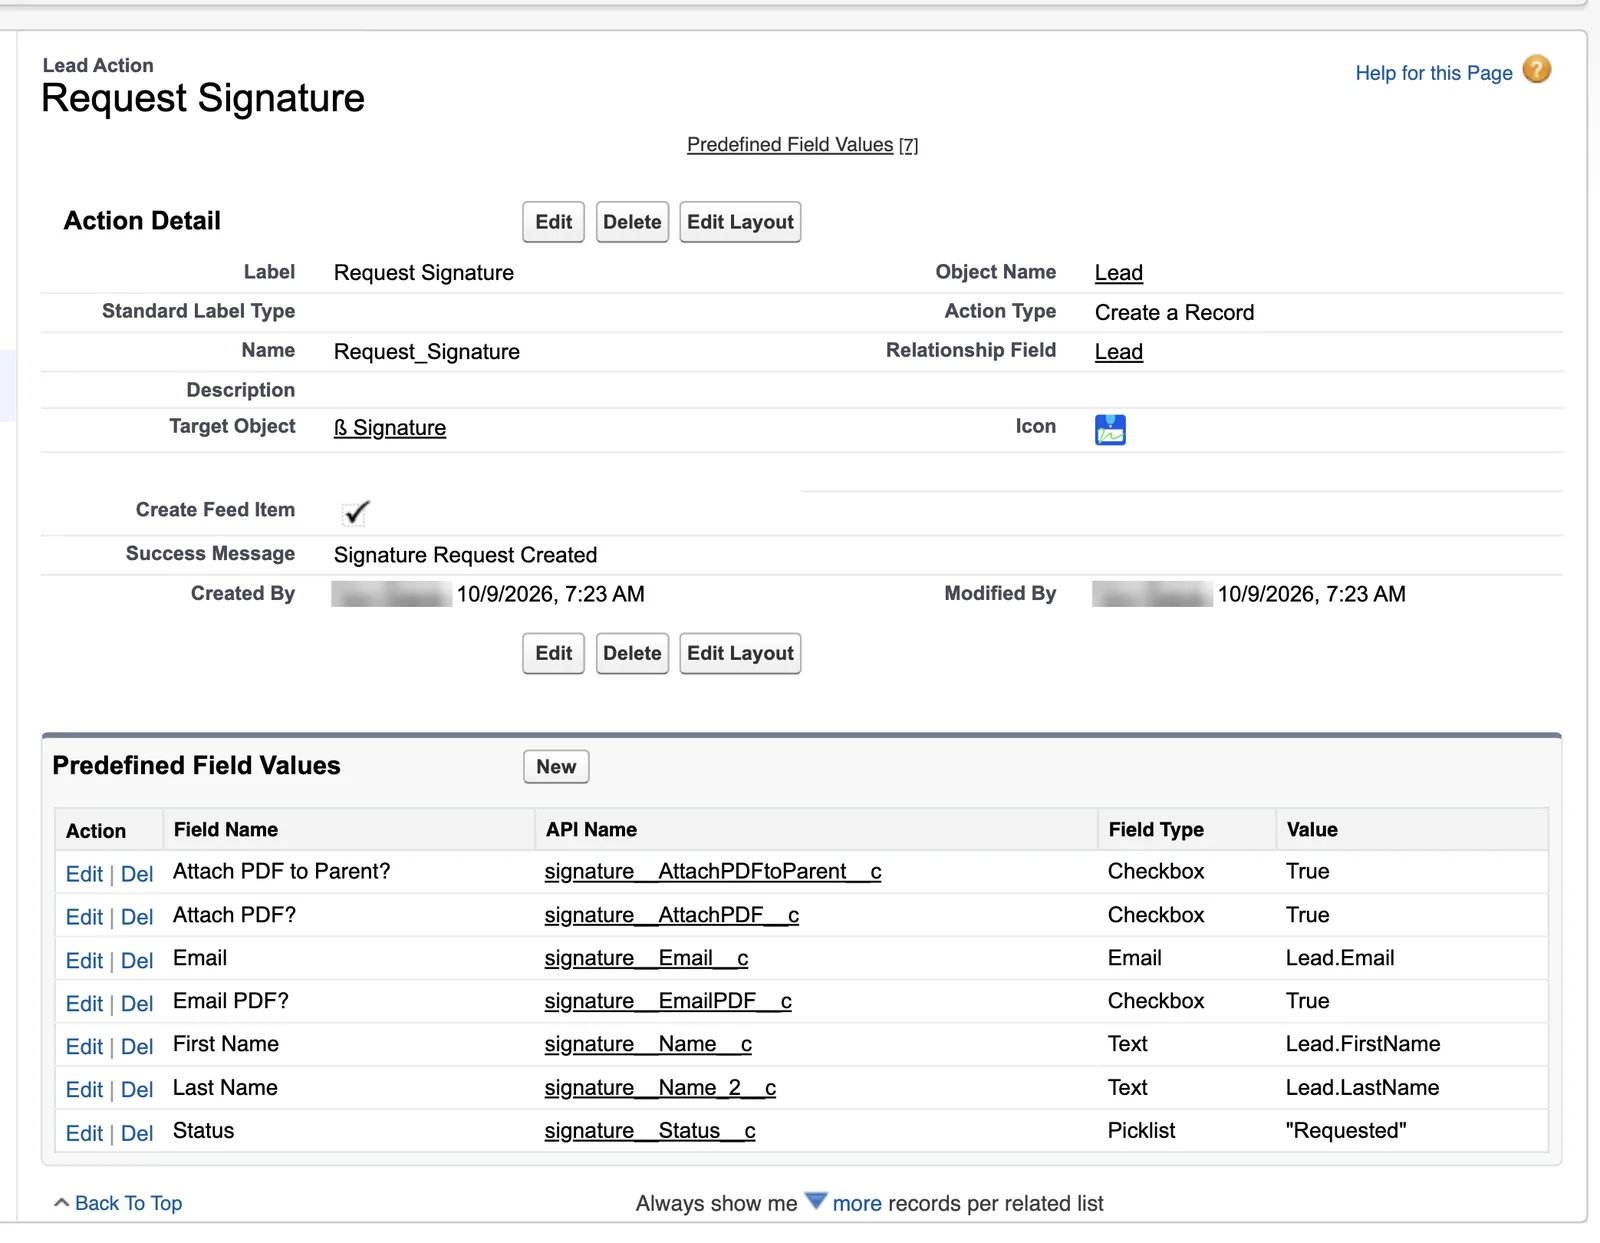
The page has no field for the link to the Lead. After the save, the action shows **Relationship Field** Lead.
3. **Put First Name, Last Name and Email on the action layout. Click Save.**
Salesforce opens the layout of the action. Drag the three fields into it. The user who sends the request sees these fields, and can change them before the save.
4. **Add the predefined field values below.**
Below the layout, find **Predefined Field Values**. Click **New** for each row. Pick the **Field Name**. Set the value in **Specify New Field Value**. Click **Save**.
If New opens a blank page, go back to the action and click New again.
| Field Name | Value | What it does |
| --- | --- | --- |
| Attach PDF to Parent? | True | Saves the signed PDF on the Lead. |
| Attach PDF? | True | Saves the signed PDF on the Signature record. |
| Email PDF? | True | Emails the signed PDF to the signer. |
| Email | `Lead.Email` | The address that gets the request. |
| First Name | `Lead.FirstName` | The first name of the signer. |
| Last Name | `Lead.LastName` | The last name of the signer. |
| Status | Requested | Starts the request. |
Type True and the Lead fields, such as `Lead.Email`, in **Formula Value**. **Show Formula Editor** opens a larger editor, if you need one. For Status, pick Requested in the **Specific Value** list. If Formula Value then stays empty, type `"Requested"`, with the quote marks.
On Contacts, use `Contact.Email`, `Contact.FirstName` and `Contact.LastName`.
5. **Add the action and two related lists to the Lead page layout.**
Click **Page Layouts**, then the Lead layout. In the palette, click **Mobile & Lightning Actions**. Drag **Request Signature** into **Salesforce Mobile and Lightning Experience Actions**. If that section asks you to override the predefined actions, click the link to do so first.
In the palette, click **Related Lists**. Drag **ß Signatures** and **Notes & Attachments** into the Related Lists section, if they are not there. The requests and the signed PDFs show in them. Click **Save**.
6. **Open a test Lead with your own email address. Click Request Signature. Click Save.**
If the button row is full, Request Signature sits in the menu under the arrow at the end of the row.
The action shows the name and the email of the Lead. Salesforce shows **Signature Request Created**.
The new record shows in the **ß Signatures** related list of the Lead. Within a minute, its Status changes from Requested to Emailed.
7. **Open the request email. Open its link in a private browser window.**
A private window has no Salesforce login. It shows the page the way your signers see it. In Chrome, press Ctrl+Shift+N on Windows or Command+Shift+N on a Mac. Paste the link there.
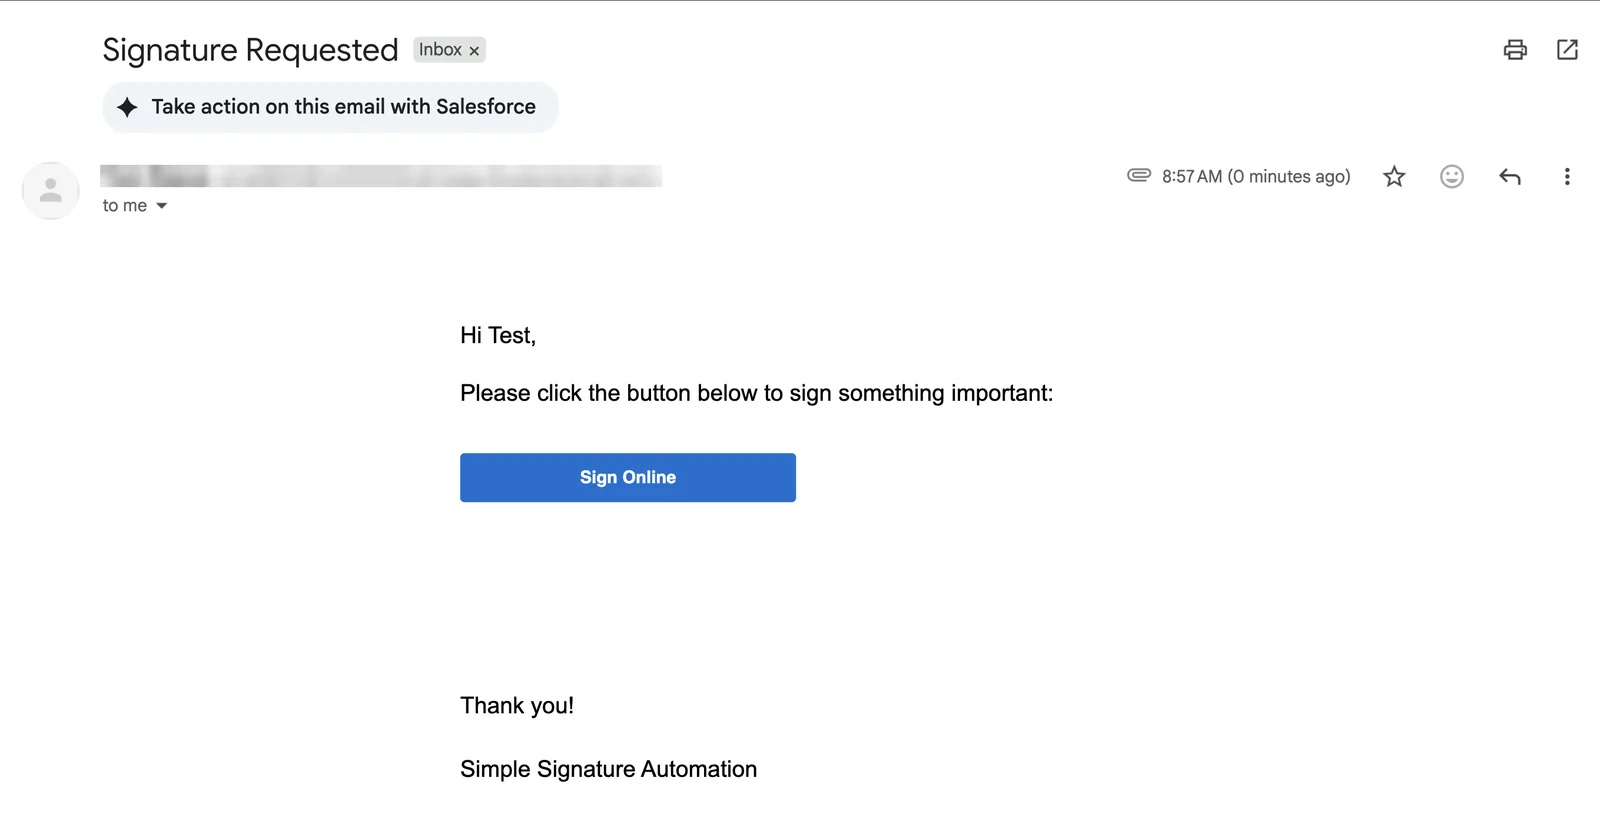
The email has the Subject **Signature Requested** and a **Sign Online** button. It carries the PDF to sign as an attachment. Until you make your own document, Simple Signature uses its standard PDF. To change the words, see [Change the request emails](https://www.toafinish.com/support/guides/simple-signature/#request-emails).
The sender can show as an address that ends in `sfcustomeremail.com`. Salesforce puts it in place of an address it cannot send from. See [The sender of the emails](https://www.toafinish.com/support/guides/simple-signature/#request-sender).
8. **Fill in the form. Sign. Click Save Signature.**
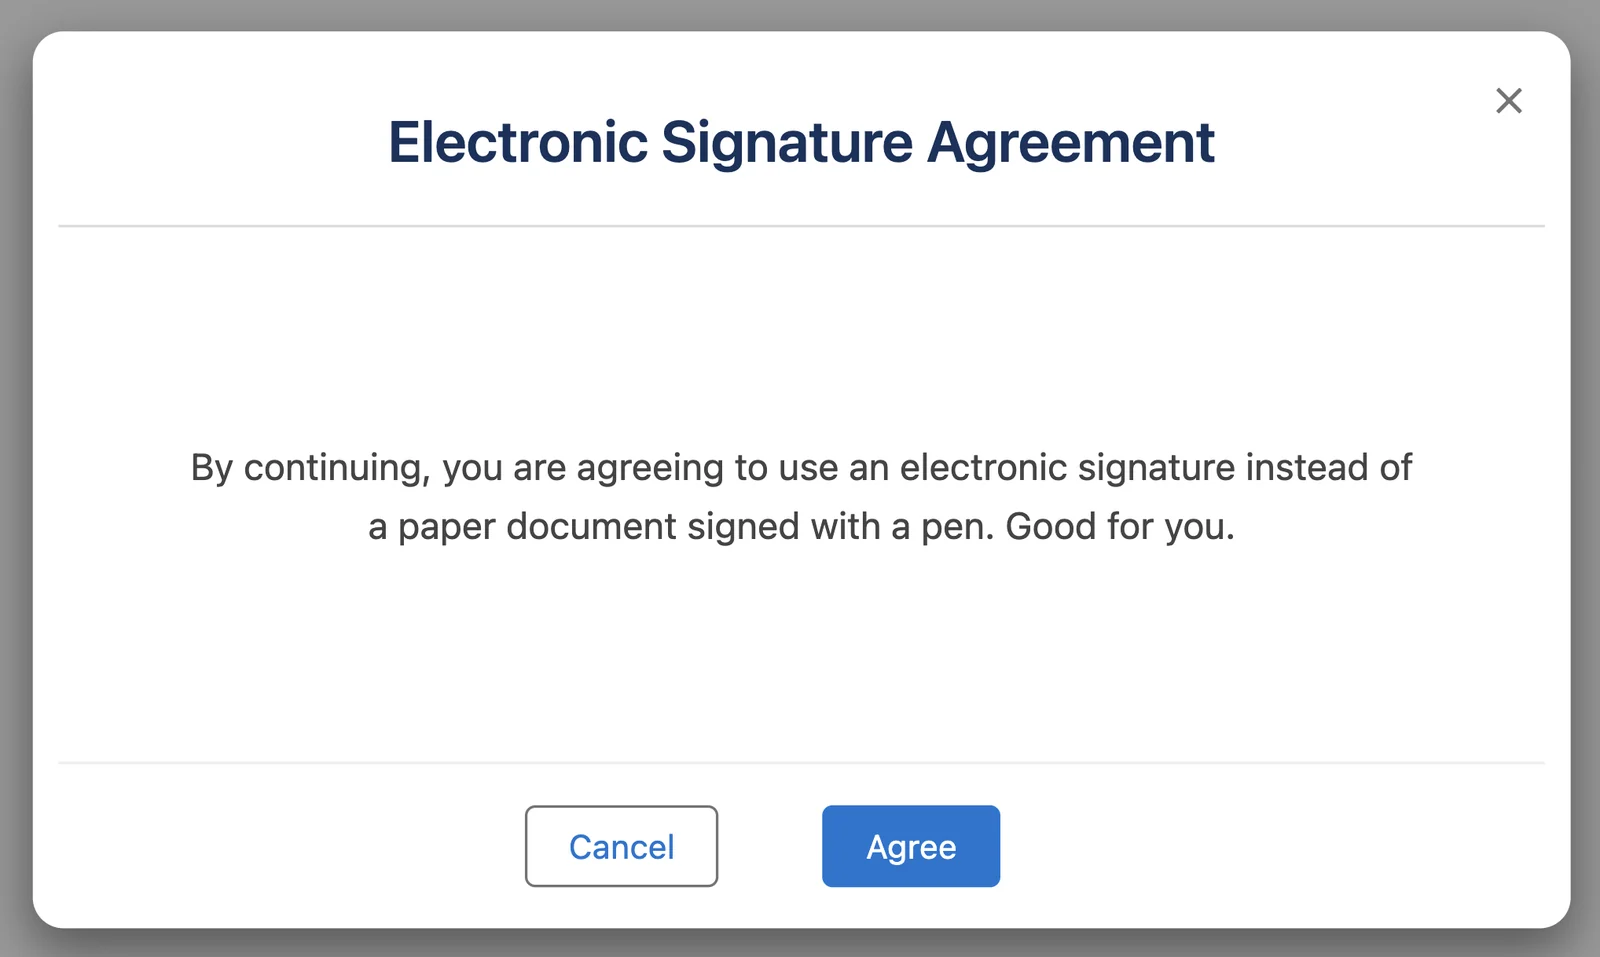
With Require eSignature Agreement on, the window **Electronic Signature Agreement** opens first. Click **Agree**.
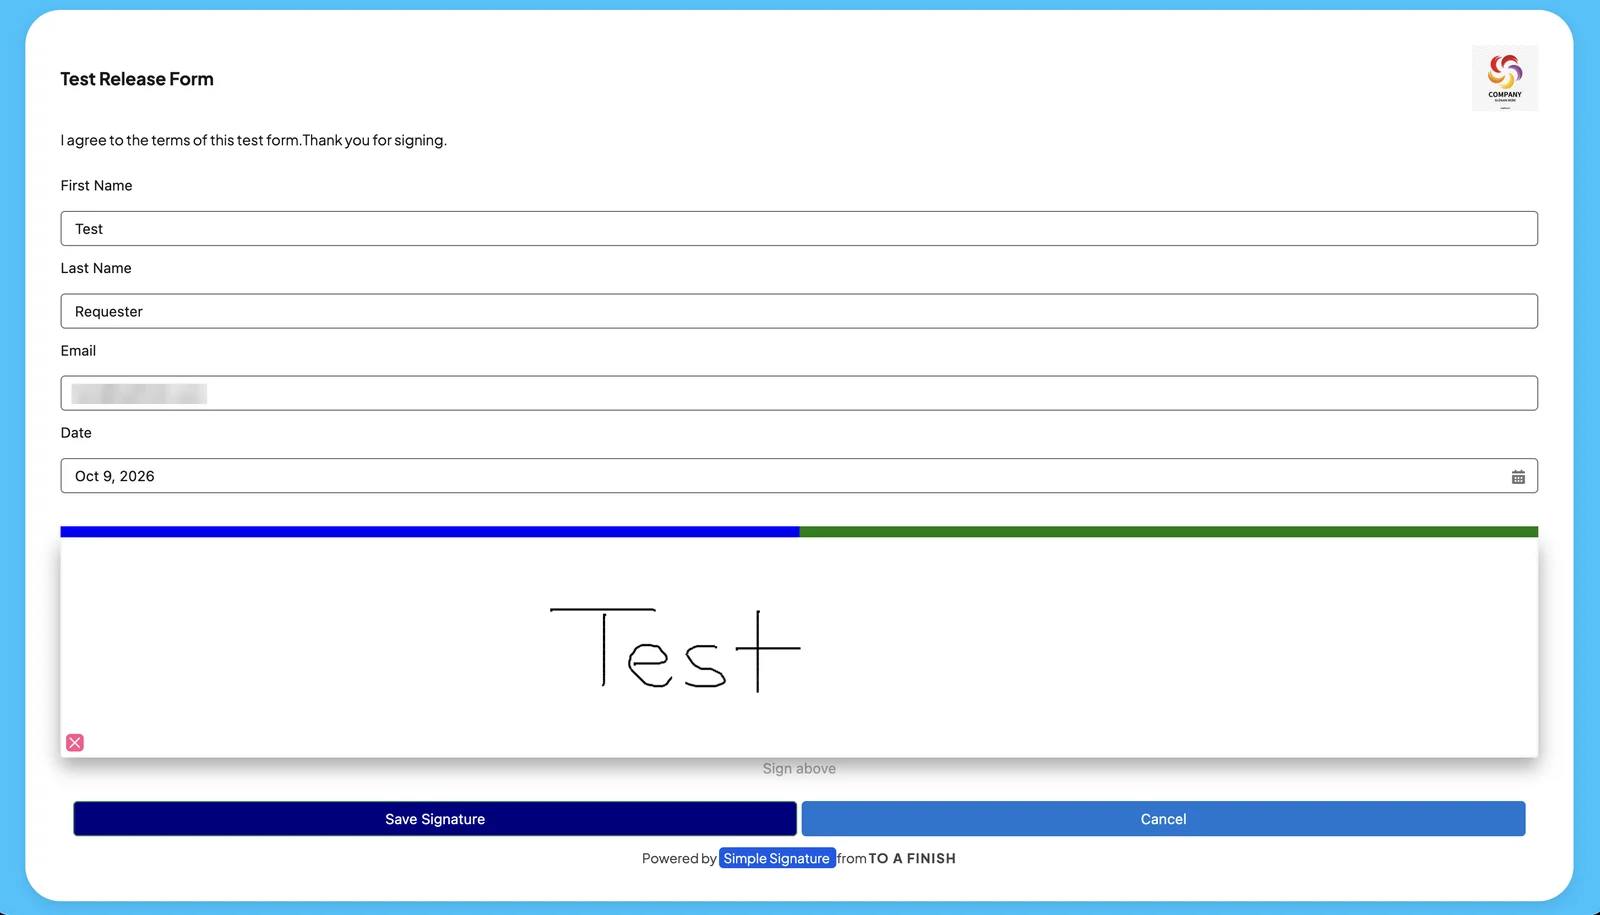
After the save, the page shows **You may close this page.**
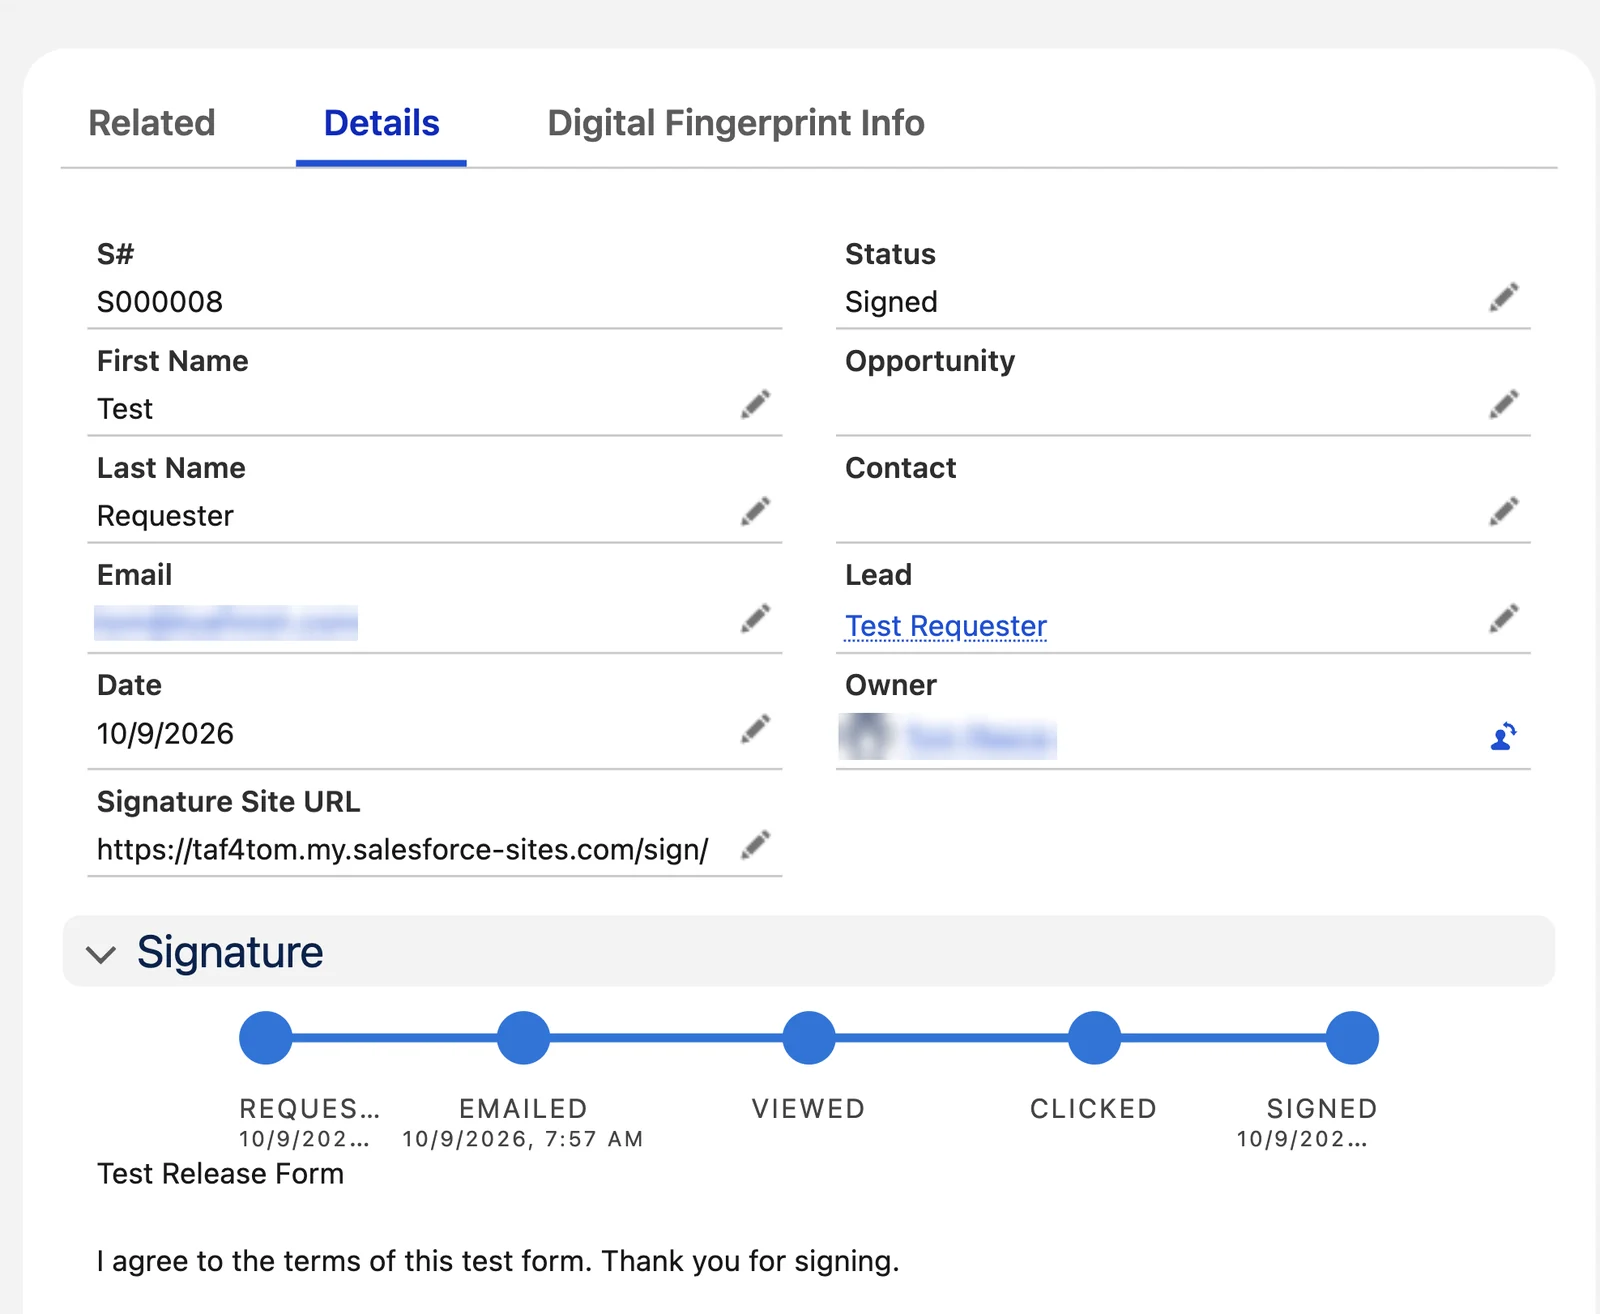
9. **Check the result in Salesforce.**
Open the Signature record. The Status reads **Signed**. The fields **PDF Attached**, **PDF Attached to Parent** and **PDF Emailed** show the time.
The signed PDF sits in Notes & Attachments of the Signature and of the Lead. With Use Files instead of Attachments on, it sits in Files. The signer gets a second email with the signed PDF, with the Subject **Your Signed Form**.
If the dates stay empty, see [The signer signed, but no PDF comes](https://www.toafinish.com/support/guides/simple-signature/#no-signed-pdf).
> **Other ways to send a request**
>
> Any process that makes a ß Signature record with these values sends a request, for example a Flow, Apex code or a data load. A signature experience can also add a request button to the form. See [Request parameters for an experience](https://www.toafinish.com/support/guides/simple-signature/#request-parameters).
## 18. Change the request emails
*Paid version only. These steps do not count in the setup progress.*
Simple Signature sends two emails. Both are Classic email templates of the app.
| Email | Template |
| --- | --- |
| The request, with the Sign Online button | EmailSignature |
| The email with the signed PDF, after the signature | SignatureReturn |
Change their words, so the signer knows who you are and what to sign.
1. **Open Classic Email Templates. Open the folder Simple Signature. Click EmailSignature.**
Open Setup. In the Quick Find box, type **Classic Email Templates**. Click it. The list opens on another folder. In the folder list at the top, pick **Simple Signature**.
An icon with the tip Managed - Installed marks the templates of the app.
2. **Click Edit HTML Version.**
The page says that you may only edit certain attributes of a managed template. The Subject is one of them.
3. **Change the Subject and the text. Click Save.**
Change the words around the button. Do not change the **Sign Online** button. It holds hidden values that open the right Signature.
Leave in place every merge field near the button. They start with `{!Signature__c.`. Simple Signature needs them, for example to record when the signer opens the email.
The request email carries the PDF to sign. Say so in the text.
4. **Go back to Classic Email Templates. Click SignatureReturn.**
5. **Click Edit HTML Version. Change the Subject and the text. Click Save.**
The Subject starts as `Your Signed Form: {!signature__Signature__c.signature__RequestedForm__c}`. The part in braces puts in the Requested Form of the Signature. When that field is empty, the Subject ends after the colon. To fill it, add a predefined value for Requested Form to the action, for example `"Release Form"`.
6. **Send a test request. Check both emails.**
Follow steps 6 to 9 of [Send a signature request](https://www.toafinish.com/support/guides/simple-signature/#request).
> **The Email Templates tab of the Configure page**
>
> The tab lists these templates and others. For EmailSignature and SignatureReturn, Go to Edit opens a page that says you can't edit a template from a managed package. Use Classic Email Templates, as above. In TAF's test, a change to the Signature Request row did not change the request email.
## 19. More request options
*Paid version only. These steps do not count in the setup progress.*
These options serve special cases. Read them, and set up only what your process needs.
### Request settings on the Configuration tab
| Option | What it does |
| --- | --- |
| Run PDF Automation on Save | Makes the PDF when the form is signed. |
| Attach PDF After Signature | Saves the PDF on the Signature record. |
| Attach PDF on Parent Record After signature | Saves the PDF on the parent record of the Signature. |
| Attach PDF on Contact Record If Not Parent | Also saves the PDF on the Contact of the Signature, when the Contact is not the parent. |
| Email PDF to Contact After Signature | Emails the PDF to the signer. |
| Use Files instead of Attachments | Saves the signature pictures and the PDFs in Files, not in Notes & Attachments. Salesforce then shows the files in both lists. |
| Turn Off Emails | Stops all emails, except to the addresses and domains on the Whitelist. When it is off, all emails go, except to the Blacklist. |
| Blacklist and Whitelist Emails/Domains | The addresses or domains for Turn Off Emails. |
| Default Signature Request Send Email (Uses Org-Wide Email) | One address that sends the requests and the signed PDFs. See the next section. |
| CC Record Owner When Emailing Signed PDF | Copies the user who made the request on the email with the signed PDF. |
| CC Record Owner's Role Hierarchy When Emailing Signed PDF | Also copies the manager of that user, the manager's manager, and so on. |
| CC Other Email Address When Emailing Signed PDF | Copies one fixed address. |
| BCC Record Owner's Email to Salesforce When Emailing Signed PDF | Logs the email in the activity history, when the user has Email to Salesforce on. |
| Send Email to Partner, Partner Email Address | Only with TAF support, for orgs where TAF hosts the requests, for example Professional Edition. |
The Attach and Email options are defaults. The fields Attach PDF?, Attach PDF to Parent? and Email PDF? on a Signature record change them for that record.
### The sender of the emails
The request email comes from the user who sends the request. The email with the signed PDF comes from the user who authorized the site. To send both from a known address, use one of these ways.
- Type one address in **Default Signature Request Send Email** on the Configuration tab. The address must be a verified Organization-Wide Email Address.
- Or make a verified Organization-Wide Email Address for each user who sends requests. Both emails then come from that user. For a user with no such address, Simple Signature uses the default address, then the user who authorized the site.
To add an address, open Setup and type **Organization-Wide Addresses** in the Quick Find box. Salesforce sends a verification email to the new address.
If an email comes from an address that ends in `sfcustomeremail.com`, Salesforce could not send it from the user's own address. This happens when your email domain is not set up for email from Salesforce. A verified Organization-Wide Email Address, and the email authentication in the next section, fix it.
### Emails that look like spam
Email programs can mark Salesforce email from your domain as unsafe, with a warning such as Be careful with this message. To stop this, your email admin must let Salesforce send email for your domain. This setup is called email authentication, for example SPF and DKIM. Ask your Salesforce partner, or open a case and TAF points you to help.
### Request parameters for an experience
A signature experience can send requests too. Add these parameters to the experience. See [Build a signature experience](https://www.toafinish.com/support/guides/simple-signature/#experience).
| Parameter | What it does |
| --- | --- |
| `allowrequest` | Adds a button to the form that sends a signature request. Pick In-Person Signature, Signature Request Only, or Signature Request and In-Person Signature. |
| `embedpdf` | Shows the PDF above the form, so the signer can read it before the signature. |
| `generateqrcode` | Makes a QR code for the request and shows it in the window. The signer scans it with a phone to open the signing page. |
| `multistep` | Makes a Step record with the request. See [More than one signer](https://www.toafinish.com/support/guides/simple-signature/#multistep). |
| `emailtemplaterequest` | The Name, not the label, of the email template for the request. |
| `emailtemplatecompletion` | The Name of the email template for the email with the signed PDF. |
| `nosignature` | Lets the signer submit the form with no signature. |
| `rurl` | The page on the site that opens after the signature, for example a thank-you page. |
| `requestedpdfname` | The file name of the signed PDF. It can hold fields, for example `{!Contact.Name}_Release`. |
A form in a Lightning component does not work offline in the Salesforce mobile app. An action does.
### More than one signer
A request can collect signatures from several people, one after the other or at the same time. Each signer gets a Step record, a child of the Signature.
1. **Turn on MultiStep for the request.**
On an action or in a Flow, set the field `signature__MultipleSteps__c` to True. In an experience, tick the parameter `multistep`.
2. **Check the first Step.**
Simple Signature makes the first Step record, with Order 1, when it makes the Signature. Requests with steps use the email template ESignMutliContact, not the regular request template. The name has this typo on screen.
3. **Build a Flow that makes the other Steps.**
Start the Flow when a Step record with Order 1 is made. Make one Step record for each other signer, with these fields.
| Field | Value |
| --- | --- |
| First Name | The first name of the signer. The email can show it. |
| Last Name | The last name of the signer. |
| Email | The address that gets the request. |
| Order | 2, 3, 4 and so on. The order of the requests. |
| Email Template | The unique name of an email template, if you do not use ESignMutliContact. Then also set emailtemplatecompletion in the experience. |
| Status | `Requested` |
| Wait On Prior Step | True sends the request only after the step before it is Signed. False sends it at the same time. |
Save the Flow. Activate it.
4. **Copy the signatures to the Signature record, if the PDF shows them.**
When all Steps are Signed, the Status of the Signature changes to Signed, and Simple Signature makes the PDF. Step 1 copies its date and its signature to the Signature. For the other steps, make your own fields on ß Signature, for example a Rich Text field SignatureImage2\_\_c, a field SignatureDate2\_\_c and a field SignatureName2\_\_c.
Then build a Flow on Step. Start it when the Status of a Step with Order 2 changes to Signed. Copy these values. Do the same for Order 3 and higher.
| Signature field | Value from the Step |
| --- | --- |
| SignatureImage2\_\_c | `signature__SignatureImage__c` |
| SignatureDate2\_\_c | `signature__Signed__c` |
| SignatureName2\_\_c | `signature__Firstname__c`, a space and `signature__LastName__c` |
A developer can also read the signatures from the Steps in Apex code for a Visualforce PDF.
### Check who signed
People question electronic signatures more often than paper ones. These fields help you check that the right person signed. They cannot prove it.
| Field | What it does |
| --- | --- |
| Signature MFA | A code that the signer must type before the form shows. Fill it in with a Flow or a trigger. Give the code to the signer another way, for example by phone. |
| Expiration Date | A date in the future. After it, the request is no longer valid. |
| Digital Fingerprint | A 32-character value for the device of the signer, saved at the signature. Two signatures with the same value came from the same device. The component fingerPrintInformation shows the details on a Signature page. |
| Actual Signed IP, Actual Signed IP Info | The IP address of the signer, and its location when Simple Signature can find it. |
| Actual Signed Location | The latitude and longitude of the signer, when the device gives them. |
These formulas make the values easier to read. Make each one as a Text formula field on ß Signature.
**A link to the details of the IP address**
```
if ( not ( isblank ( signature__IPWhenSigned__c ) ), signature__IPWhenSigned__c & " " &
HYPERLINK("https://ipapi.co/"+signature__IPWhenSigned__c+"/json/", "info","_blank"), "" )
```
**A link to a map of the location**
```
if ( not ( isblank ( signature__ActualSignedLocation__Latitude__s ) ),
text( signature__ActualSignedLocation__Latitude__s )+" "+text(
signature__ActualSignedLocation__Longitude__s ) + " " +
HYPERLINK("http://www.google.com/maps/place/"+text(
signature__ActualSignedLocation__Latitude__s )+","+text(
signature__ActualSignedLocation__Longitude__s ), "map","_blank"), "" )
```
**The time from the request email to the signature**
```
if( if( isblank ( signature__ActualSignedTimestamp__c ), Now(),
signature__ActualSignedTimestamp__c ) - if ( isblank ( signature__Emailed__c ),
CreatedDate, signature__Emailed__c ) > 0 , "D:"
& TEXT( FLOOR( if ( isblank ( signature__ActualSignedTimestamp__c ), Now(),
signature__ActualSignedTimestamp__c ) - if ( isblank ( signature__Emailed__c ),
CreatedDate, signature__Emailed__c ) ) ) & " H:"
& RIGHT( "0" & TEXT( FLOOR( MOD( ( if ( isblank ( signature__ActualSignedTimestamp__c ),
Now(), signature__ActualSignedTimestamp__c ) - if ( isblank ( signature__Emailed__c ),
CreatedDate, signature__Emailed__c ) ) * 24, 24 ) ) ),2) & " M:"
& RIGHT( "0" & TEXT( ROUND( MOD( ( if ( isblank ( signature__ActualSignedTimestamp__c ),
Now(), signature__ActualSignedTimestamp__c ) - if ( isblank ( signature__Emailed__c ),
CreatedDate, signature__Emailed__c ) ) * 24 * 60, 60 ), 0 ) ),2), "")
```
The last formula shows days, hours and minutes, for example `D:0 H:02 M:15`. A blank or strange value needs a check. You can change it to count only days or hours, and then set a limit on the time to sign.
### Hide the record ID in the link
The request link holds the ID of the Signature record. A signer who changes the ID could open another request, if the site shares too much. To hide the ID, Simple Signature can put a random 32-character path in the link.
1. **Copy the body of your request email.**
On the Email Templates tab, click **View** beside the request template you use, EmailSignature at first. Select the whole body, with the button. Copy it. Close the window.
2. **Click New. Fill in the template. Paste the body. Click Save.**
Fill in Label, Name and Subject. Description is optional. Tick **Active**. Keep the **Name** for step 5. Expand **HTML Body**. Paste the body. Click **Save**.
3. **Change the link in the code of the new template.**
Click **Edit** beside the new template. Expand HTML Body. Click the code button ``. Find the two links of the button, `data-cke-saved-href` and `href`. Replace the value inside the quote marks of both with this text. Remove any fixed web address in front of it.
```
{!signature__Signature__c.signature__SiteURL__c}/{!signature__Signature__c.signature__Signature_Path__c}
```
Click **Save**.
4. **Check that the site uses signatureURLRewriter.**
You set it in [step 2 of Set up the signature site](https://www.toafinish.com/support/guides/simple-signature/#site-2).
5. **Make the request use the new template.**
Open the Request Signature action. Under Predefined Field Values, click **New**. Pick **Email Template (Request)**. Type the Name of the new template in quote marks, for example `"Secure_Request"`. Click **Save**.
For an experience, use the parameter `emailtemplaterequest`.
6. **Send a test request.**
The link in the email now ends with a random path, not with `?id=` and the record ID.
### Countersignature
A user can save a signature once. Simple Signature then adds it to the PDF after the signer signs, as a countersignature.
1. **Make a Files library named Simple Signature.**
In the App Launcher, type **Files**. Click **Files**. Click **Libraries**. If no library named Simple Signature exists, click **New Library**. Type `Simple Signature`. Click **Save**.
2. **Add the users who countersign to the library.**
Open the library. Click **Manage Members**. Add the users. For many users, add a public group.
3. **Each user saves a signature on the User Signature page.**
In the App Launcher, the user types **User Signature**, opens it and signs.
4. **Add the countersignature to the PDF template.**
In a Google Docs template, use the merge code `<ß>User.LibrarySignature-300`. See [Merge codes for Google Docs](https://www.toafinish.com/support/guides/simple-signature/#merge-codes).
Experience Cloud users need the permission Access Libraries for User Signature. It is off at first.
### Your own signing page
The standard page SiteSignature serves most orgs. To change more than a few fields, a developer can start from a copy of it.
- Open Setup. In the Quick Find box, type **Visualforce Pages**. Click **New**. Type a Label and a Name. Delete the code in the page.
- Copy the code of Custom\_SiteSignature from the pages folder of the [sample code on GitHub](https://github.com/ToAFinish/simplesignature), from `
`. Paste it. Click **Save**.
- In the list of Visualforce pages, click **Security** beside the new page. Give access to the profiles that use Simple Signature. Click **Save**.
- Edit your signature site. In **Active Site Home Page**, pick the new page. Click **Save**.
TAF can write the page for you at its hourly rate. Open a case.
## 20. Check two Salesforce settings for PDF documents
*Paid version only. These steps do not count in the setup progress.*
PDF documents need two Salesforce settings. Each one changes the whole org. Ask the admin who looks after security settings before you change them.
1. **Untick Adopt updated CSP directives.**
Open Setup. In the Quick Find box, type **Session Settings**. Click **Session Settings**. Untick **Adopt updated CSP directives**. Click **Save**.
Reload the page. Check that the box stays unticked. If it is ticked again, untick it and save again.
With it ticked, some browsers cannot edit or preview Google Docs templates inside Salesforce.
2. **Set .pdf files to Execute in Browser.**
Open Setup. In the Quick Find box, type **File Upload and Download Security**. Click it. Click **Edit**. In the row for **.pdf**, set the download behavior to **Execute in Browser**. Click **Save**.
The signing page can then show the PDF to sign. With another value, the browser downloads the PDF.
## 21. Make a PDF template in Google Docs
*Paid version only. These steps do not count in the setup progress.*
A Google Docs template is a Google document with merge codes in it. Simple Signature fills in the Salesforce data and the signature, and saves the result as a PDF. TAF advises Google Docs for most orgs. A free Google account works too.
> **Use a standard Salesforce user**
>
> A user with a Salesforce Platform license cannot connect Simple Signature to Google.
1. **Switch to Salesforce Classic. Open the Configure page.**
Click your profile picture at the top right. Click **Switch to Salesforce Classic**. Click **Setup**. In the Quick Find box, type **Installed Packages**. Click **Configure** beside ß Simple Signature.
The Google connection works only in Classic, the same as the site authorization.
2. **Click the Google Docs Configuration tab. Add the remote sites, if the tab asks for them.**
If a message lists remote sites, add each one in Remote Site Settings, the same way as [step 5 of Connect the site](https://www.toafinish.com/support/guides/simple-signature/#connect-5).
3. **Open Google APP. Check the setting.**
Under **Template Configuration**, click **Google APP** to open it. **Native** is ticked and **Web Configuration** is not. This is the setting at first. Change nothing.
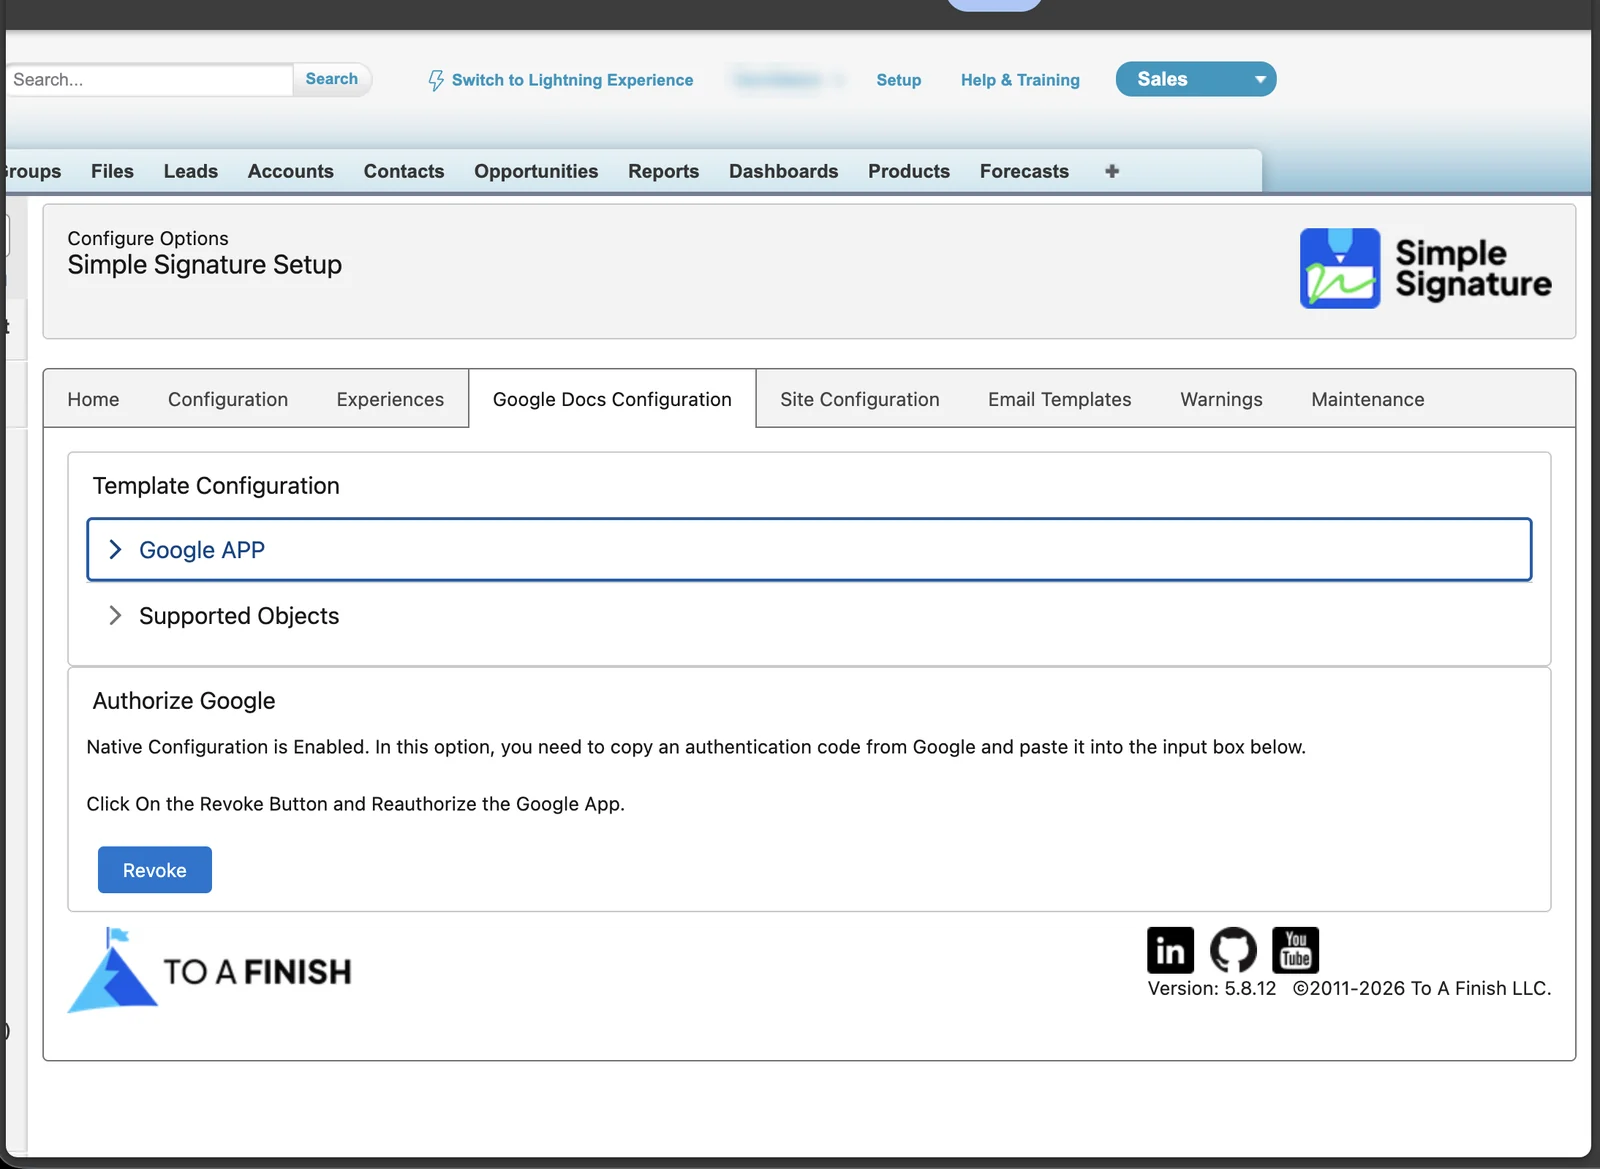
4. **Click Authenticate. Sign in to Google. Paste the code. Click Submit.**
Under **Authorize Google**, click **Authenticate**. Sign in to the Google account that keeps your templates. Accept the permissions. Google then shows a code. Copy it.
Back in Salesforce, paste the code into **Authorization Code**. Click **Submit**.
The section then shows a **Revoke** button. The connection works. Do not click Revoke now. Click it only to connect again, for example in a sandbox. See [step 8 of Set up a sandbox made from production](https://www.toafinish.com/support/guides/simple-signature/#sbx-8).
5. **Switch back to Lightning Experience. Open ß Templates. Click New.**
In the App Launcher, type `Templates`. Click **ß Templates**.
6. **Pick Google Docs. Click Next. Pick Create New Template. Click Next.**
The two screens are **Document Platform** and **Choose Template**.
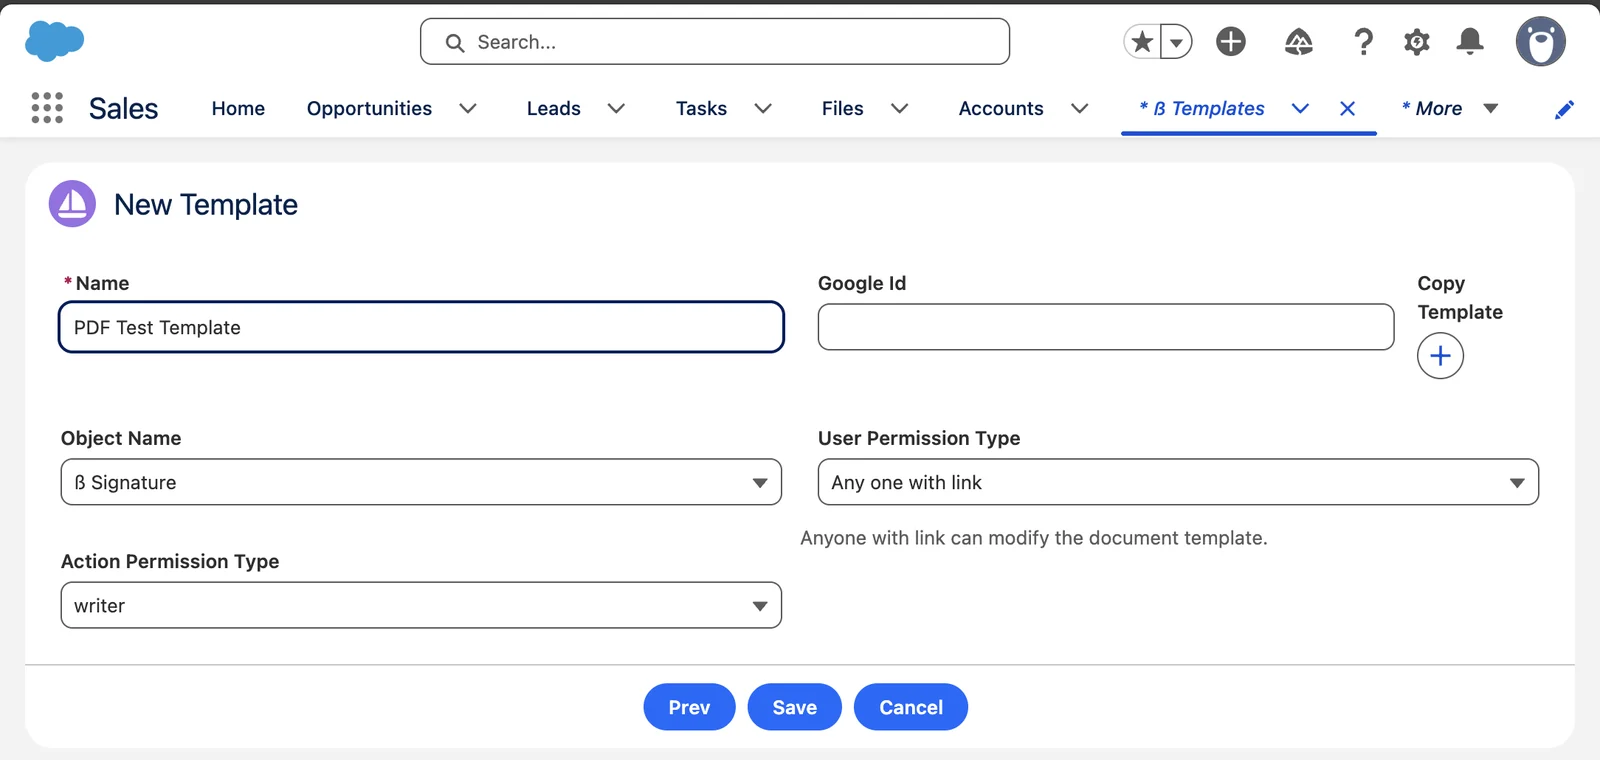
7. **Fill in the template as below. Then click Save.**
| Field | Value |
| --- | --- |
| Name | Any name. Simple Signature does not use it in code. |
| Google Id | Leave it empty. To start from a Google document you have, paste its ID from its web address. |
| Copy Template | A **+** button. Leave it as it is. Use it only with a Google Id. |
| Object Name | Pick **ß Signature**. For a document that nobody signs, pick another object. |
| User Permission Type | Pick **Any one with link**. Other Salesforce users can then use the template. |
| Action Permission Type | Pick **writer**. Other Salesforce users can then edit it. Pick another value to keep the editing to yourself. |
8. **Click Edit Google Doc. Write the document.**
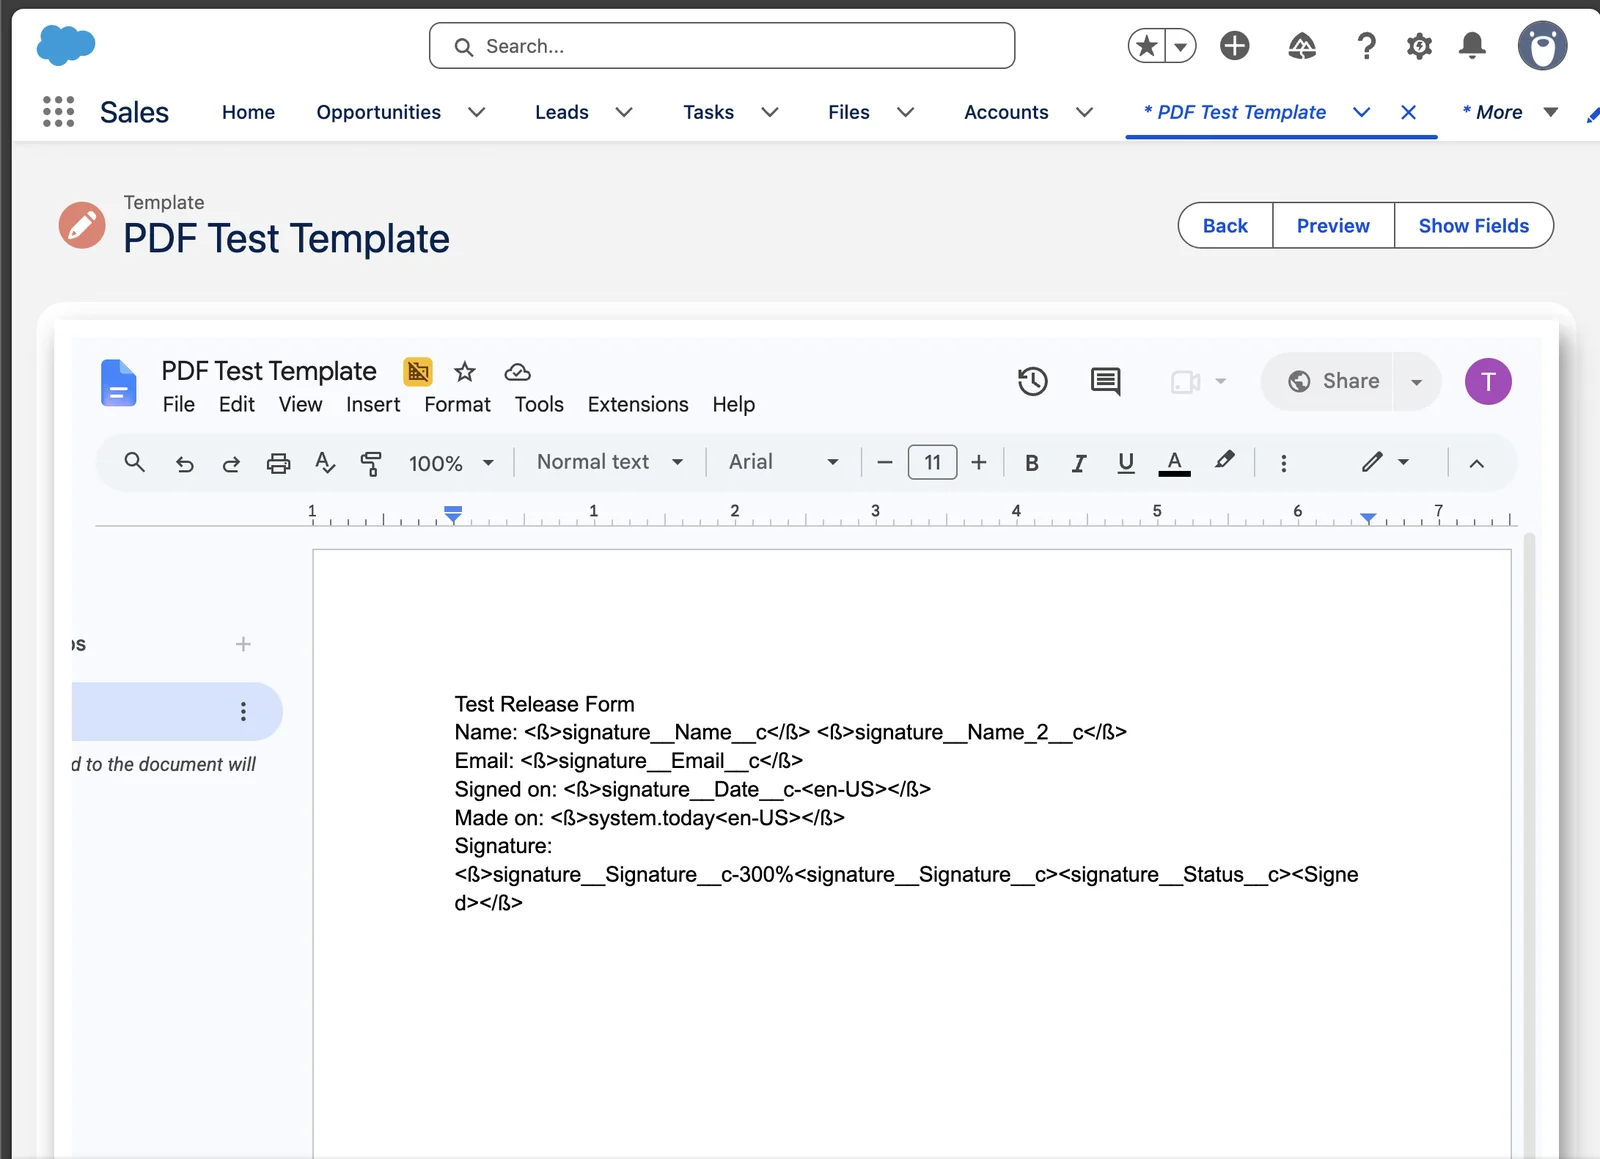
Google Docs opens inside the Salesforce page. Write the text, and add tables and pictures as you need.
Simple Signature cannot merge a Microsoft Word file. To use one, open it in Google Docs. Click **File**, then **Save as Google Docs**.
9. **Add Salesforce data with merge codes.**
Click **Show Fields**. Browse to a field or a related list. Copy its merge code. Paste it into the document. Other buttons add the signature image and a time stamp of the merge.
Show Fields keeps your last search. Clear the search box before you look for the next field. If a window is wider than the screen, zoom the browser out to reach its buttons.
See [Merge codes for Google Docs](https://www.toafinish.com/support/guides/simple-signature/#merge-codes) below.
10. **Copy the ID of the template. Add it to your request.**
Click **Back**. Copy the ID of the template from the address bar of the browser. It has 18 characters, for example `a0Qhm000001oVZVEA2`.
For an experience, add the parameter `templates` with the ID as its value. For the Request Signature action, add a predefined value for **Templates**. Type the ID in quote marks. See [step 4 of Send a signature request](https://www.toafinish.com/support/guides/simple-signature/#req-4).
Pick Templates in the Field Name list with the mouse. The Enter key there saves the form, with an error.
Several templates can go in one value, with commas between their IDs.
11. **Send a test request. Open the signed PDF.**
Follow steps 6 to 9 of [Send a signature request](https://www.toafinish.com/support/guides/simple-signature/#request). The request email carries the PDF to sign.
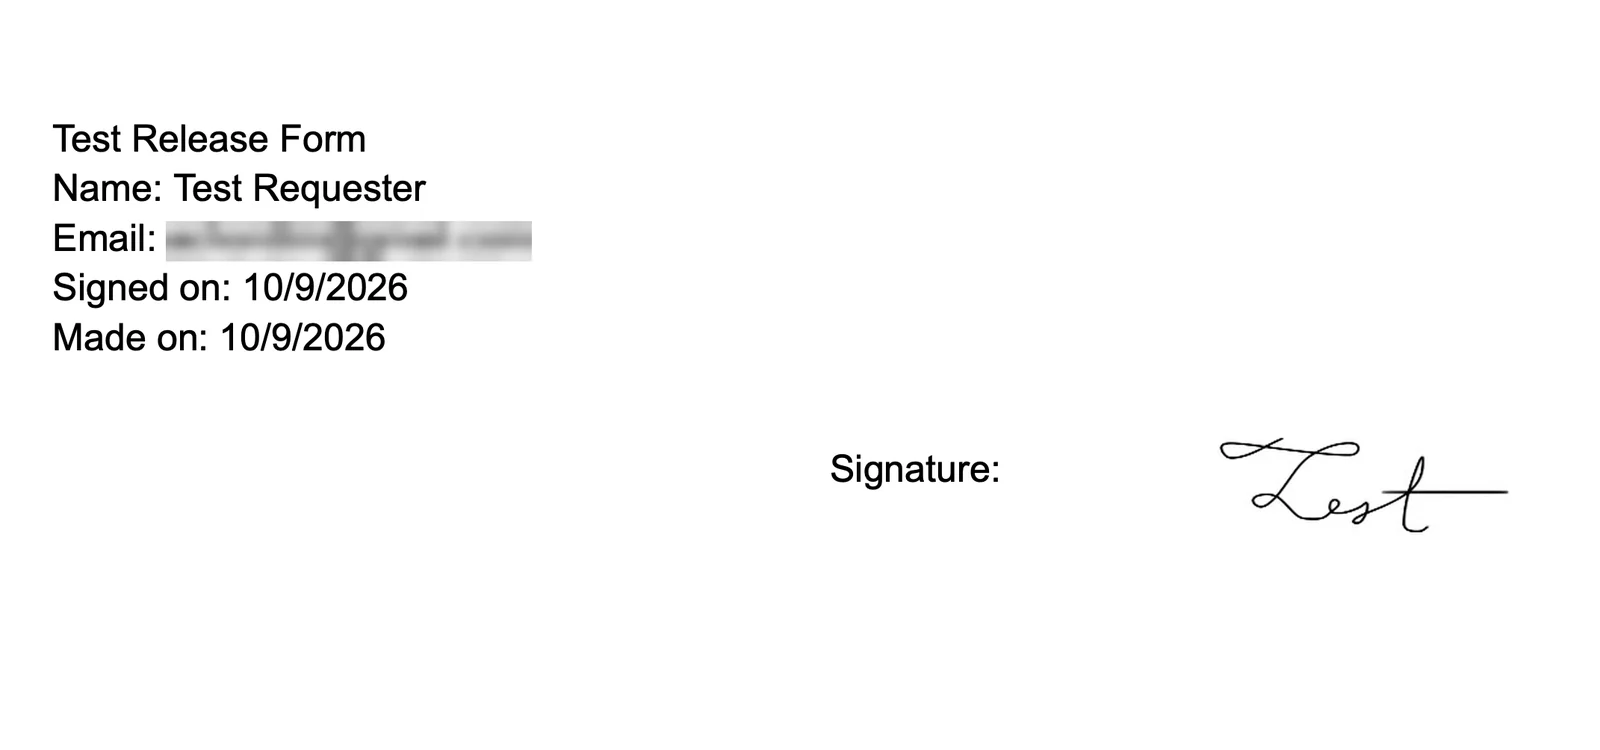
After the signature, open the signed PDF in Notes & Attachments of the Signature or of the Lead. It has the Name of the template. It shows your data and the signature.
### Merge codes for Google Docs
Start with a merge code from Show Fields. Then add options and filters as below. A merge code starts with `<ß>` and ends with ``.
| What it shows | Merge code |
| --- | --- |
| The first name of the signer | `<ß>signature__Name__c` |
| The last name of the signer | `<ß>signature__Name_2__c` |
| The email of the signer | `<ß>signature__Email__c` |
| The signature image, 300 pixels wide | `<ß>signature__Signature__c-300` |
| The signature image, only when the Status is Signed | `<ß>signature__Signature__c-300%` |
| The countersignature of the user | `<ß>User.LibrarySignature-300` |
| The countersignature, only when the Status is Signed | `<ß>User.LibrarySignature-300%` |
| A signature from a Rich Text field on the user | `<ß>User.User_Signature__c-300%` |
| The signature date, United States format | `<ß>signature__Date__c-` |
| The signature date, India format | `<ß>signature__Date__c-` |
| 5 days after today, United States format | `<ß>system.today` |
| 5 days before today, India format | `<ß>system.today` |
| 6 days after now, with the time, United States format | `<ß>system.now` |
| The signature date, only when the First Name is Testing | `<ß>signature__Date__c-%` |
A filter follows the `%` sign: the object, the field and the value, each in angle brackets.
### Dates, numbers and money
Show Fields adds format tags to date, money, number and location fields: `-`. With more than one tag, put the format tags first, then the filter tags, then the sort tags. Only the first tag starts with a dash. For example:
`<ß>signature__Opportunity__r.OpportunityLineItems.TotalPrice-<#FIL-DEC-3600><#SORT-UP>`
To show all the decimals of a number, put a format just before ``, for example:
`<ß>signature__ActualSignedLocation__Latitude__s-#0.00000000#`
### Lists of related records
A template can list child records, for example the products of an Opportunity. Show Fields offers two ways. The related list itself gives a table with no format and no filter. TAF does not advise it. Use the second way:
- In Show Fields, click the object name with the **>** sign, for example **Opportunity >**. The list shows the merge codes of its fields.
- In Google Docs, click **Insert**, then **Table**. Make a table two rows high, with a column for each field.
- Type the column titles in the first row. Paste a merge code into each cell of the second row.
To sort the table, add a sort tag at the end of one cell, once per table: `-<#SORT-UP>` or `-<#SORT-DOWN>`. The dash goes in only when it is the first tag in the cell.
To filter the table, add a filter tag at the end of one cell: `-<#FIL-TYPE-OPERATOR-VALUE>`. TYPE is DEC for decimal numbers, INT for whole numbers, BOL for checkboxes, STR for text, DT for dates or DTT for date and time. VALUE is optional. Without it, the filter compares with a blank value. For dates, TODAY and YESTERDAY also work.
| Operator | Meaning | Works with | Example |
| --- | --- | --- | --- |
| EQ | equal | checkbox, text, date, number | `<#FIL-STR-EQ-Sample>` |
| NEQ | not equal | checkbox, text, date, number | `<#FIL-STR-NEQ-Sample>` |
| GR | greater than | text, date, number | `<#FIL-DEC-GR-100>` |
| LS | less than | text, date, number | `<#FIL-DEC-LS-100>` |
| GREQ | greater than or equal | text, date, number | `<#FIL-DEC-GREQ-100>` |
| LSEQ | less than or equal | text, date, number | `<#FIL-DEC-LSEQ-100>` |
| STWH | starts with | text | `<#FIL-STR-STWH-Sample>` |
| ENWH | ends with | text | `<#FIL-STR-ENWH-Sample>` |
| CTNS | contains | text | `<#FIL-STR-CTNS-Sample>` |
### Sections that show or hide
A checkbox field can show or hide a part of the document. Put a start tag before the part, with the checkbox field. When the field is True, the part shows. Put an end tag after the part.
`<ß>CONDITIONSTART`
`<ß>CONDITIONEND`
### Document parameters for an experience
Add these parameters to a signature experience. See [Build a signature experience](https://www.toafinish.com/support/guides/simple-signature/#experience).
| Parameter | What it does |
| --- | --- |
| `templates` | The ID of one or more templates, with commas between them. Simple Signature makes the PDF from them, before and after the signature. |
| `pdftemplate` | The name of a Visualforce PDF page, with `c__` in front. |
| `attachpdf` | Saves the PDF on the Signature record. |
| `attachpdftoparent` | Saves the PDF on the parent record. |
| `emailpdf` | Emails the PDF to the Contact of the Signature. |
| `embedpdf` | Shows the PDF above the form, so the signer can read it first. |
| `requestedpdfname` | The file name of the PDF. It can hold fields, for example `{!Contact.Name}_Release`. |
| `requestedpdfnamepreview` | Also names the preview PDF in the request email, with \_Preview at the end. Google Docs only. |
| `deletesigantureafter` | Deletes the picture of the signature after Simple Signature makes the PDF. The parameter name has this typo. |
## 22. Make a PDF page in Visualforce
*Paid version only. These steps do not count in the setup progress.*
Use a Visualforce page if you do not use Google Docs. Most Visualforce pages need a developer, because each design is different. TAF builds pages at its hourly rate. Email [sales@toafinish.com](mailto:sales@toafinish.com).
The pages folder of the [sample code on GitHub](https://github.com/ToAFinish/simplesignature) holds these pages to start from, among others. Their file names end in .html, but they hold Visualforce code.
| Page | What it is |
| --- | --- |
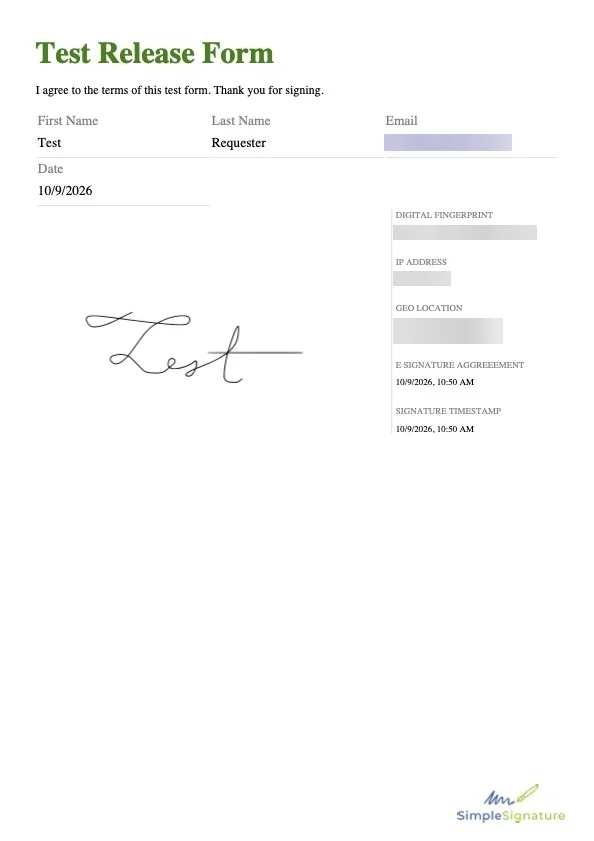
| SamplePDF\_v2 | A copy of the standard PDF page of Simple Signature, BasicSignaturePDF. Change the logo and the layout as you need. |
| SampleAgreementPDF | A simple PDF laid out like a legal document, for example a non-disclosure agreement. |
| SampleOpportunityPDF | A quote from an Opportunity, with its product lines. It needs an Apex controller. See below. |
| SampleOpportunityPDF\_noController | The same quote, with no controller. |
| SampleQuotePDF | A quote from a Quote, with its lines. It needs an Apex controller. See below. |
| CustomEmbeddedSignature | Not a PDF. A page for the Signature page layout, in place of the standard one. |
| CustomSignature\_hardcoded | Not a PDF. A signing page for in-person signatures inside Salesforce. |
| Custom\_SiteSignature | Not a PDF. A signing page for requests on the site. See [Your own signing page](https://www.toafinish.com/support/guides/simple-signature/#custom-site-page). |
1. **Open Visualforce Pages. Click New.**
Open Setup. In the Quick Find box, type **Visualforce Pages**. Click **Visualforce Pages**. If you see no New button, ask your admin for the right to make pages.
2. **Type a Label and a Name. Delete the code in the page.**
For example, Label `Signature PDF` and Name `Signature_PDF`. The Name can fill in by itself, with spaces. A Name takes no spaces, so type an underscore in place of each one.
3. **Paste the code of a sample page. Click Save.**
On GitHub, open the page in the pages folder, for example SamplePDF\_v2. Click **Raw** to see the code without the line numbers. Copy all the code, from ``. Paste it into **Visualforce Markup**.
4. **Give the profiles access to the page.**
In the list of Visualforce pages, click **Security** beside the new page. Add all the profiles, or at least the profiles of the users who work with Simple Signature. Click **Save**.
5. **Make Simple Signature use the page.**
Use the page name with `c__` in front, for example `c__Signature_PDF`. Without `c__`, Simple Signature cannot find the page.
| For | Where to put it |
| --- | --- |
| All signatures | Template VisualForce Page for PDF on the Configuration tab. See [step 4 of Connect the site](https://www.toafinish.com/support/guides/simple-signature/#connect-4). |
| One experience | The parameter `pdftemplate`. See [Document parameters for an experience](https://www.toafinish.com/support/guides/simple-signature/#document-parameters). |
| One request action | A predefined value for **PDF Template**, in quote marks. |
6. **Send a test request. Open the signed PDF.**
Follow steps 6 to 9 of [Send a signature request](https://www.toafinish.com/support/guides/simple-signature/#request). The signed PDF in Notes & Attachments of the Signature now uses your page.
If no signed PDF comes, see [The signer signed, but no PDF comes](https://www.toafinish.com/support/guides/simple-signature/#no-signed-pdf).
### The Opportunity and Quote samples
These two samples need an Apex class, so make them in a sandbox and deploy them to production. Production does not let you write Apex directly.
- Open Setup. In the Quick Find box, type **Static Resources**. Click **New**. Name it `sampleinvoice`. Pick the file SampleInvoice.zip from the resources folder on GitHub. Set Cache Control to **Public**. Click **Save**.
- Open **Apex Classes**. Click **New**. Paste the code of SampleOpportunityPDFController or SampleQuotePDFController from the classes folder on GitHub. Click **Save**.
- Make one more class with the matching test class from the same folder. Salesforce needs it for the deploy to production.
- Make the page as in steps 1 to 5 above, with the code of SampleOpportunityPDF or SampleQuotePDF.
### Other document apps
Simple Signature can also work with a document app such as Salesforce CPQ, S-Docs, Conga Composer or Nintex DocGen. This way needs a lot of technical work, so TAF advises Google Docs. Open a case if you need help.
If the app reads values from one object only, copy the signature to that object:
- On that object, make a Rich Text Area field `SignatureImage__c` and a checkbox field `Signed__c`.
- On ß Signature, make a lookup field to that object, if none exists.
- Build a Flow on ß Signature. When the Status changes to Signed, copy the Signature field, and the Date field if you need it, to the object.
- Put the new image field into the template of your document app.
A person who knows your document app then does the rest:
- Build a trigger that makes a Signature request from each new document. Start from CreateSignatureOnAttachments or CreateSignatureOnFile in the triggers folder on GitHub. Both expect a parent object named Quote\_\_c. Change it to yours.
- When the Signature is Signed, make the document again, with a Flow or a trigger. The new document holds the signature.
## 23. Show the PDF in a Flow before the signature
*Paid version only. These steps do not count in the setup progress.*
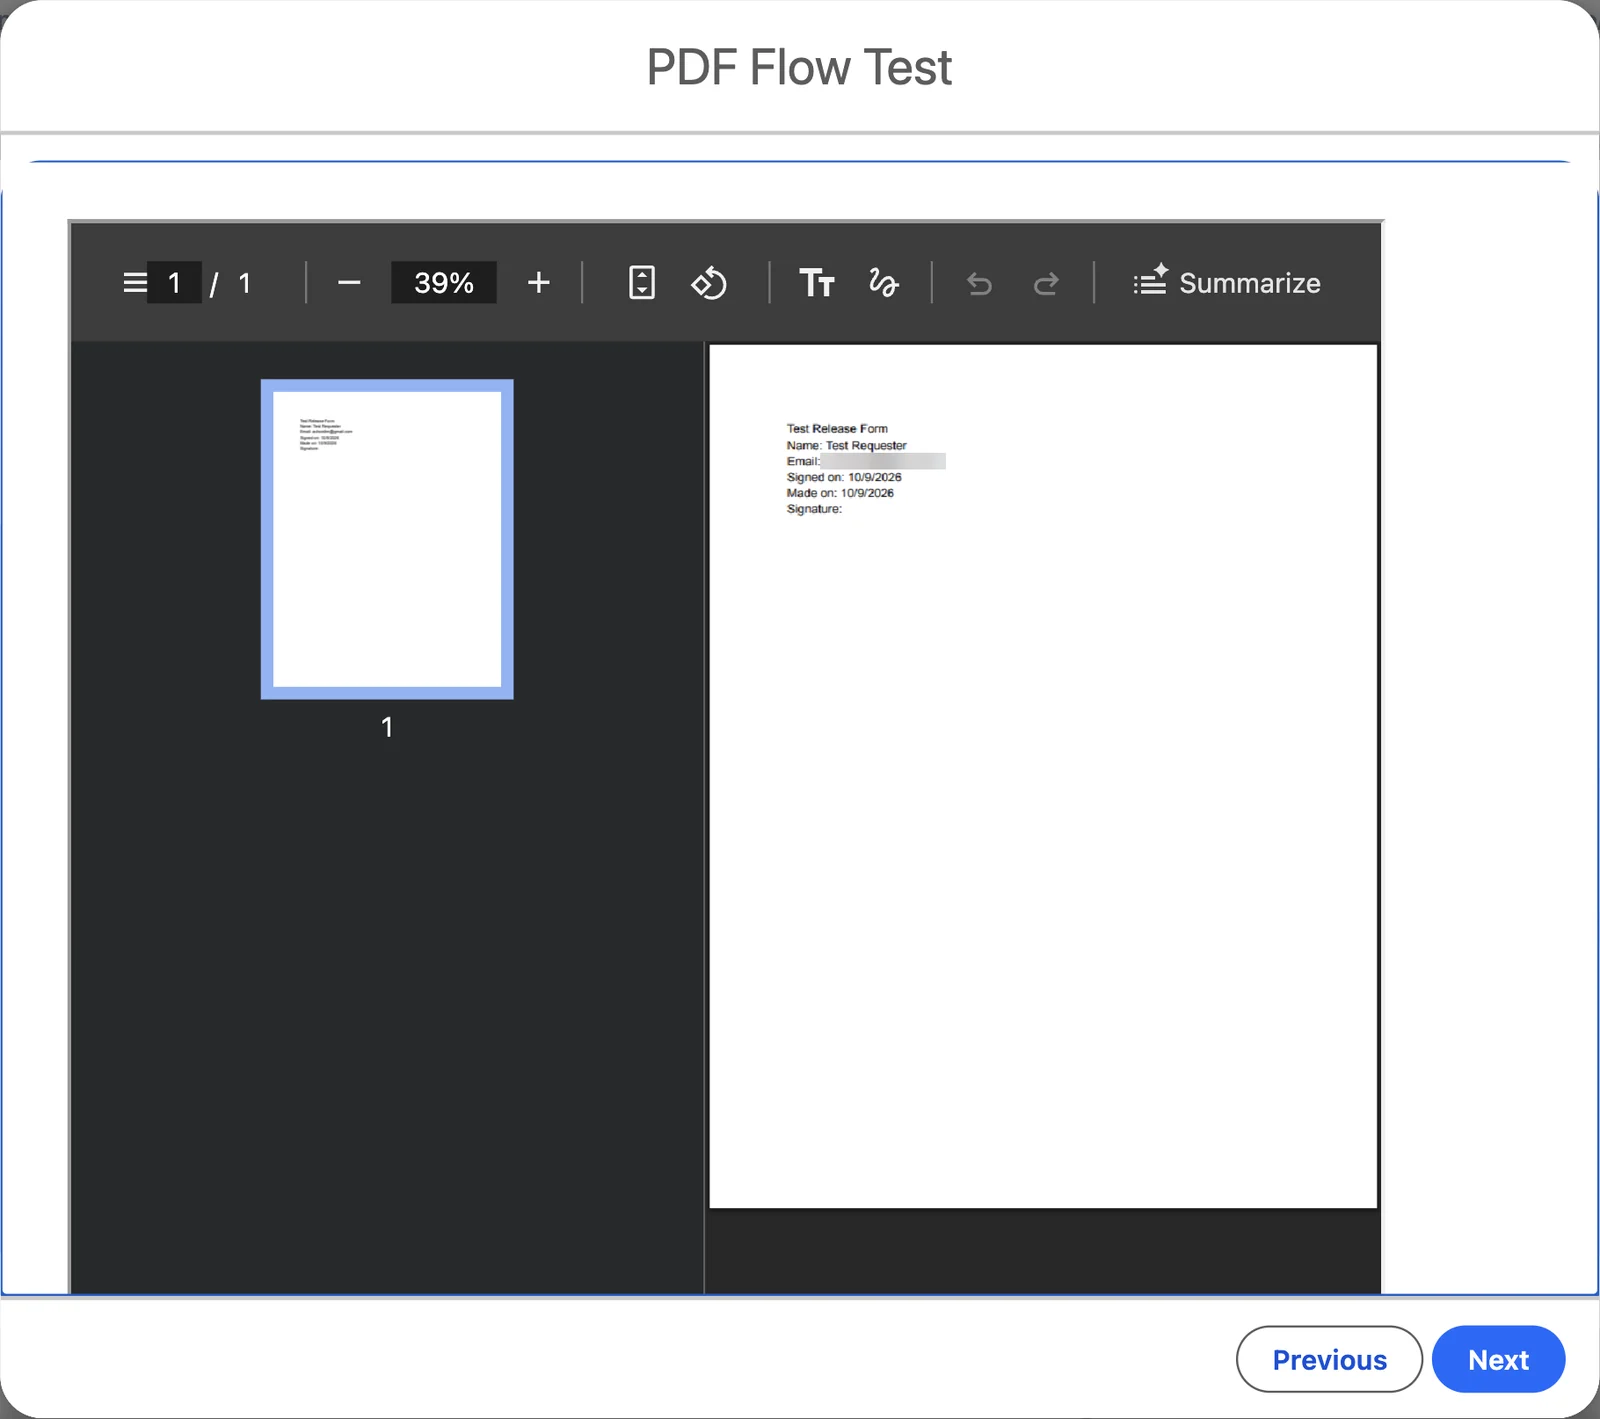
This screen Flow makes the Signature first. It waits for the PDF from a Google Docs template and shows it. Then it shows the form. The example starts from a Lead.
> **Before you start**
>
> Make a Google Docs template. Then add the parameter `templates` with its ID to the experience that this Flow uses. See [Make a PDF template in Google Docs](https://www.toafinish.com/support/guides/simple-signature/#google-docs).
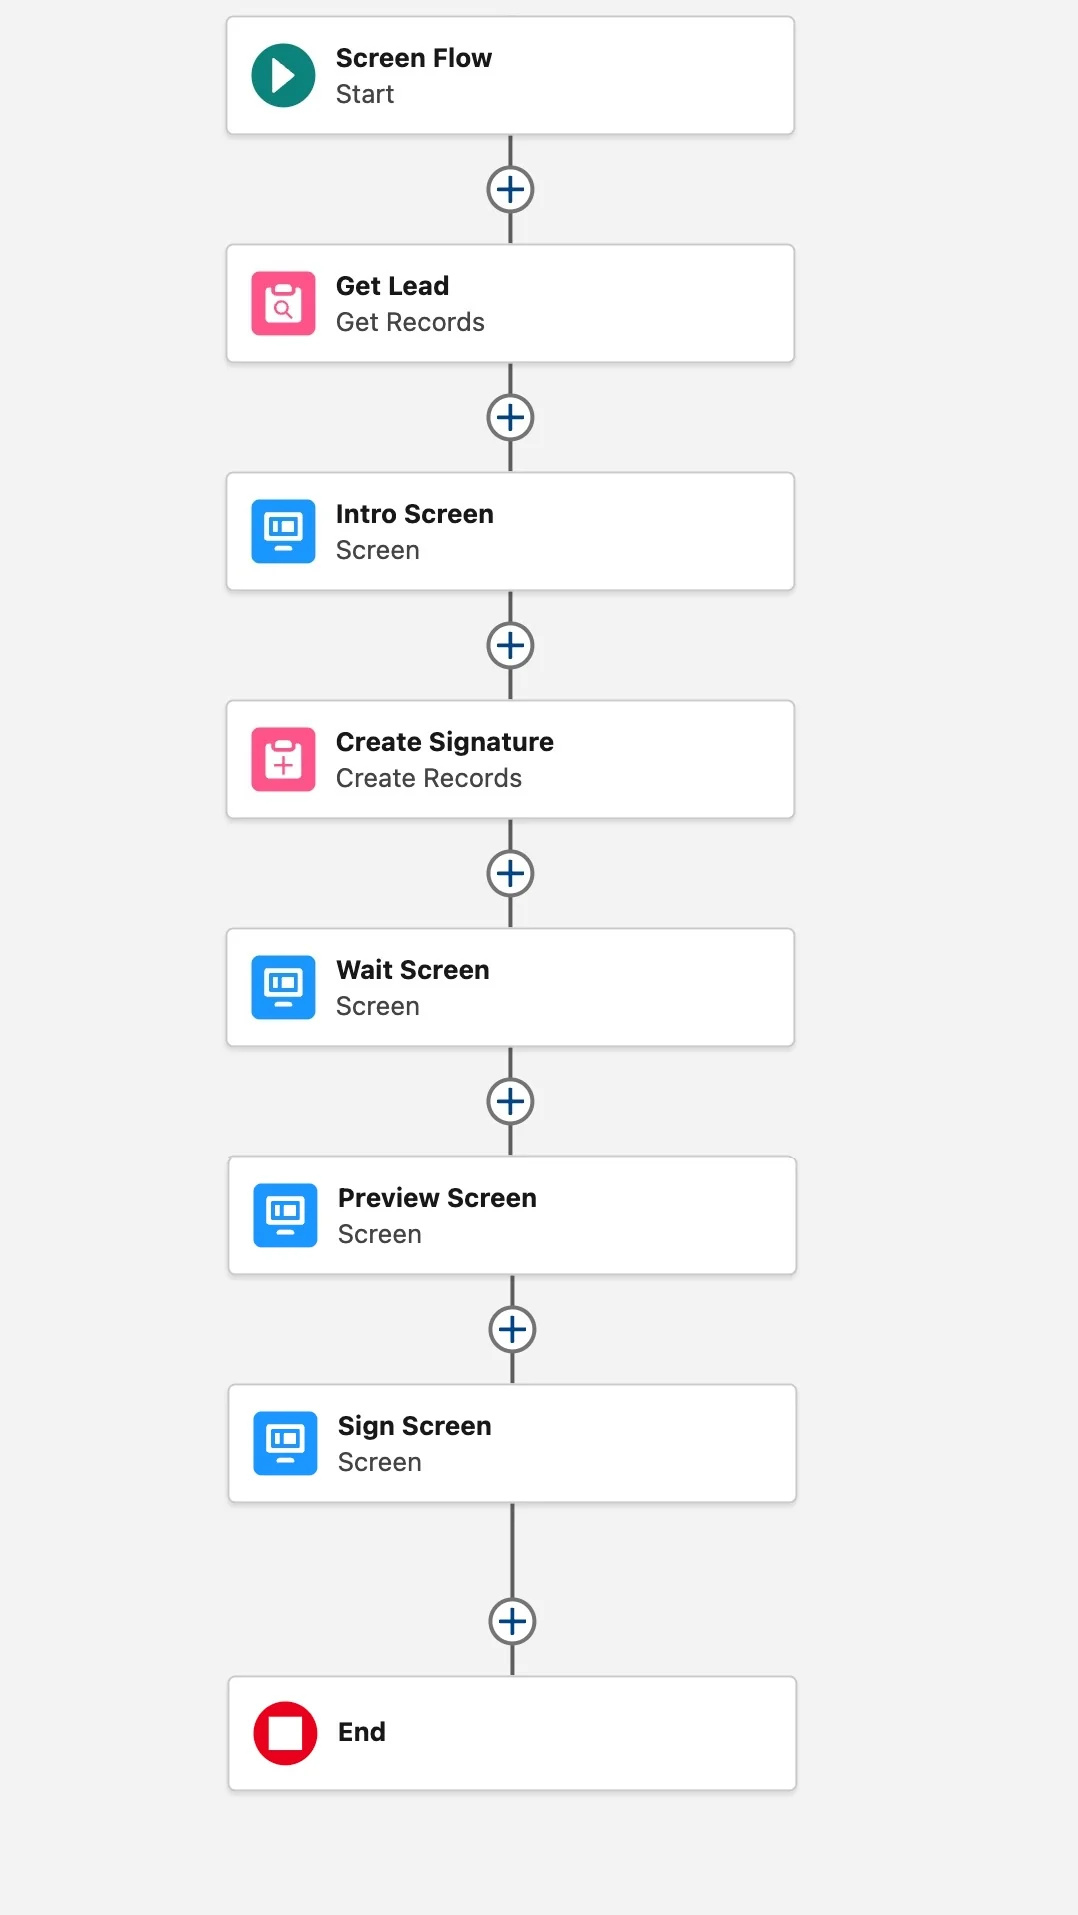
1. **Make a new Screen Flow.**
Do it the same way as in [step 1 of Take signatures in a Flow](https://www.toafinish.com/support/guides/simple-signature/#flow-1).
2. **Make a variable named recordId.**
Click the **Toolbox** icon. Click **Manager**, then **New Resource**. Pick **Variable**. In API Name, type `recordId`, with exactly this case. Pick **Text** as the Data Type. Tick **Available for input** and **Available for output**. Click **Done**.
3. **Add a Get Records element for the Lead.**
Click the **+** on the line. Click **Get Records**. Type a Label. Pick **Lead** as the object. Add one filter: **Lead ID** Equals `recordId`. Leave the other settings as they are.
4. **Add a screen that tells the user what happens.**
Add a **Screen**. Type a Label. Drag **Display Text** onto it. Type an API Name for it, for example `IntroText`. Type the text, for example `We are making your document. Then you can read it and sign.`
5. **Add a Create Records element for the Signature.**
Type a Label. Pick **Manually** for how to set the field values. It starts on another choice. Pick **ß Signature** as the object. A search for Signature can show other objects first. Click **Add Field** for each row:
| Field | Value |
| --- | --- |
| Lead | The variable `recordId`. |
| Experience ID | Your Experience ID. |
| First Name, Last Name, Email | The matching Lead fields, from the Get Records element. |
| Attach PDF? | `{!$GlobalConstant.True}` |
| Embed PDF? | `{!$GlobalConstant.True}` |
| Status | Requested |
| Templates | The ID of your template, the same as in the experience. |
| Send Type | None |
To also save the PDF on the Lead and email it, add **Attach PDF to Parent?** and **Email PDF?** with `{!$GlobalConstant.True}`.
6. **Add a screen with Simple Signature Wait.**
Add a **Screen**. Type a Label. Drag **Simple Signature Wait** onto it. Fill in its settings:
| Setting | Value |
| --- | --- |
| API Name | A name, for example `WaitPreview`. |
| Signature Id | Pick the Create Records element, then **Record ID**. |
| Step Id | Leave it empty. It serves signatures with steps. |
| Type | `Preview`. Final waits for the signed PDF instead. |
7. **Add a screen with Simple Signature Preview. This step is optional.**
Add a **Screen**. Drag **Simple Signature Preview** onto it. In **FileId**, pick the Wait element, then **fileId**. Click **Done**.
8. **Add a screen with Simple Signature Form.**
Add a **Screen**. Open **Configure Footer** and untick **Show Footer**. Drag **Simple Signature Form** onto it. Fill in its settings:
| Setting | Value |
| --- | --- |
| Experience ID | Your Experience ID. |
| Parent ID | The variable `recordId`. |
| Other Parameters | Type `id=` and the ID of the record from the Create Records element, for example `id={!Create_Signature.Id}`. Without it, the Flow makes a second Signature. |
| Style | Optional. |
To show the PDF above the form, add `&showattachmentid=` and the fileId of the Wait element, for example `id={!Create_Signature.Id}&showattachmentid={!WaitPreview.fileId}`.
9. **Show the signed PDF too, if you want.**
Repeat steps 6 and 7 after the form, with `Final` as the Type.
10. **Save the Flow. Activate it.**
11. **Make a Flow action on Lead. Add it to the page layout.**
Open Object Manager. Click **Lead**, then **Buttons, Links, and Actions**. Click **New Action**. Pick **Flow** as the Action Type. Pick your Flow. Type a Label. Click **Save**.
Add the action to the Lead page layout, the same way as in [step 5 of Send a signature request](https://www.toafinish.com/support/guides/simple-signature/#req-5).
12. **Open a test Lead. Start the Flow from the action.**
The Flow does not run from Flow Builder. Start it from a Lead in Lightning Experience.
The Flow makes the Signature and waits for the PDF. A spinner shows while it waits, for up to a minute. Then the PDF shows. Click **Next**. If the first click only zooms the PDF, click Next again.
With Require eSignature Agreement on, the agreement window opens before the form.
## 24. Send reminders and clean up old requests
*Paid version only. These steps do not count in the setup progress.*
Maintenance rules act on old signature requests on a schedule. One scheduled job runs all the rules each time.
| Type | What it does |
| --- | --- |
| Re-request | Sends the request again, the same as a new request. Any progress is lost, for example a click on the Sign Online button. |
| Notification | Sends a reminder. The Status does not change. |
| Deletion | Deletes the Signature records. Use it for old requests that nobody signed, or for signed requests you no longer need. |
| Clean Up | Deletes the records that a Signature no longer needs: process records, preview PDFs in Files, and private values such as a password. |
> **Check every rule before you schedule the job**
>
> The job can email many signers at once, or delete records that you cannot get back. TAF advises that its support team checks your rules the first time. Open a case.
1. **Open the Configure page. Click the Maintenance tab.**
Open it the same way as in [step 2 of Turn on the paid version](https://www.toafinish.com/support/guides/simple-signature/#upgrade-2).
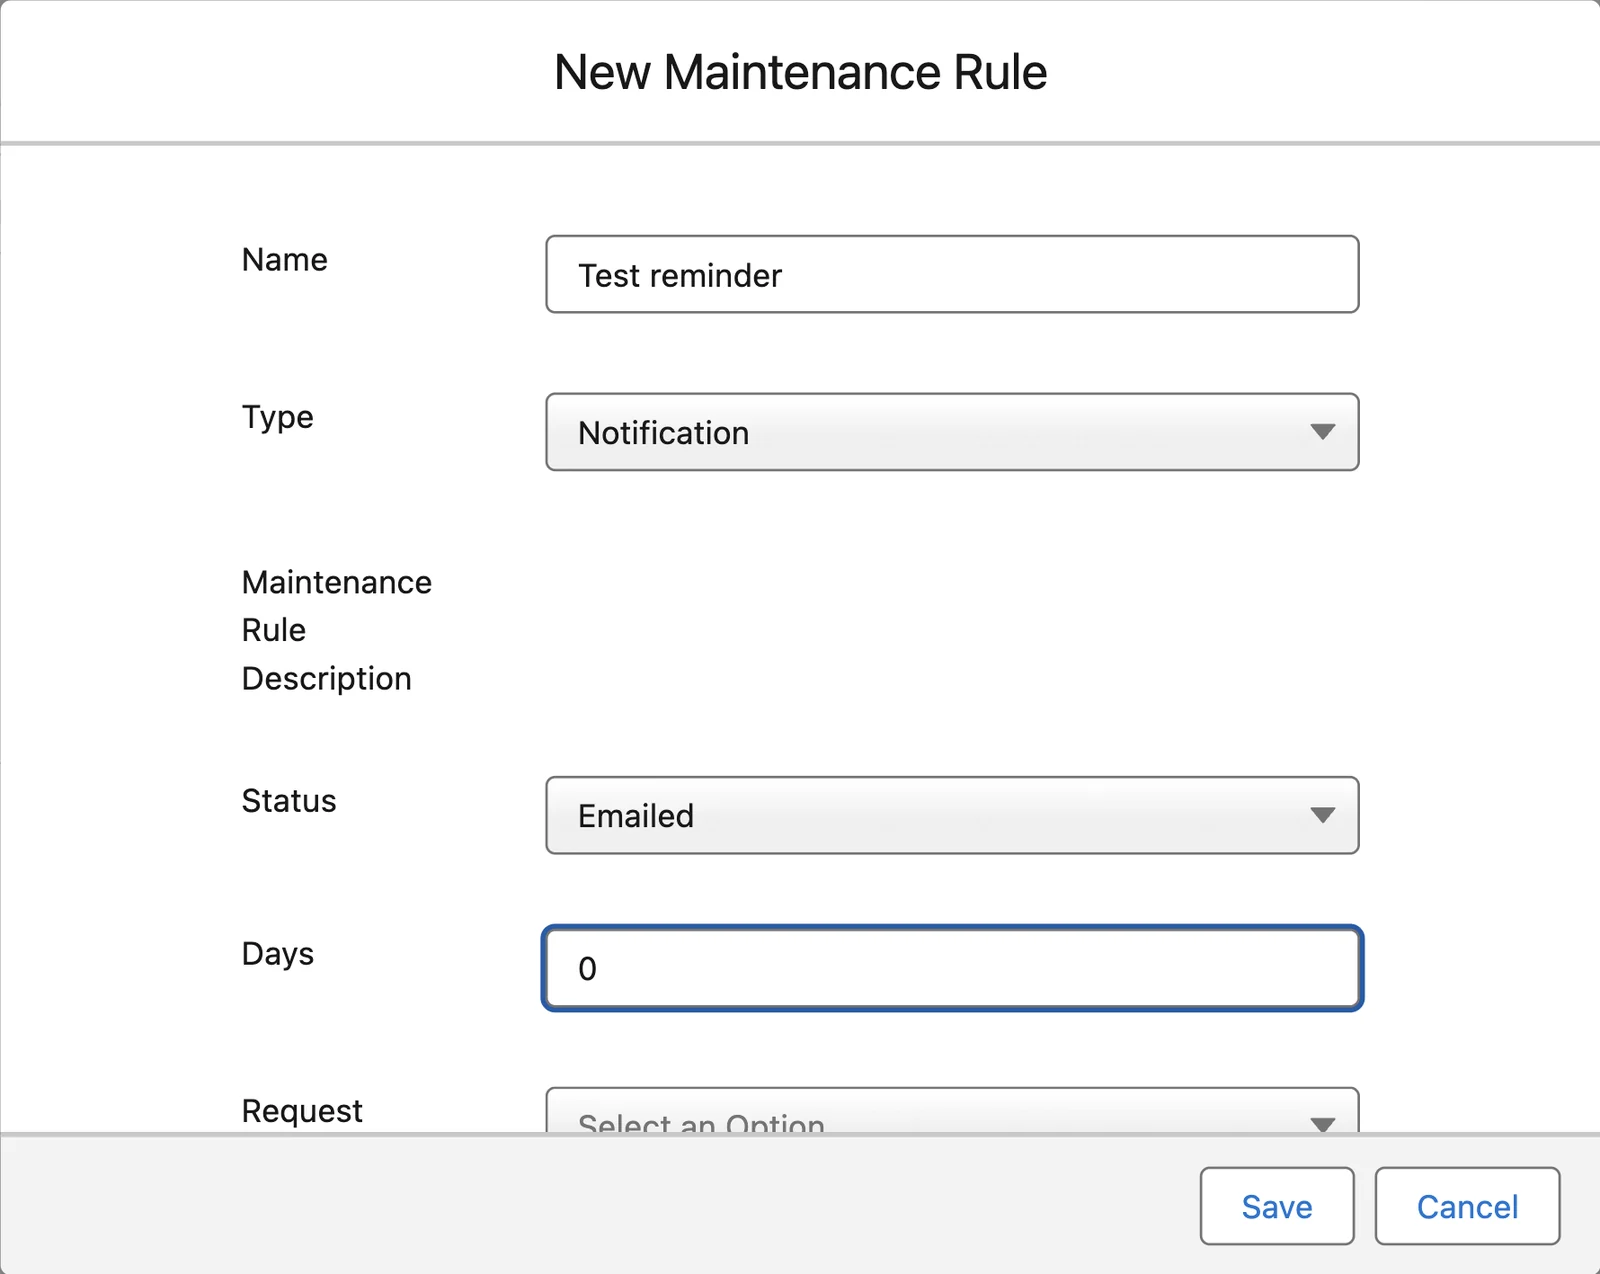
2. **Click New Maintenance Rule. Fill in the rule as below.**
| Field | Value |
| --- | --- |
| Name | A name that says what the rule does, for example `Reminder after 3 days`. |
| Type | Deletion, Clean Up, Re-request or Notification. See the table above. |
| Status | The rule acts only on Signatures with this Status: Requested, Emailed, Viewed, Clicked, Approved or Signed. For more than one Status, make one rule for each. Deletion and Clean Up mostly use Signed. The other types use earlier statuses. |
| Days | The rule acts on a Signature that stays in that Status for more than this number of days. For example, with Status Emailed and 3 Days, the rule acts on day 4 on each request that nobody viewed, clicked or signed. With 0, it acts from the next day. |
| Request Form | Optional. Pick a value of Requested Form from the list. The rule then acts only on those Signatures. Use it when you have more than one request process. |
| Email Template | Only Re-request and Notification use it. Pick the email template to send. The list holds every email template in the org. Leave it empty to send the standard request email. |
| CC Record Owner | Only Re-request and Notification use it. Copies the owner of the Signature, mostly the user who made the request. |
| CC Record Owner's Role Hierarchy | Only Re-request and Notification use it. Also copies the managers above the owner, maybe several levels up. Use it with care. |
| BCC Record Owner's Email to Salesforce | Only Re-request and Notification use it. Logs the email on the record. The owner must first set up My Email to Salesforce, under My Settings, then Email. |
Under Type, the window shows a **Maintenance Rule Description**. It fills in by itself, for example **Includes all Signatures in emailed Status more than 3 days since Emailed**. Read it to check the rule.
3. **Click Save. Make the other rules you need.**
The window closes with no message. The Maintenance tab lists each rule with its Name, Days, Type and Status, and the links Edit and Delete.
4. **Open Apex Classes. Click Schedule Apex.**
Open Setup. In the Quick Find box, type **Apex Classes**. Click **Apex Classes**. Click **Schedule Apex**.
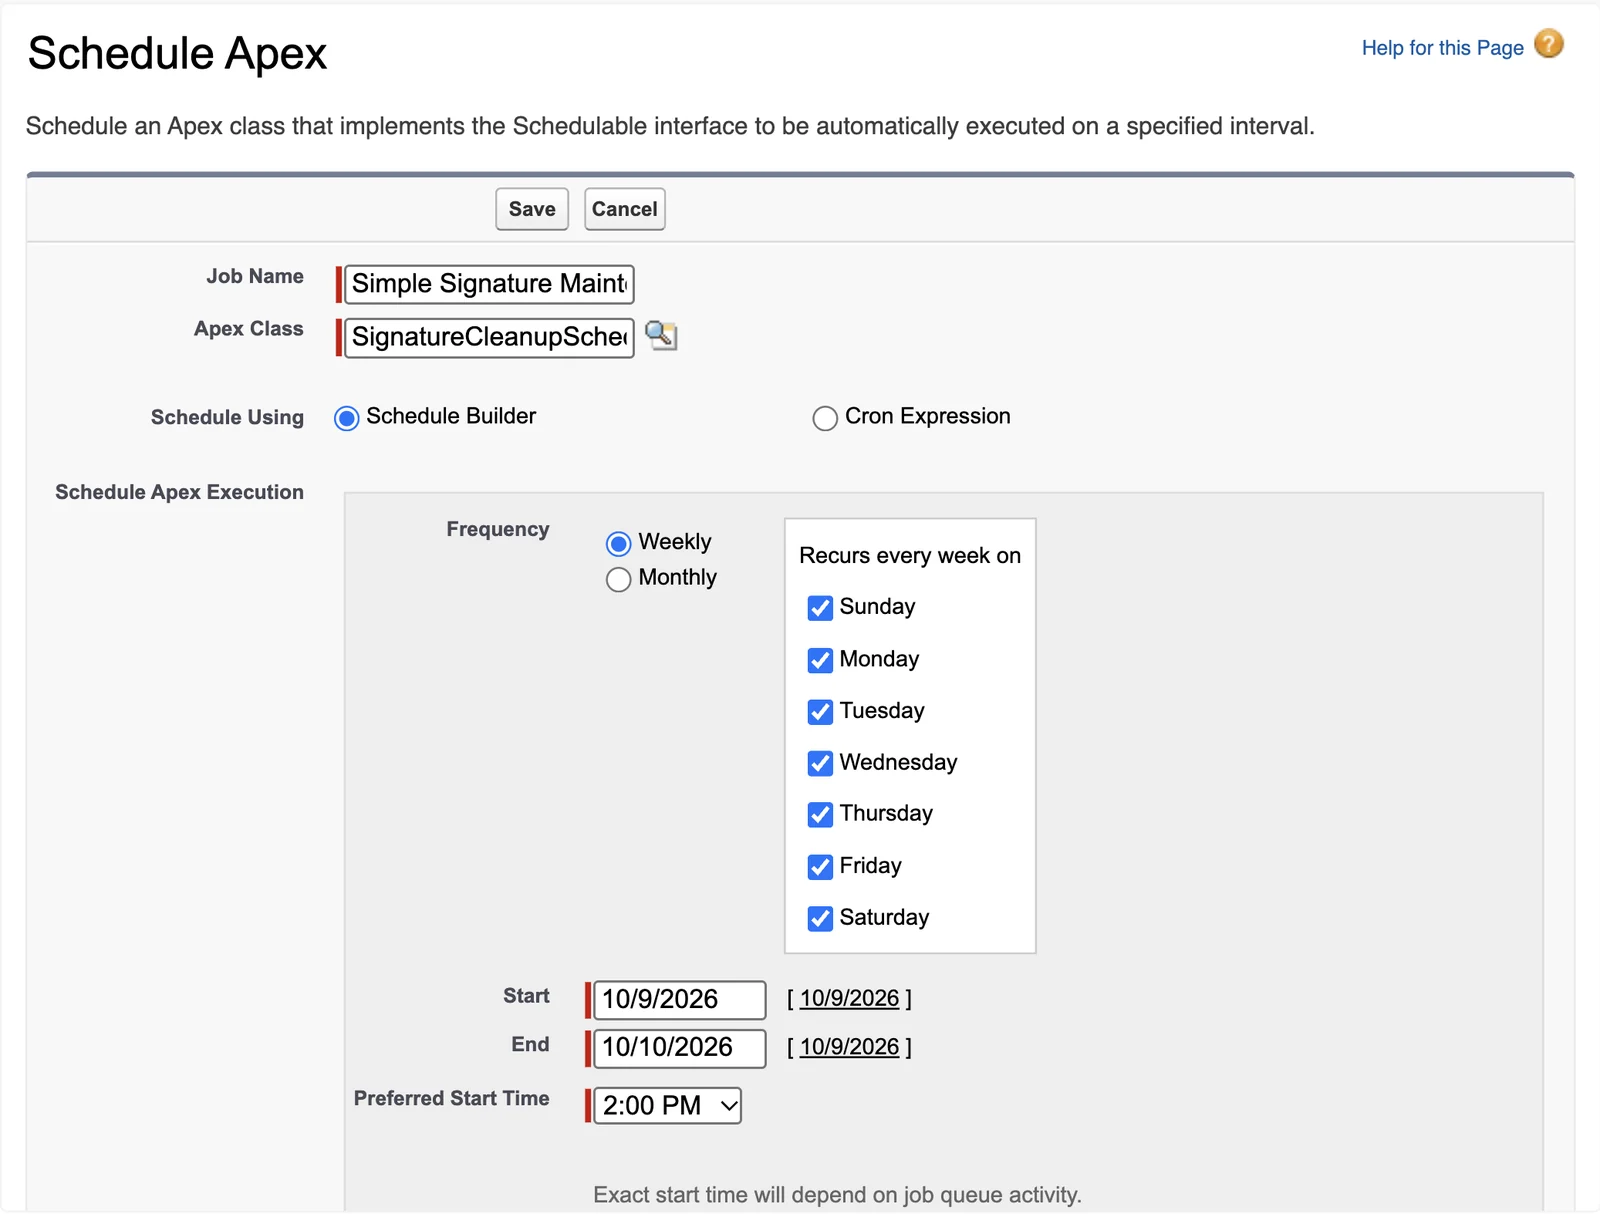
5. **Fill in the job. Click Save.**
Type a **Job Name**, for example `Simple Signature Maintenance`. In **Apex Class**, type `SignatureCleanupScheduler`, or pick it with the lookup icon.
To run the job every day, leave **Weekly** on and tick every day. **End** starts one month ahead. The job stops after that date, so set it far ahead. Pick **Preferred Start Time** with the mouse. The Enter key in that list saves the form.
6. **Check the job.**
Open Setup. In the Quick Find box, type **Scheduled Jobs**. The list shows your job and its next run.
## 25. Print a backup of all signatures
*Paid version only. These steps do not count in the setup progress.*
The Signature Report makes one PDF, with each signature on its own page. Use it as a backup. It is basic, and it is not made for clients.
1. **Open the Signature Report.**
Click the App Launcher at the top left. Type **Signature Report**. Under Items, click **ß Signature Report**.
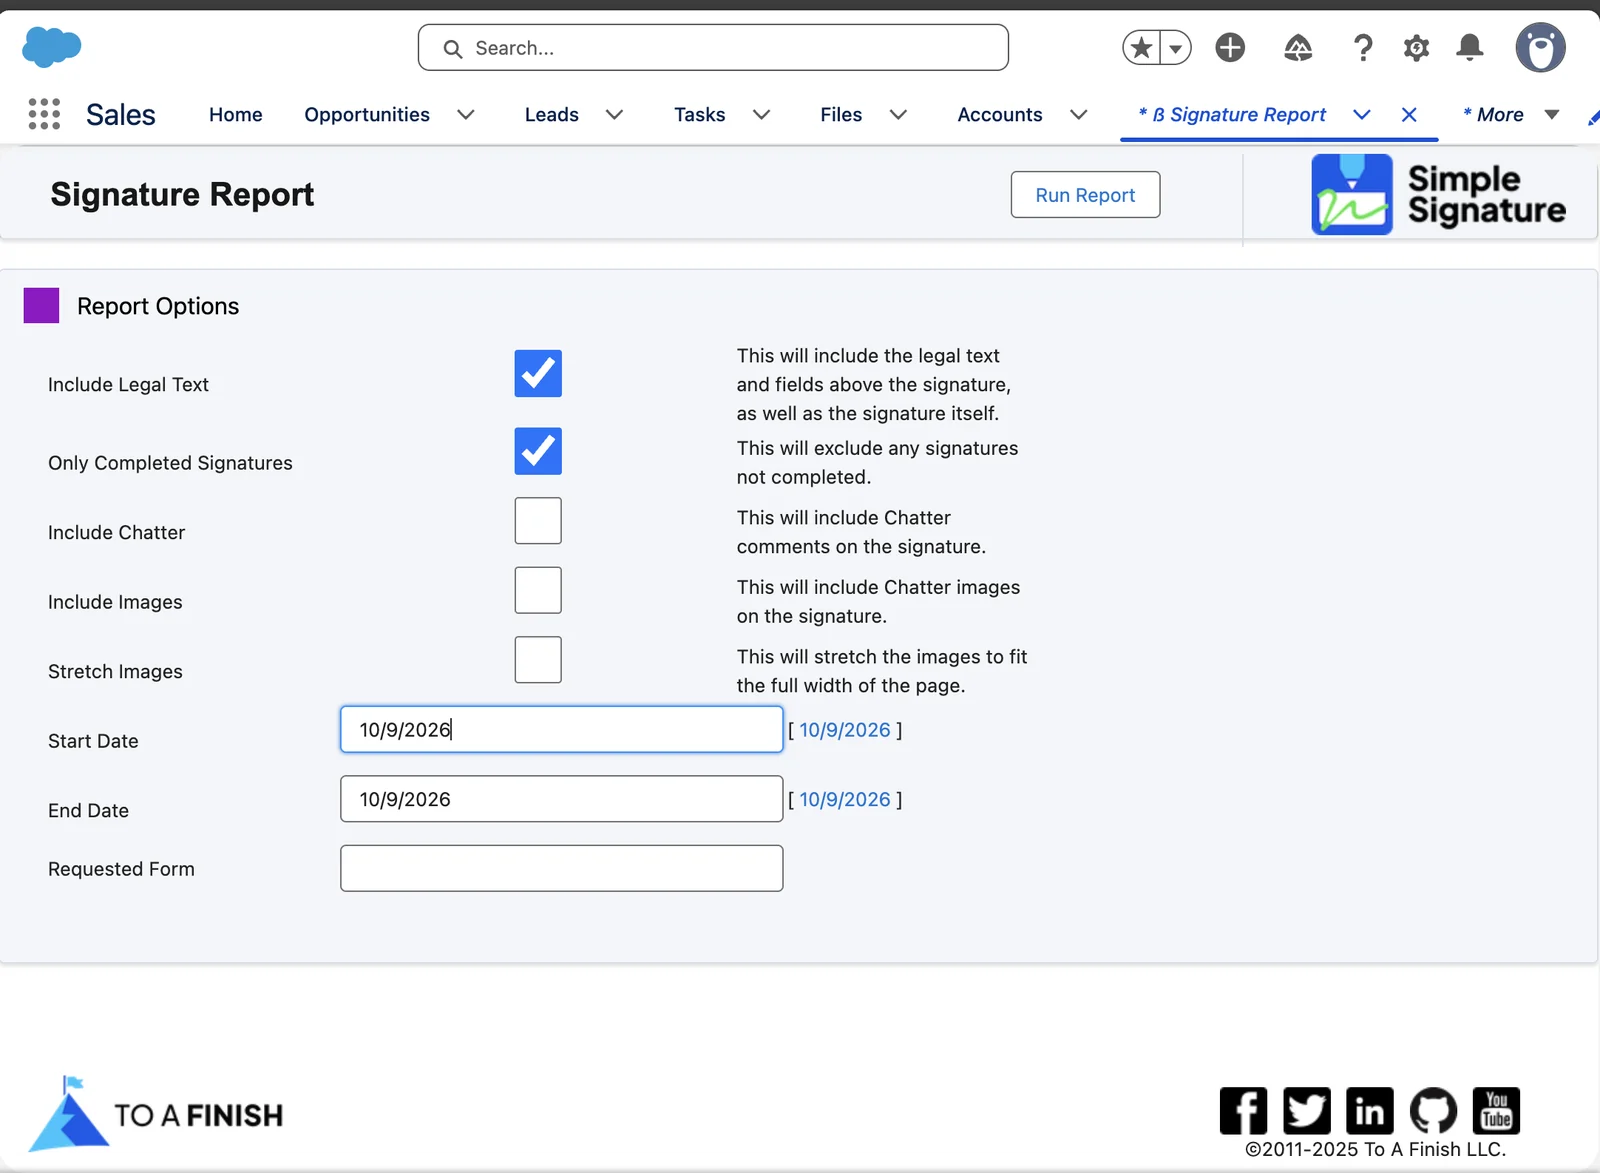
2. **Set the Report Options. Click Run Report.**
| Option | What it does |
| --- | --- |
| Start Date, End Date | The dates of the Signatures to put in the PDF. |
| Requested Form | Optional. Only Signatures with this Requested Form. |
| Only Completed Signatures | Only signed forms. On at first. |
| Include Legal Text | Adds the legal text of each form. On at first. |
| Include Chatter, Include Images, Stretch Images | Add more to each page. Off at first. |
Click **Run Report**. The PDF opens in a new tab, with one signature on each page.
## 26. Set up a sandbox made from production
*Paid version only. These steps do not count in the setup progress.*
A sandbox made or refreshed from production holds most of the setup of Simple Signature. Do the steps below there. In a sandbox where you install Simple Signature yourself, follow the whole guide instead.
1. **Switch to Salesforce Classic.**
Some of these steps can fail in Lightning. See [step 9 of Connect the site](https://www.toafinish.com/support/guides/simple-signature/#connect-9).
2. **Copy the address of the signature site.**
Open Setup. In the Quick Find box, type **Sites**. Click **Sites**. Click the Site URL of your signature site. The site opens in a new tab. Copy its address.
3. **Paste it into Site URL for Signature Requests.**
Open the Configure page. Click the **Configuration** tab. Paste the address into **Site URL for Signature Requests**. End it with a slash.
4. **Decide about Turn Off Emails.**
A sandbox can hold the email addresses of real customers, mostly a Full or Partial Copy sandbox. Then keep **Turn Off Emails** ticked, and put your own test addresses on the Whitelist. Emails then go to those addresses only.
To add an address, click **Blacklist and Whitelist Emails/Domains**. Type a **Name** and the address in **Entry**. Pick **Whitelist** as the **Type**. Click **Add**.
Untick Turn Off Emails only when the sandbox must send all emails, and it holds no real address. Maintenance rules and large tests can send many emails.
5. **Click Save Settings.**
6. **Click the Site Configuration tab. Add the remote site it asks for.**
The tab can show a message about the remote site settings, with an address under To Enable Site Access. Copy that address. Add it as a new remote site, as in [step 5 of Connect the site](https://www.toafinish.com/support/guides/simple-signature/#connect-5). Tick **Active**.
7. **Authorize the site again.**
Do it as in [Authorize the connection again](https://www.toafinish.com/support/guides/simple-signature/#authorize-again). Salesforce can ask you to sign in to the sandbox again. If it fails, see [Authorize does not work](https://www.toafinish.com/support/guides/simple-signature/#authorize-fails).
8. **Connect Google Docs again, if you use it.**
Click the **Google Docs Configuration** tab. Click **Revoke**. A window asks you to sign in to Google. Pick the account that owns your template documents. Accept the permissions. Copy the code. Paste it into **Authorization Code**. Click **Submit**.
The tab shows no message after this. The Revoke button shows again.
9. **Make the templates again, in a Developer sandbox.**
A Developer or Developer Pro sandbox has no data from production, so it has no ß Templates. A Full or Partial Copy sandbox has them. Skip this step there.
Do this step in Lightning Experience. In Classic, New opens a plain form with no Google Docs choice. For each template in production:
- In production, open the template. Copy its **Google Doc Id**.
- In the sandbox, open **ß Templates**. Click **New**. Pick **Google Docs**. Click **Next**. Pick **Create New Template**. Click **Next**.
- Paste the Google Id. Fill in the other fields the same as in production. Leave Copy Template as it is. Click **Save**.
- Copy the ID of the new template from the address bar. Put it in place of the production ID in your actions and experiences. See [step 10 of Make a PDF template in Google Docs](https://www.toafinish.com/support/guides/simple-signature/#gdoc-10).
Both orgs then use the same Google document. A change that you make from the sandbox also changes the PDF in production.
10. **Set the email Access level to All email.**
Open Setup. In the Quick Find box, type **Deliverability**. Set **Access level** to **All email**. Click **Save**. A new sandbox starts with System email only.
## 27. Move your setup from a sandbox to production
*Paid version only. These steps do not count in the setup progress.*
A change set cannot carry most of the setup of Simple Signature. Do these steps in production by hand.
1. **Install Simple Signature in production.**
Install it from the AppExchange, as in [Install Simple Signature](https://www.toafinish.com/support/guides/simple-signature/#install). TAF support can also send you an install link.
2. **Check that both orgs run the same version.**
The version shows at the bottom right of the Configure page, and in Installed Packages. If the versions differ, ask TAF support to push the new version to production, or for a link to do it yourself. See [Update Simple Signature](https://www.toafinish.com/support/guides/simple-signature/#update).
3. **Turn on the paid version in production.**
Each org needs its own Upgrade Key. See [Turn on the paid version](https://www.toafinish.com/support/guides/simple-signature/#paid).
4. **Set up the signature site and its connection, if you use requests.**
Do [Set up the signature site](https://www.toafinish.com/support/guides/simple-signature/#site) and [Connect the site to Simple Signature](https://www.toafinish.com/support/guides/simple-signature/#connect) in production.
5. **Connect Google Docs, if you use it.**
Do steps 1 to 4 of [Make a PDF template in Google Docs](https://www.toafinish.com/support/guides/simple-signature/#google-docs) in production.
6. **Set the Configuration tab the same as in the sandbox.**
Type each value again. Click **Save Settings**. Only Site URL for Signature Requests is different: use the address of the production site.
7. **Move the experiences with Export and Import.**
In the sandbox, open the **Experiences** tab. Click **Export**. The browser downloads `Experience.csv`, with all your experiences.
In production, open the Experiences tab. Click **Import**. Under **Upload Files**, pick the file. Click **Upload**. The window shows the columns of the file. For each column, pick the matching **Field** and a **Field Type**: **Experience** for Experience Name and Description, **Parameter** for the others. Click **Save**.
Then check each experience:
- Each experience gets a new Experience ID in production. Change it everywhere you typed it, for example in the Sign button component, on record pages and in Flows.
- Import does not keep values with commas. Check the parameters `fieldreadonly`, `hideblankfields`, `templates` and `submissiontype`. Type their values again.
If the import fails, see [Import of experiences fails](https://www.toafinish.com/support/guides/simple-signature/#import-fails).
8. **Move your own changes.**
Make them again in production, or deploy them with a change set: your own fields, Visualforce pages, Lightning components, actions and Flows. TAF support can help with the deploy.
## 28. If something does not work
### The form shows an error when it opens
Check that Lightning Web Security is on. See [Check one Salesforce setting](https://www.toafinish.com/support/guides/simple-signature/#setting).
### No Sign button on the record
Check that Sign sits in the actions of the page layout. See [step 5 of Add the Sign button](https://www.toafinish.com/support/guides/simple-signature/#sign-5). Also check that the user has Simple Signature (User) or Simple Signature (Admin).
If the record page uses Dynamic Actions, the page layout does not decide its buttons. Open the page in the Lightning App Builder, click the highlights panel at the top, and add Sign there.
### The form shows the title Salesforce.com, Inc. Release Form
The user works in a language with no override. Add one for that language. See [step 5 of Set the wording](https://www.toafinish.com/support/guides/simple-signature/#wording-5).
### The form ignores your experience
Check the Experience ID in the component, the record page or the Flow. Copy it again from the Experiences tab. Make sure no space sits inside the quote marks. Also check that the org runs the paid version: the Configure page shows the Experiences tab. See [Turn on the paid version](https://www.toafinish.com/support/guides/simple-signature/#paid).
### The signer sees Site Configuration not done
The full message reads **Site Configuration not done.Please ask Admin to Authorize.** The connection stopped. Authorize it again. See [Authorize the connection again](https://www.toafinish.com/support/guides/simple-signature/#authorize-again).
### The signing link shows Authorization Required
The guest user of the site lost its permission set. Assign Simple Signature (Guest) again. See [step 5 of Set up the signature site](https://www.toafinish.com/support/guides/simple-signature/#site-5).
### Authorize does not work
First check three things. You work in Salesforce Classic. You clicked Save Settings just before. Your user has Simple Signature (Admin). Then find what you see below.
| What you see | What to do |
| --- | --- |
| login.salesforce.com refused to connect | You are in Lightning. Switch to Salesforce Classic. Click Authorize again. |
| Invalid Code Verifier | Click Save Settings on the Site Configuration tab. Then click Authorize again, in Classic. |
| A blank page after you sign in, and no date above the button | Make a new External Client App. Paste its key and secret. Click Save Settings. Click Authorize again. |
| Salesforce logs you out | Log out of Salesforce. A reload is not enough. Log in again as the admin. Click Authorize again. |
| Nothing happens | Click Authorize a second time. |
| You cannot untick PKCE | Leave it ticked. Simple Signature works with it. |
### Insufficient Privileges on the External Client App
Some orgs cannot use External Client Apps yet. Open a case with Salesforce support. Ask them to turn on External Client Apps in your org.
### The signer signed, but no PDF comes
The Status reads Signed, but PDF Attached and PDF Emailed stay empty. Check these points.
- **Run PDF Automation on Save** is on. See [step 3 of Connect the site](https://www.toafinish.com/support/guides/simple-signature/#connect-3).
- A page of your own in **Template VisualForce Page for PDF** has `c__` in front of its name. See [step 4](https://www.toafinish.com/support/guides/simple-signature/#connect-4).
- Open Setup and type **Apex Jobs** in the Quick Find box. Find the failed job of Simple Signature and read its error.
The error **PDF generation failed. Check the page markup is valid.** means the PDF page has an error. In TAF's test, one line in SamplePDF\_v2 caused it:
``
To work around it, make a page of your own from SamplePDF\_v2, as in [Make a PDF page in Visualforce](https://www.toafinish.com/support/guides/simple-signature/#vf-pdf). Change that line to `
`. Type the page name with `c__` in front in Template VisualForce Page for PDF. Then send the request again.
### The signer gets no email
- Open the Signature record. Check the Status and the Email field. Read the **Processing Log** field.
- A Status that stays at Requested can mean a wrong PDF page name. The error in Apex Jobs then reads **You have attempted to reach a URL that no longer exists on salesforce.com.** Check the `c__` in front of the name.
- Open Setup. In the Quick Find box, type **Deliverability**. **Access level** must be **All email**. A new sandbox starts with System email only.
- On the Configuration tab, check that Turn Off Emails is off, or that the address is on the Whitelist.
- Ask the signer to look in the spam folder. See [Emails that look like spam](https://www.toafinish.com/support/guides/simple-signature/#request-spam).
### Import of experiences fails
Import reads a comma as a new column, also a comma inside quote marks. A Name, a Description or a value with a comma then breaks the file. The Save can show an error, or a red bar with no text.
To work around it, make the experiences again by hand in production, as in [Build a signature experience](https://www.toafinish.com/support/guides/simple-signature/#experience). Copy each parameter and its value from the sandbox.
### You skipped the third-party access at install
Some features cannot reach the web sites they need. Add them by hand in Setup.
- In **Trusted URLs**, add `https://api.qrserver.com`.
- In **Remote Site Settings**, add one remote site for each of `https://api.addressverificationapp.com`, `https://docs.googleapis.com`, `https://script.googleapis.com` and `https://www.googleapis.com`.
## 29. Update Simple Signature
*For later. These steps do not count in the setup progress.*
TAF sometimes pushes a new version of Simple Signature into every org. Some orgs are on an exclusion list and do not get these pushes. You can also install the newest version yourself at any time, from the install links on the change log. The AppExchange listing no longer updates an installed app.
> **Update before you report a bug**
>
> TAF works on bugs in the newest version only. Check your version before you open a case, and update if it is old.
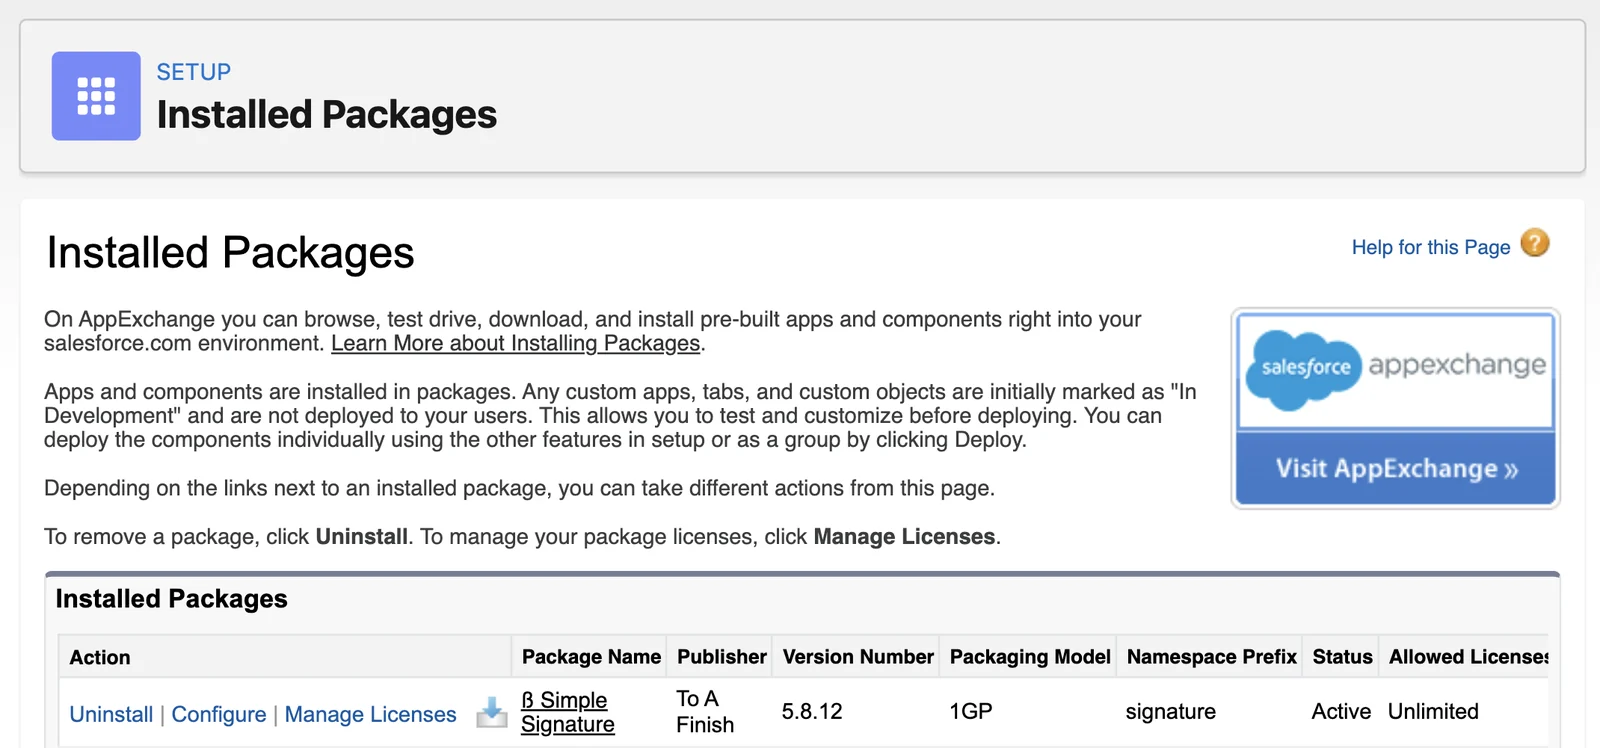
1. **Check the version you have.**
Open Setup. In the Quick Find box, type **Installed Packages**. Find **ß Simple Signature** and read the **Version Number** column.
2. **Open the Simple Signature change log.**
The newest version and its install links sit at the top of the [Simple Signature change log](https://www.toafinish.com/support/changes/simple-signature/#install-newest). If your version matches the newest one, stop here.
3. **Update a sandbox first.**
Click **Install in a sandbox**. Sign in to your sandbox and follow the install screens. The install page shows **Upgrade** in place of Install. If a screen asks who to install for, pick **Install for All Users**.
Salesforce installs the newer version over the one you have. Your labels, fields, buttons and signatures stay in place.
4. **Take a test signature in the sandbox.**
Follow [Take a test signature](https://www.toafinish.com/support/guides/simple-signature/#first-signature). Make sure the form opens and the Signature record saves.
5. **Update production.**
Go back to the change log and click **Install in production**. Sign in to production and follow the same screens.
6. **Check the version again.**
Open Installed Packages again. The Version Number now matches the top of the change log.
> **You cannot go back to an older version**
>
> To go back, you must uninstall Simple Signature and set it up again.
## 30. Get help
Open a case if a step does not work. Give the link to the step and paste the exact error text.
Before you report a bug, update to the newest version. TAF works on bugs in the newest version only. See [Update Simple Signature](https://www.toafinish.com/support/guides/simple-signature/#update).
[Open a case](https://www.toafinish.com/support/#open-a-case)[Give us access](https://www.toafinish.com/support/grant-access/)
On the free version, report bugs through a case. Help with setup and configuration comes with the paid version.
See what changed in each release in the [Simple Signature change log](https://www.toafinish.com/support/changes/simple-signature/). Sample code for custom forms and PDF pages sits in the [Simple Signature repository on GitHub](https://github.com/ToAFinish/simplesignature).
Found a mistake in this guide? [Email support](mailto:support@toafinish.com?subject=Simple%20Signature%20guide%20feedback) with the link to the step.
### Rate Simple Signature
If Simple Signature helps you, [leave a review on the AppExchange](https://appexchange.salesforce.com/appxListingDetail?listingId=a0N3A00000DqCoUUAV). If something is wrong, open a case first, so TAF can fix it with you.
---
To A Finish LLC. Open a case: https://www.toafinish.com/support/#open-a-case