


Highlighter implementation guide
Install Highlighter and set up your first highlighted field. Pick how you want to work.
Let AI do it for you
Copy this guide into an AI that works in your browser, such as Claude in Chrome. The AI does the steps in your sandbox. You sign in and approve each change.
Lightning only Currently free Applies to version 3.0 Last updated 8 Oct 2026
1Before you begin
Highlighter colors, renames or hides fields on a Lightning record page, based on rules you set. This guide takes you from the install to a working highlight.
What you need
- A Salesforce org. Any edition works, with Sales Cloud, Service Cloud or Salesforce Platform.
- A user with admin rights in that org.
- A sandbox, to set Highlighter up there first.
- Lightning Experience. Highlighter acts on fields in Lightning only.
Test in a sandbox first
Highlighter changes how record pages look for every user. Set each action up in a sandbox before you add it to production.
What Highlighter does not do
- It does not work in the Salesforce mobile app.
- It does not work on a few standard objects, such as Quote.
- It does not change buttons in Lightning.
Highlighter is free
TAF answers quick questions. Help with setup or configuration costs an hourly fee. Report a real bug through a case, and TAF does its best to fix it. See Get help.
2Install Highlighter
Install into a sandbox first. When the whole guide works there, come back and install into production.
Open the Highlighter listing on the AppExchange. Click Get It Now.
Go to Highlighter on the AppExchange. The AppExchange asks you to sign in with a Trailblazer account. That is the free login for Trailhead and the AppExchange. It then lists the orgs linked to that account. Pick your org. If your org is not in the list, link it to your Trailblazer account first. The AppExchange then asks where to install.
Click Install in Sandbox.
For your first install, pick the sandbox. Later, repeat these steps and pick Install in Production.
Tick the terms box. Then click Confirm and Install.
The page lists the package and the org it goes into. Tick I have read and agree to the terms and conditions. Salesforce then asks you to sign in to that org.
Sign in to the org.
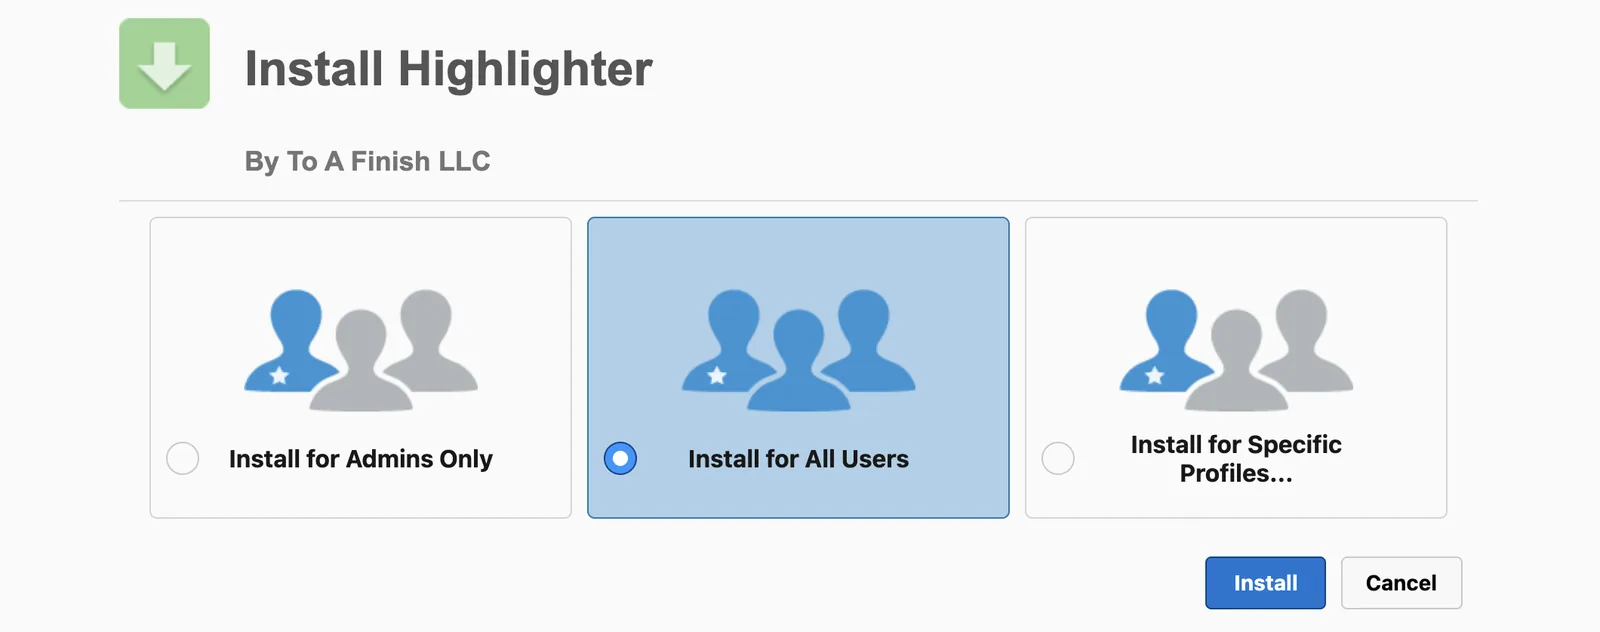
Salesforce opens the install page for Highlighter, with three choices of who to install for.
Pick Install for All Users. Then click Install.
Only an admin sets Highlighter up, but every user needs access to its pages. When the install takes a while, Salesforce says it will email you when it finishes.
Assign Highlighter (Admin) to each admin who sets up actions.
Highlighter has two permission sets.
Who Permission set What it allows Admins who set up Highlighter Highlighter (Admin) Opens the setup page and saves actions. Every other user Highlighter (User) Lets record pages read the actions and show the highlights. Open Setup. In the Quick Find box, type Permission Sets. Click Permission Sets. Click Highlighter (Admin). Click Manage Assignments, then Add Assignment. Tick each admin. Click Next. Salesforce asks whether the assignment expires. Leave it with no expiration date. Click Assign.
Assign Highlighter (User) to every other user.
Go back to Permission Sets. Click Highlighter (User). Assign it the same way, to every user who opens records with highlights.
Open the Highlighter setup page.
Open Setup. In the Quick Find box, type Installed Packages. Click Configure beside Highlighter. The Highlighter Setup page opens. The first time, it shows a red error. The next chapter fixes it.
3Add the remote site
The first time the setup page opens, it shows a red error that asks for a remote site. A remote site is a web address that Salesforce lets an app call. Here it is the address of your own org. Highlighter uses it to read the list of fields in your org.

TAF cannot reach your org through this setting
The remote site only lets your org read its own field list through Highlighter.
Copy the address in the error.
The error starts with
IO Exception: Unauthorized endpoint. It ends withAdd this endpoint =and an address. Copy that address, fromhttps://to the end.Open Remote Site Settings.
Open Setup. In the Quick Find box, type Remote Site Settings. Click Remote Site Settings. The All Remote Sites list opens.
Click New Remote Site.
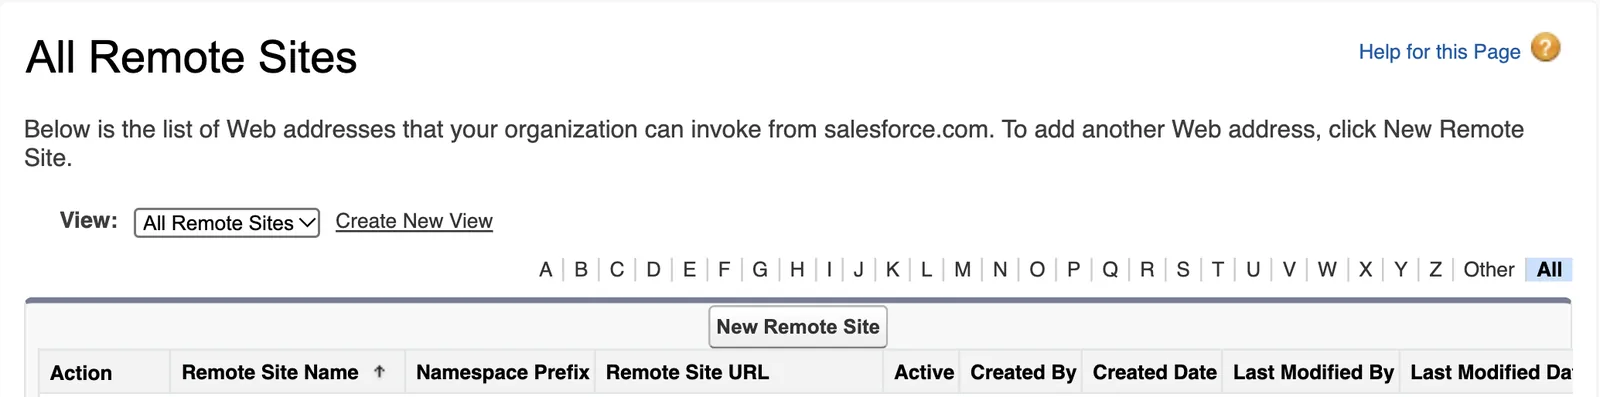
The Remote Site Edit page opens.
Type a name in Remote Site Name.
Use letters only, for example
Highlighter.Paste the address from step 1 into Remote Site URL.
Make sure Active is ticked. Then click Save.
Salesforce shows the new remote site.
Open the Highlighter setup page again.
Use step 8 of the install. The red error is gone. If the page shows an Activate Highlighter button, click it. The page then shows a Welcome box, an empty Action List and a New button.
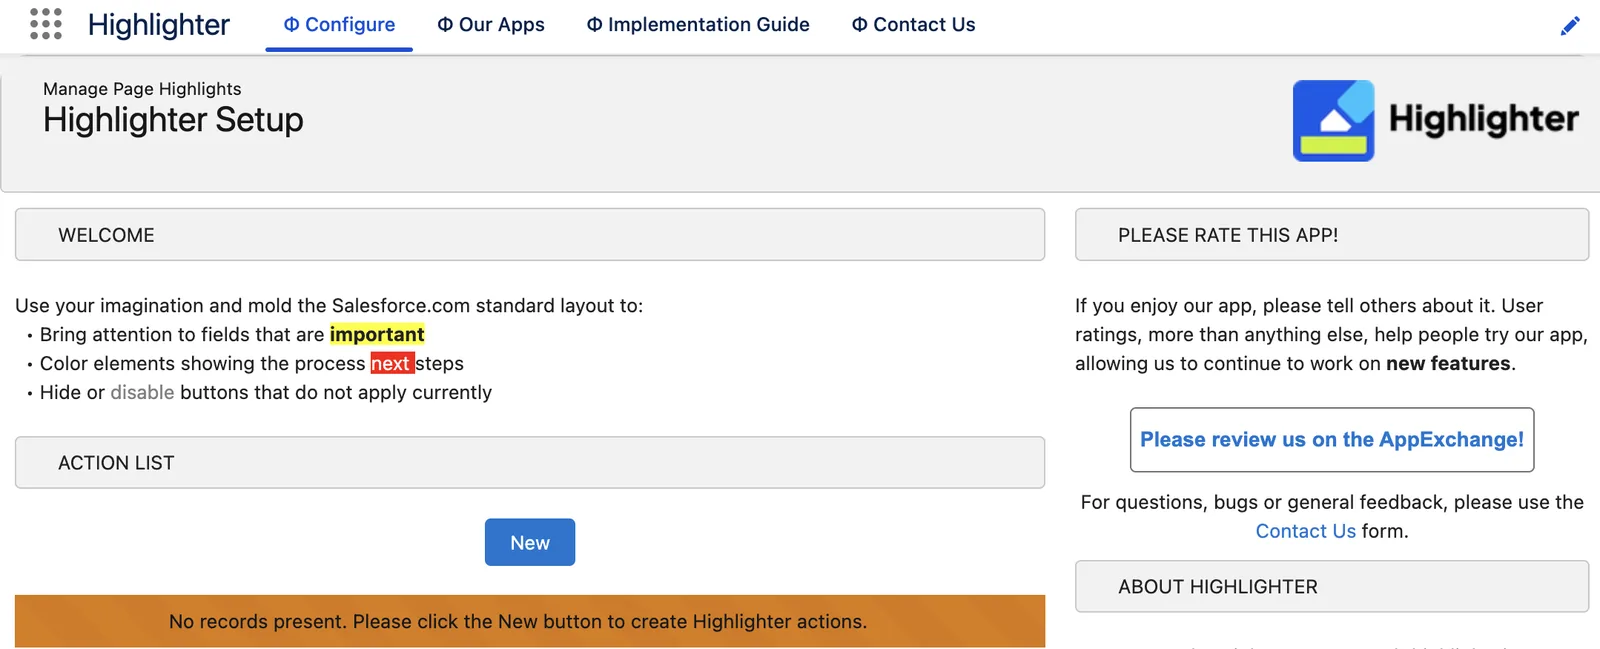
4Create an action
An action is one rule. It names an object, a field, and what Highlighter does to that field. Highlighter has three field actions.
| Action | What it does |
|---|---|
| Highlight Field | Colors the background of the field. |
| Rename Field Label | Changes the field name that users see. |
| Hide Field | Removes the field from the page. A blank space stays where it was. |
On the Highlighter setup page, click New.
The New Action window opens, with the lists Object, Action, Component Name, New Value and Only Valid For.
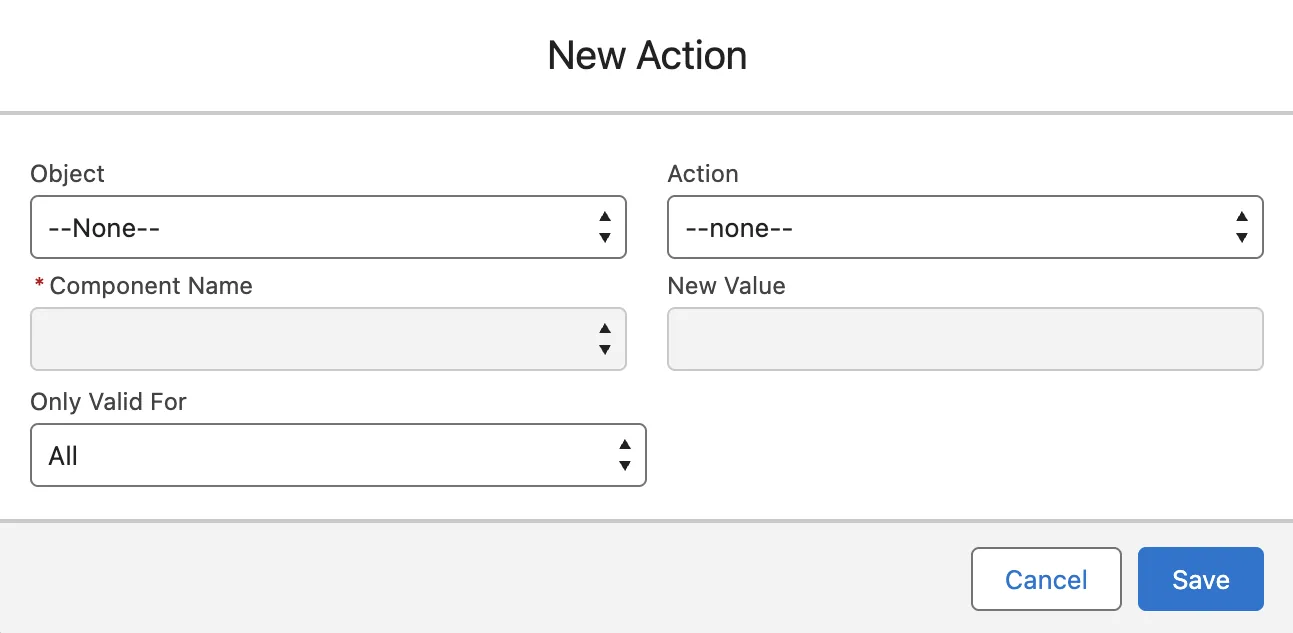
In Object, pick the object.
For example, Opportunity. A few standard objects do not work with Highlighter, such as Quote.
In Action, pick Highlight Field, Rename Field Label or Hide Field.
The list also holds four button actions. They do not work in Lightning.
In Component Name, pick the field.
The list shows every field on the object.
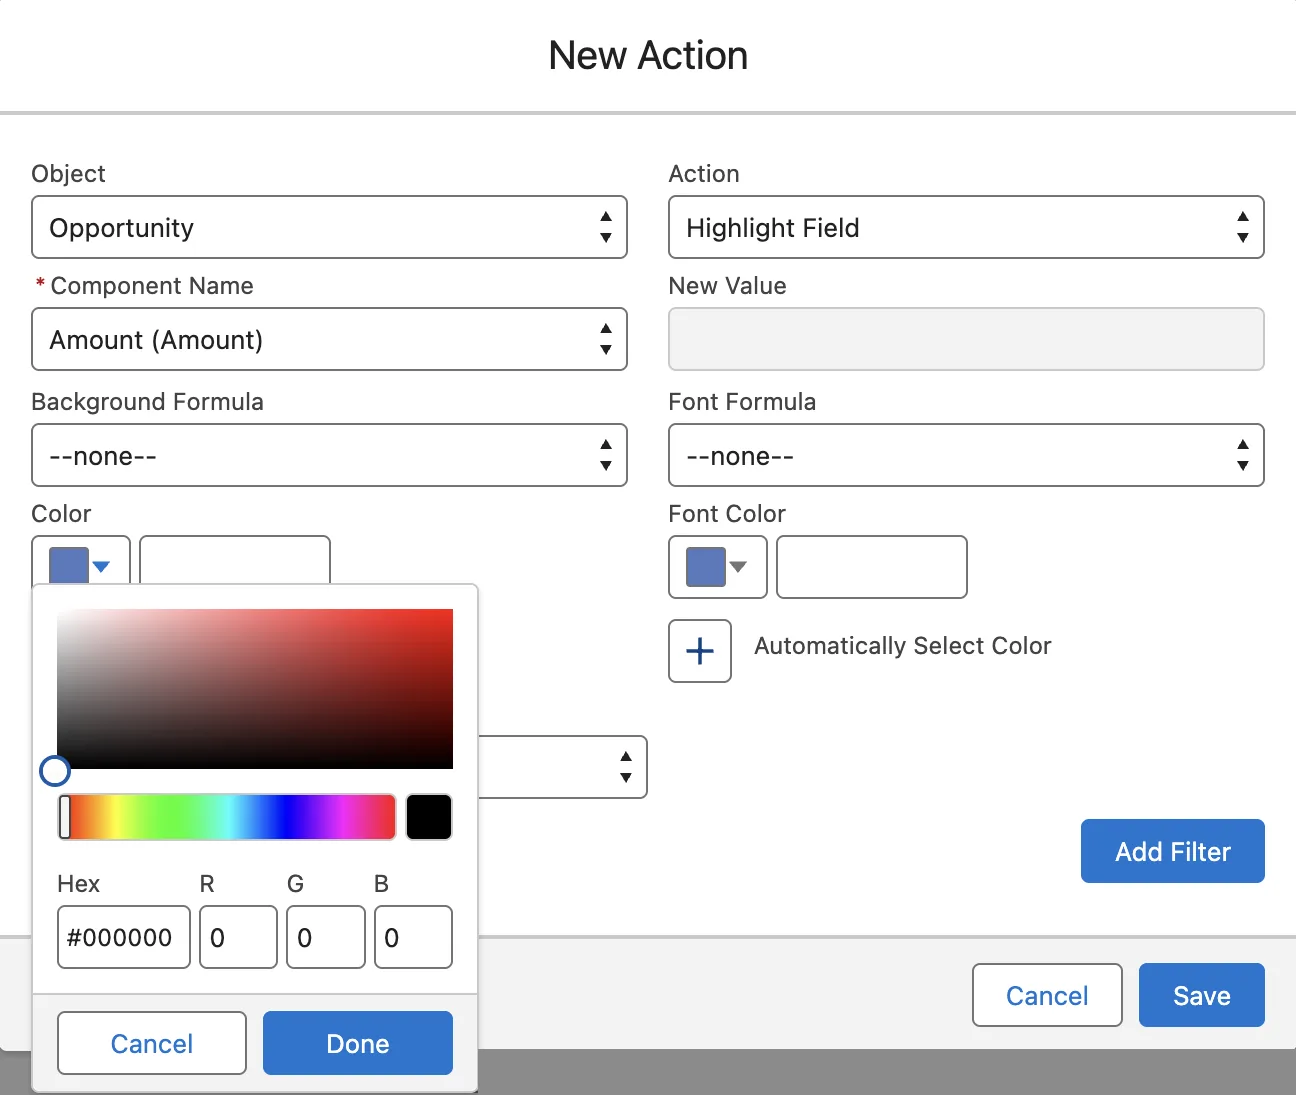
For Highlight Field, set the background color.
Pick one of two ways.
- Color. Click the color box. Pick a color in the picker, or type a hex color code such as
#3AB3AC. Then click Done. - Background Formula. Pick a formula field that returns a color code. The color then follows the data in each record. TAF recommends this over several actions on one field.
- Color. Click the color box. Pick a color in the picker, or type a hex color code such as
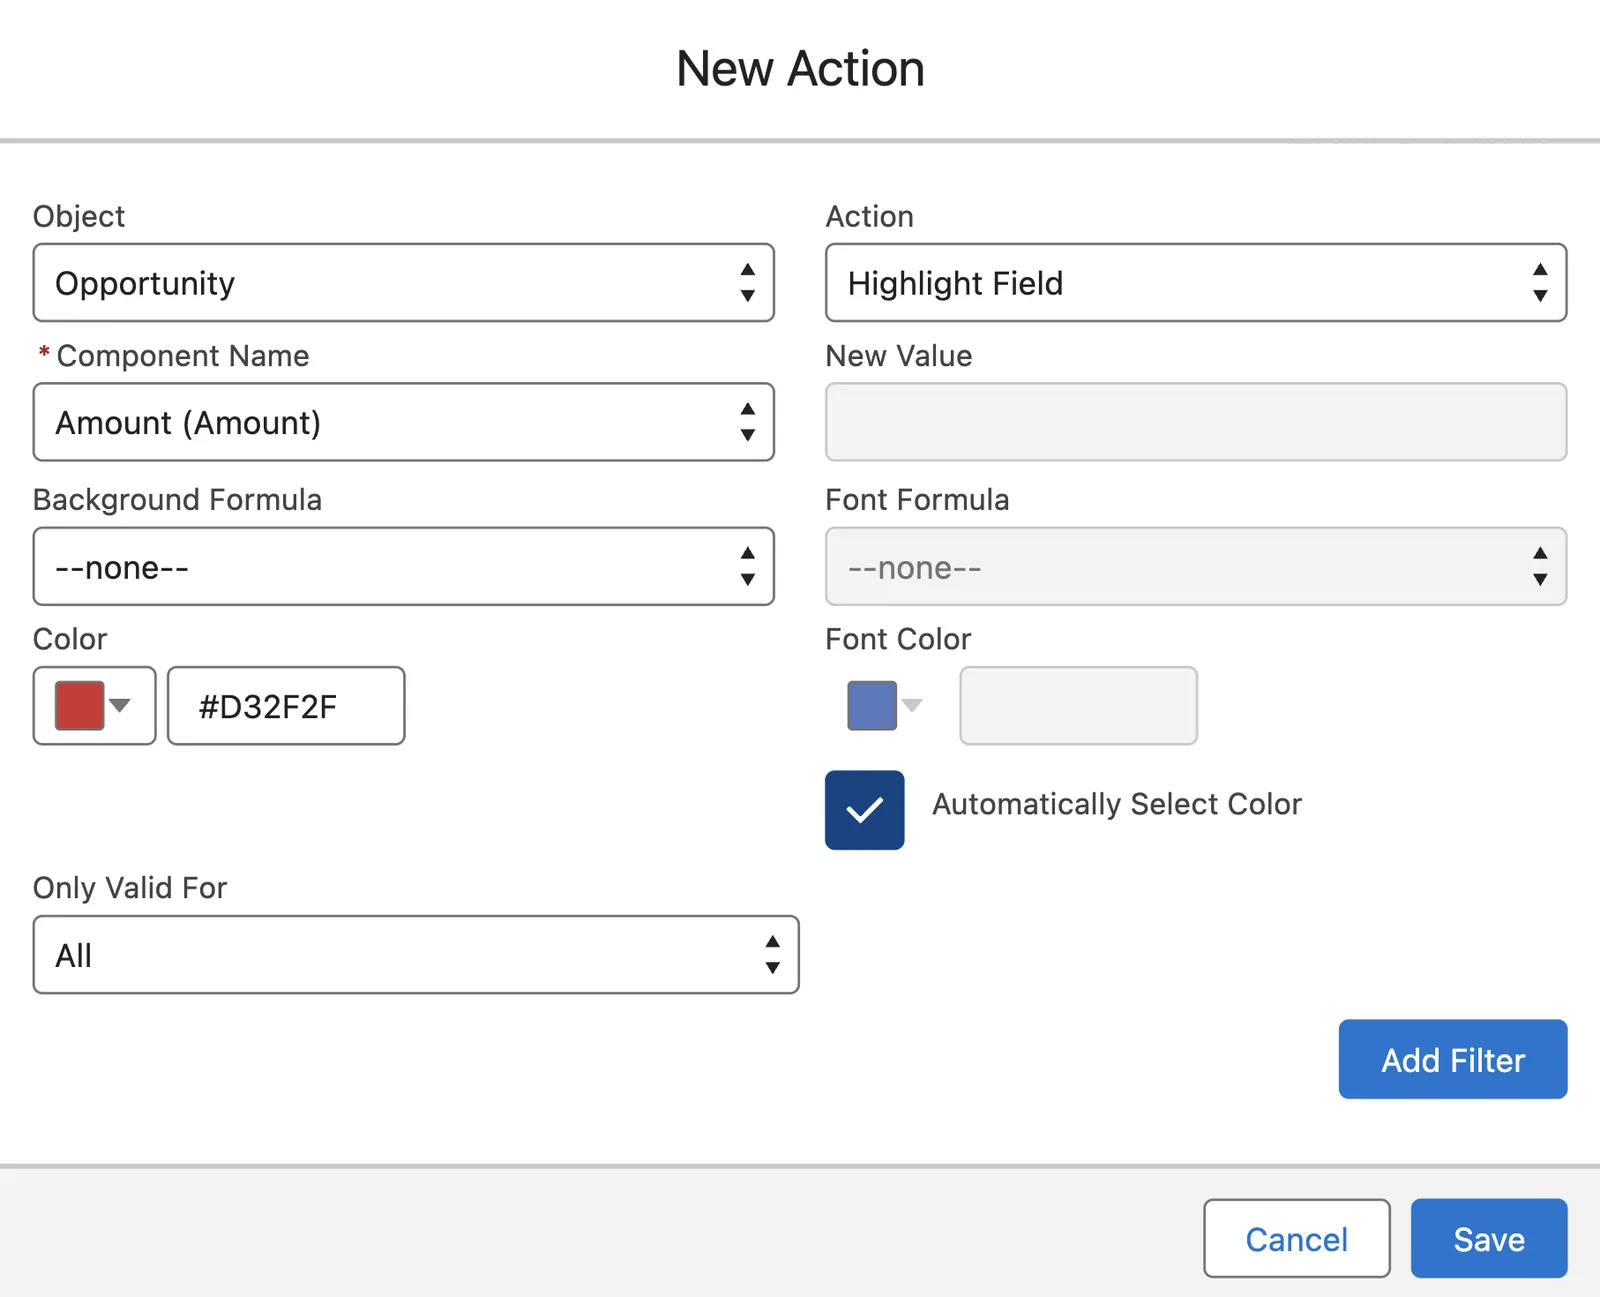
Tick Automatically Select Color for the font.
Highlighter then picks white or black text to suit the background, so the field stays easy to read. You can also set a fixed Font Color the same way as the background.
For Rename Field Label, type the new label in New Value.
Click Save, if the action applies everywhere.
The window closes, and the new action shows in the Action List. It now runs on every record, for every user. To limit it to some users or some records, do not save yet. Go to Limit an action.
If the action has no filter, a box warns that the field is always highlighted. That is expected. Click Ignore And Save. The action saves.
5Limit an action
Optional. Skip this chapter if your action applies everywhere.
You set these limits in the same New Action window, before you click Save.
Limit it to some users
In Only Valid For, pick User, Profile or Public Group.
Leave it on All to apply the action to everybody.
In the list that appears, pick the user, profile or group.
Limit it to some records
Click Add Filter.
A filter row appears, with the lists Field, Operator, Value Type, Value and And/Or.
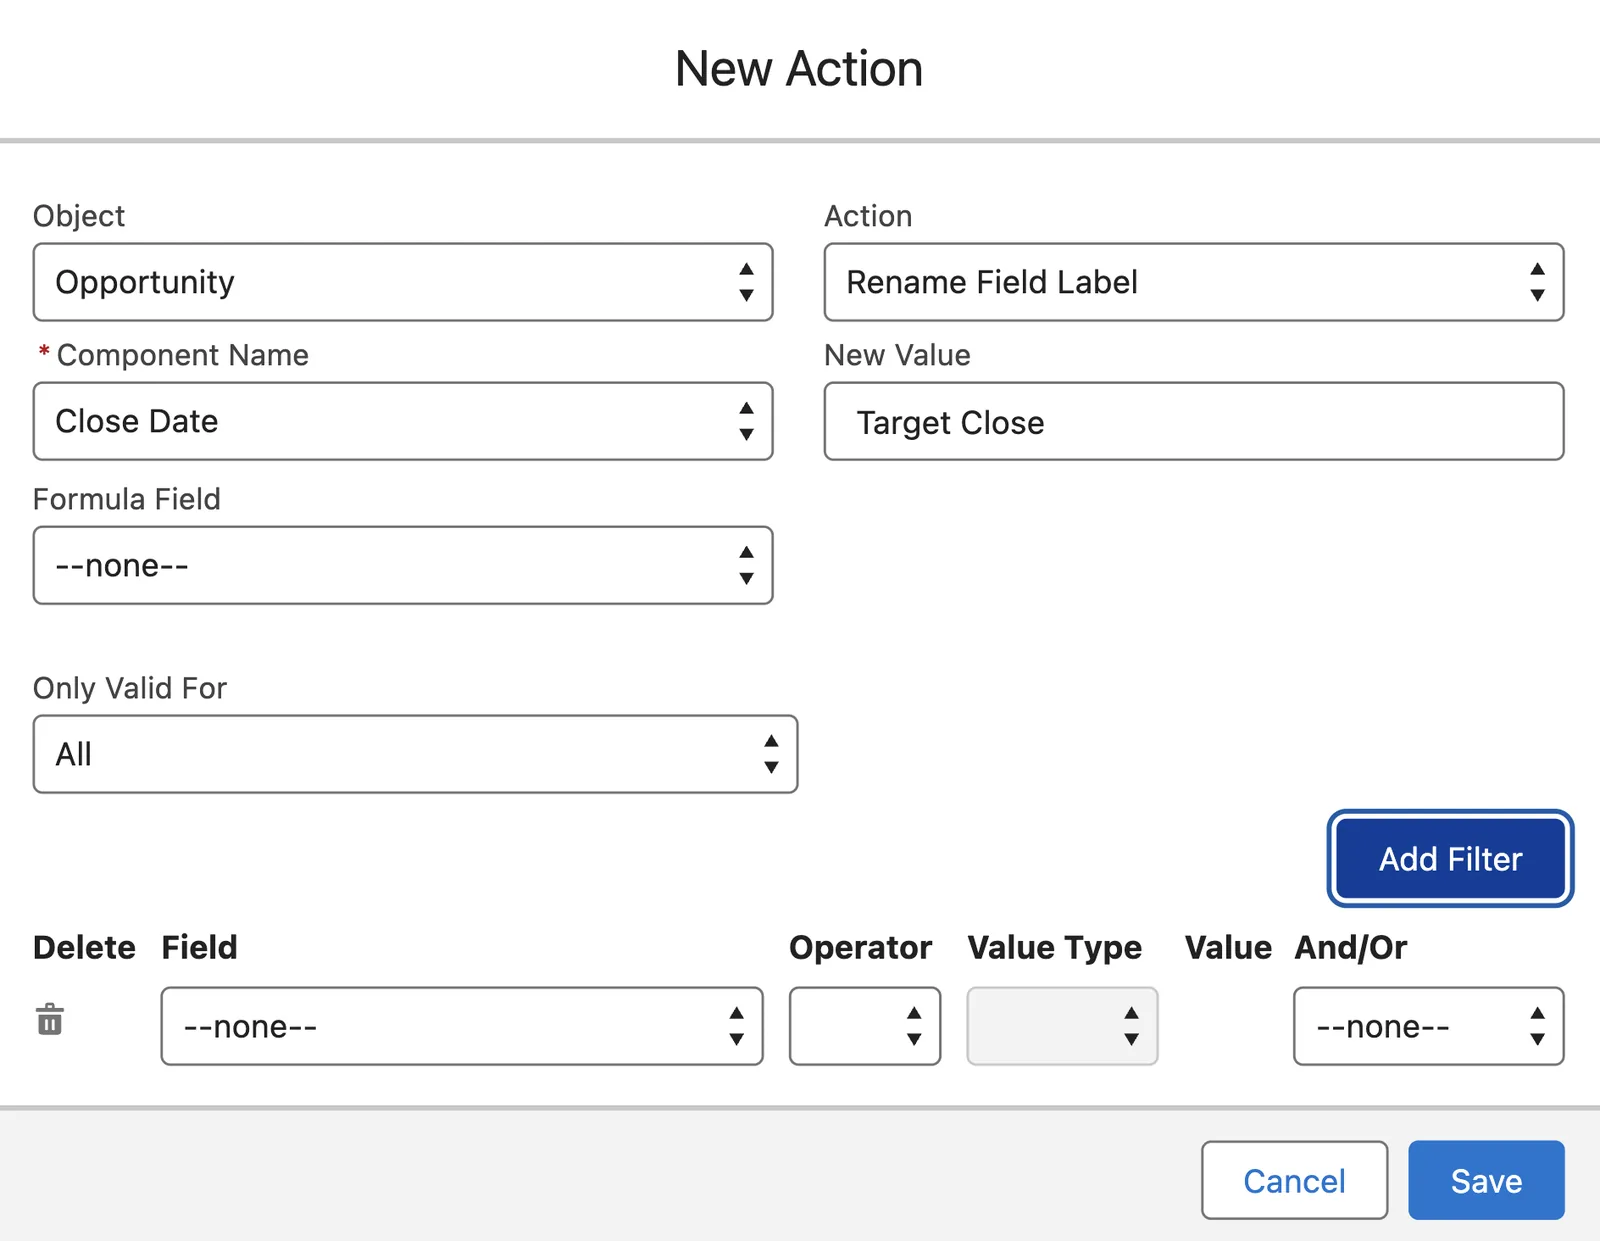
In Field, pick the field that decides whether the action runs.
It does not have to be the field in Component Name. It can be any field on the object.
In Operator, pick == or !=.
==means equals.!=means does not equal.For a Date or Date/Time field, pick a Value Type.
Pick a fixed date, or a date literal such as
TODAY,NEXT_WEEKorTHIS_YEAR. Skip this step for other field types.In Value, type or pick the value.
For a picklist, a checkbox or a date literal, pick the value from the list.
To add a second filter, click Add Filter again.
Then go back to the first filter and set its And/Or list.
&&means this filter and the next one must both be true.||means this filter or the next one must be true.
Click Save.
Highlighter goes back to the list of actions.
Keep filters few
Each filter adds time to the page load. For several conditions, build one formula field that returns True or False. Use that field as the only filter.
Highlighter does not support nested filters, or && and || mixed in one action.
6Turn Highlighter on
Your actions do nothing until the Highlighter component sits on the record page. This example uses Opportunity. The steps are the same for any object.
Open a record of the object you set up.
Use a test record in your sandbox. If the object has no records yet, make one. For Opportunity, open the Opportunities tab and click New. Fill in Opportunity Name, Close Date and Stage. Click Save.
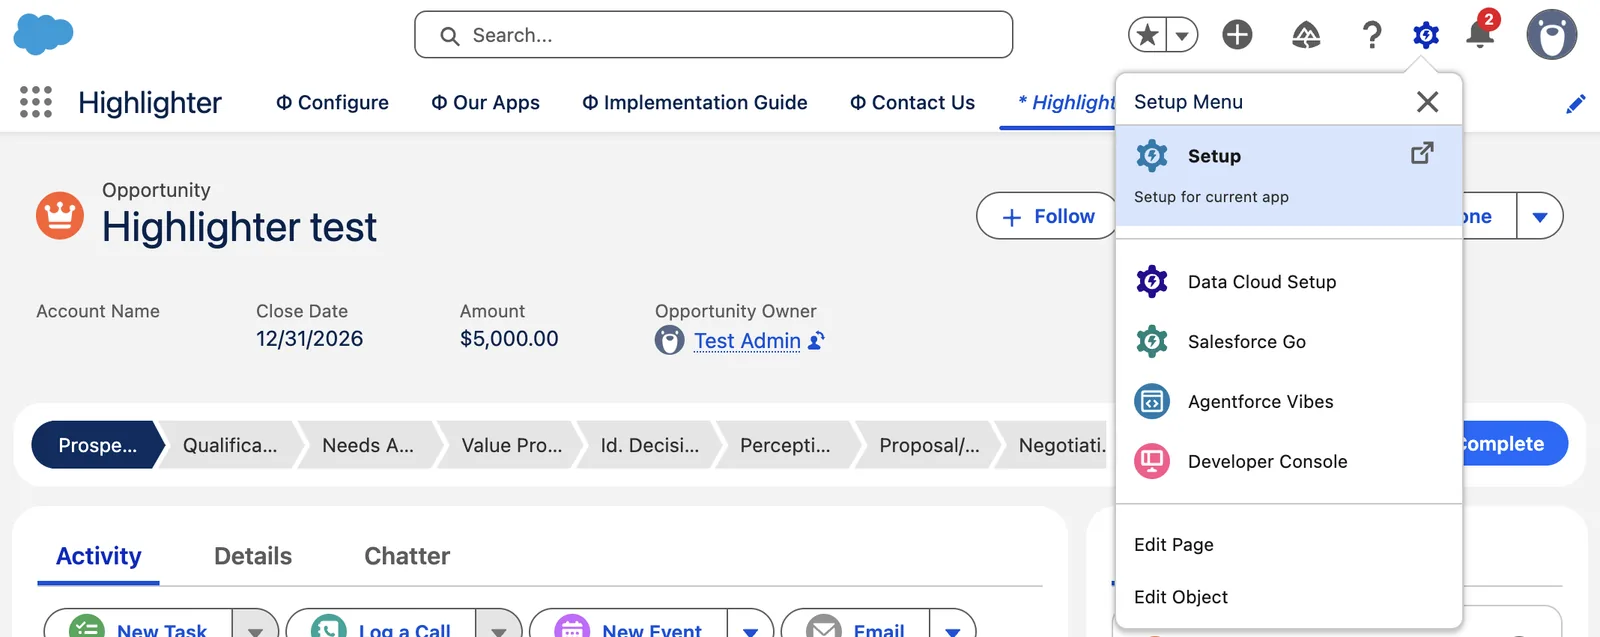
Click the gear icon at the top right. Click Edit Page.
The Lightning App Builder opens. Components sit in the left panel, the page sits in the middle, and the settings of the item you click sit in the right panel.
Add a new tab beside Details.
Click the tab bar on the page, the bar that holds Activity and Details. In the right panel, click Add Tab. Click the new tab in that list. In Tab Label, pick Custom, and type a name, for example
Details HL.Drag recordViewWithHighlights into the new tab.
recordViewWithHighlightsFind it under Custom - Managed in the left panel. Do not use the older HighlightDetail component.
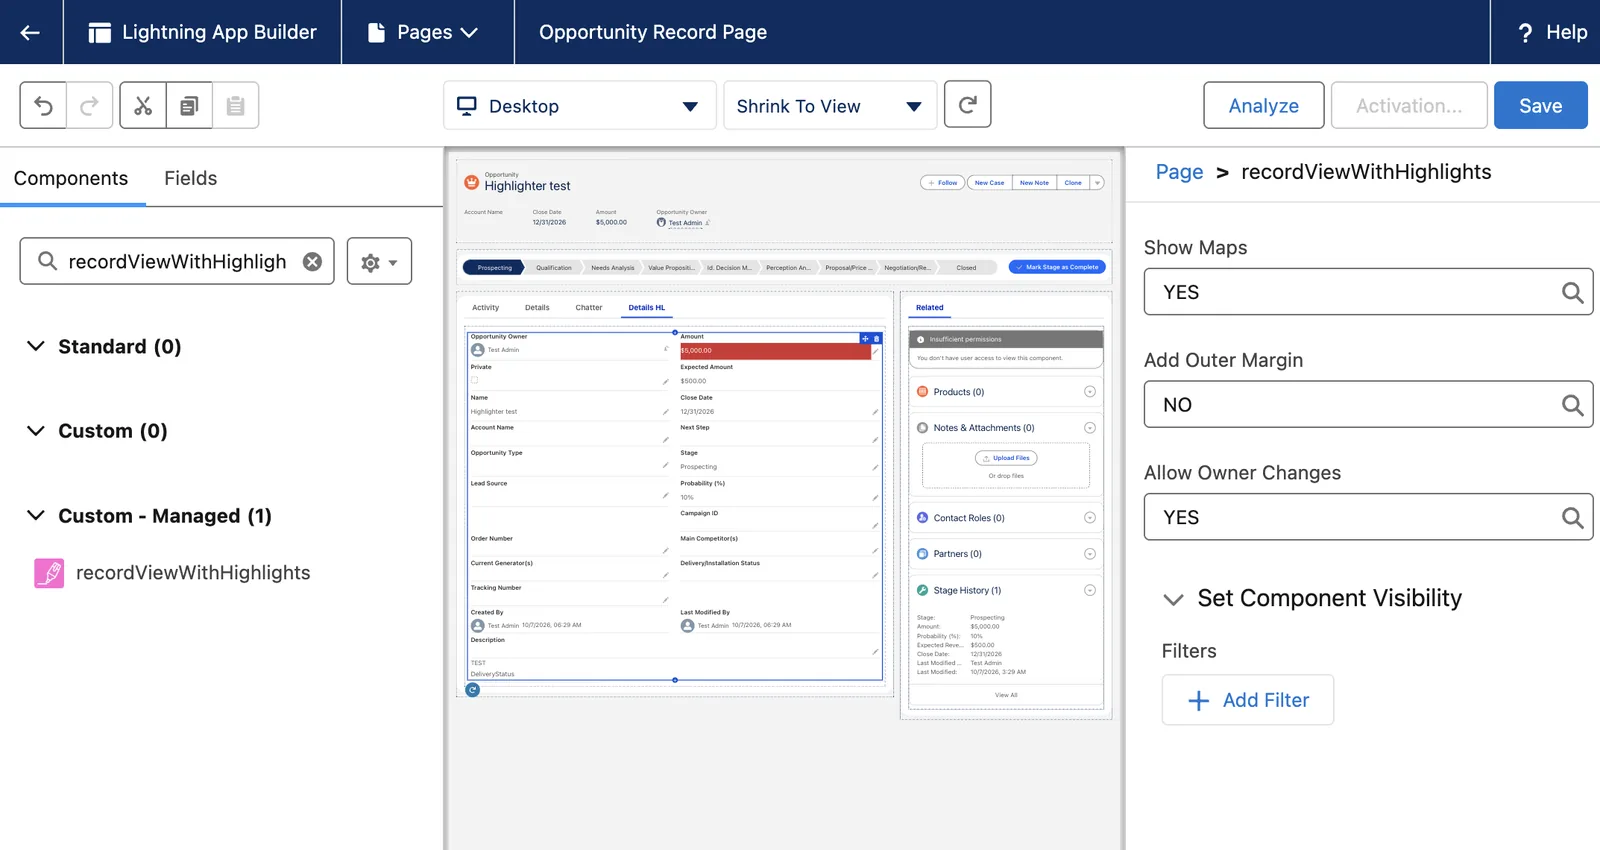
Wait for the component to load. Then click Save.
After a few seconds the component grows into a full view of the record. Click Save at the top right. If nothing happens after a few seconds, click Save anyway.
Optional: show maps beside address fields.
Click the component. In the panel on the right, choose whether maps show next to the standard address fields.
Activate the page, if Salesforce asks.
Salesforce asks the first time you edit the Lightning page of an object. Click Activate. Click Assign as Org Default. Choose Desktop. Click Next. Click Save.
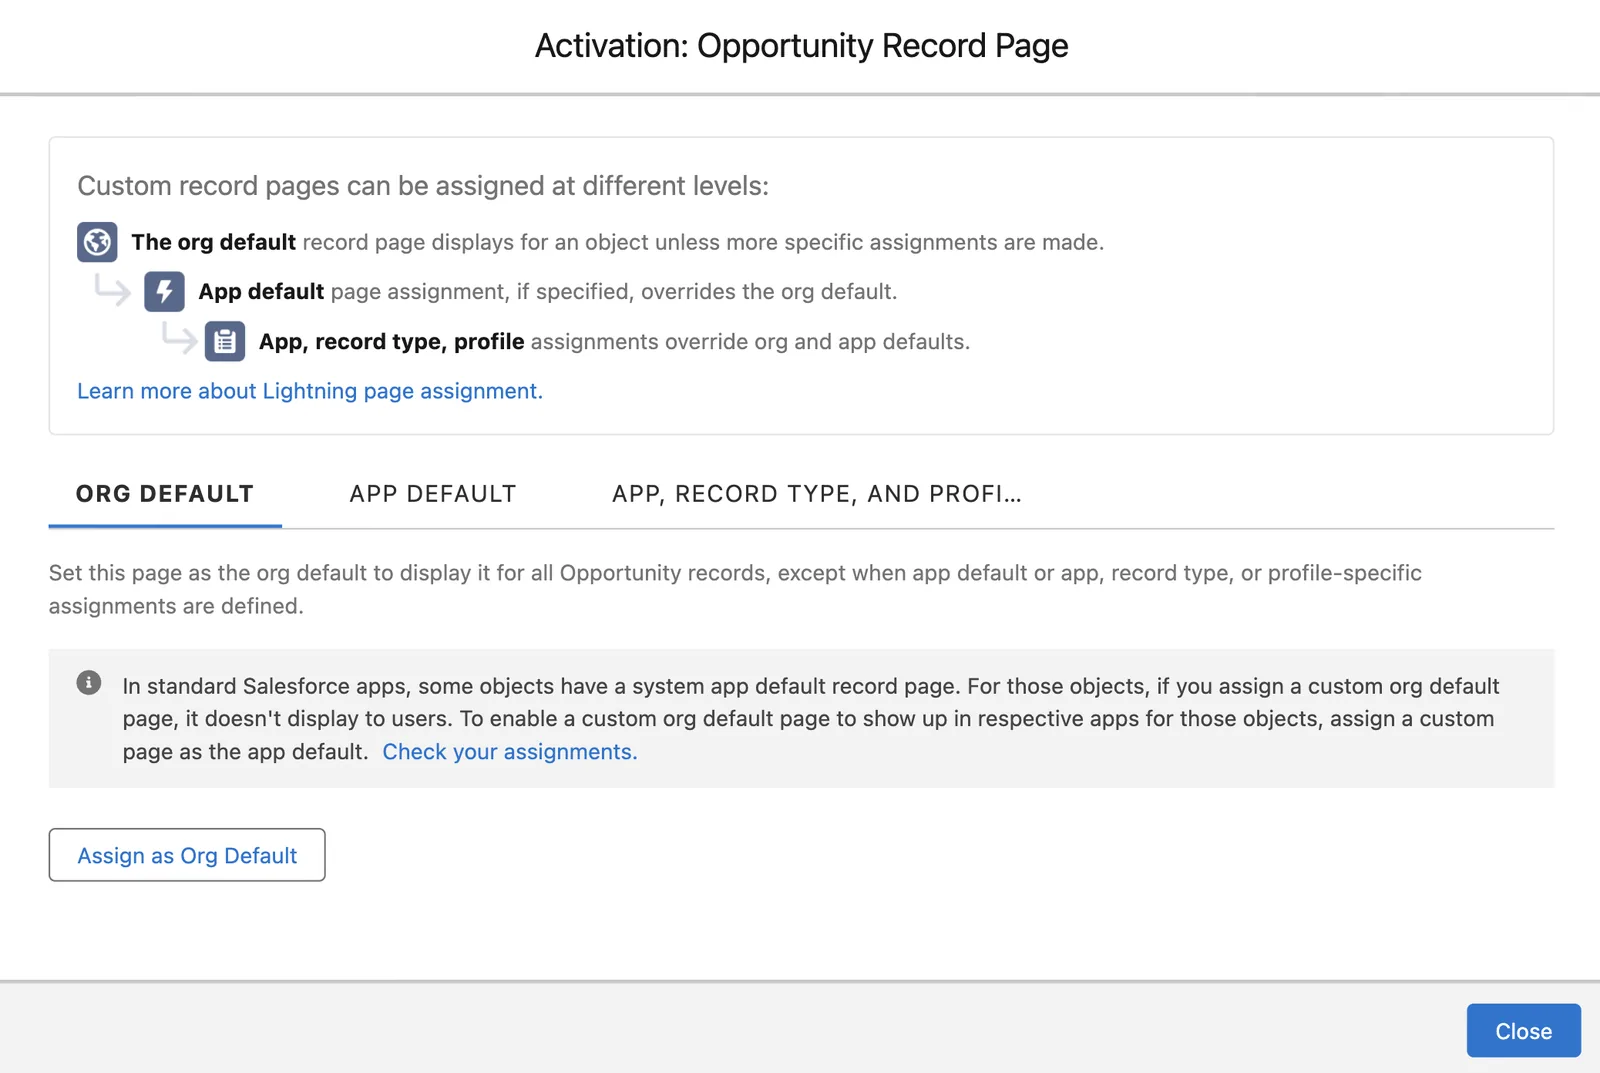
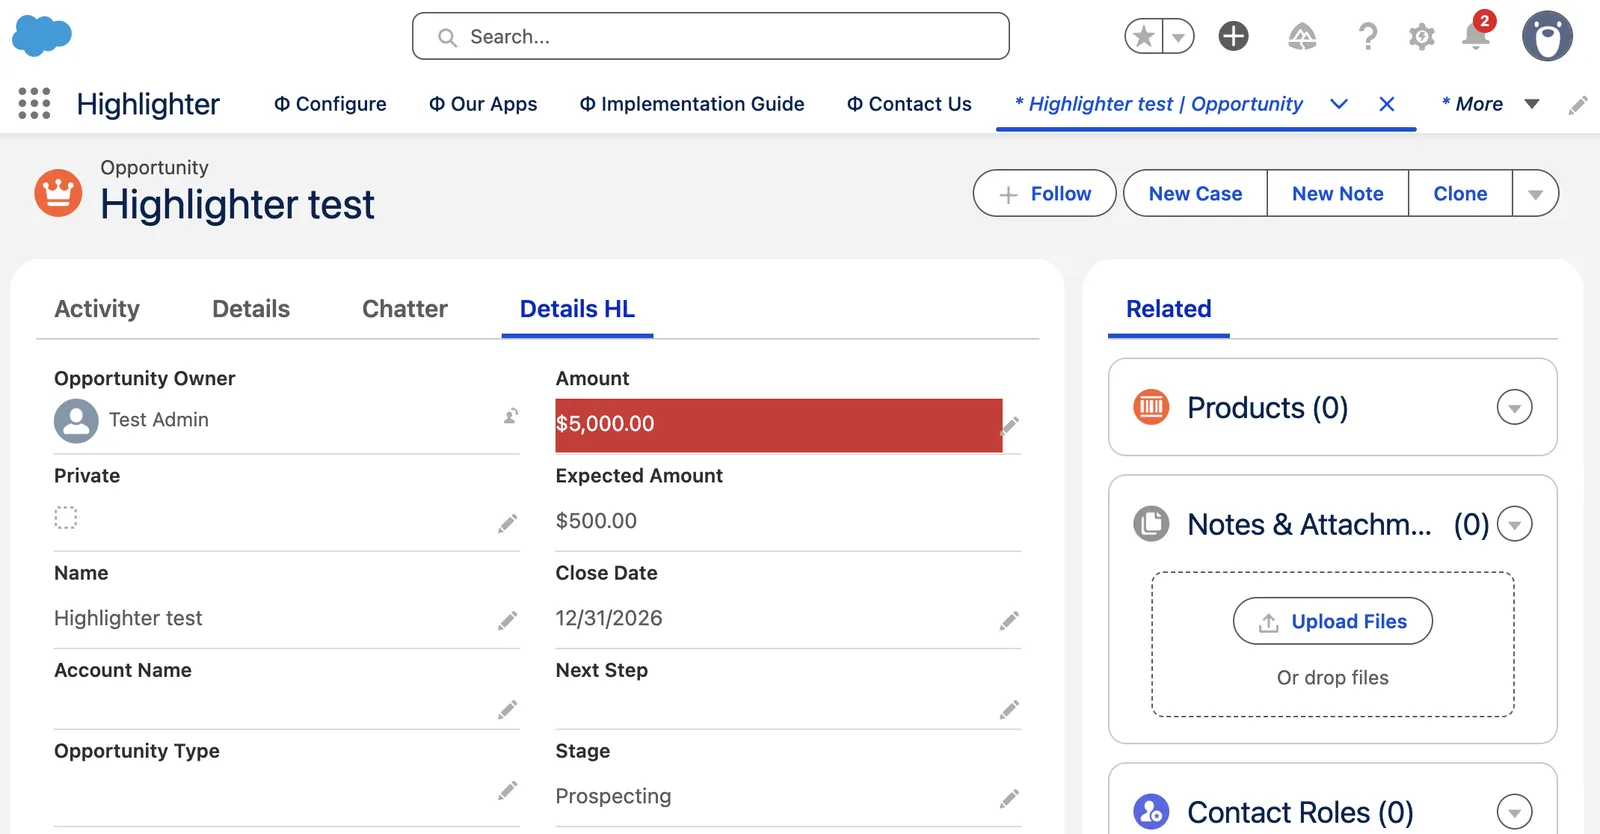
Click Back. Check the new tab.
Back sits at the top right of the Lightning App Builder. The record page opens with the new tab. Fields with actions show your colors, labels or blanks.
Tidy up when it works
When the new tab works well, remove the old Details tab. Then rename the new tab to Details.
7Advanced setup
Most orgs do not need this chapter. It asks for more Salesforce skill. TAF offers paid help with it through a case.
Edit with highlights
Check first
The recordViewWithHighlights component already edits fields in place, with the highlights on. Set up a custom Edit page only if you want highlights in the Edit window too.
Open the object in Object Manager.
Open Setup. Click Object Manager. Click your object.
Open the standard Edit action.
Click Buttons, Links, and Actions. On the Edit row, open the menu at the right and click Edit. The Override Properties page opens.
Set the Lightning override to the Highlighter Edit component. Then click Save.
Under Lightning Experience Override, pick Lightning component. Choose:
highlighter:HighlightEdit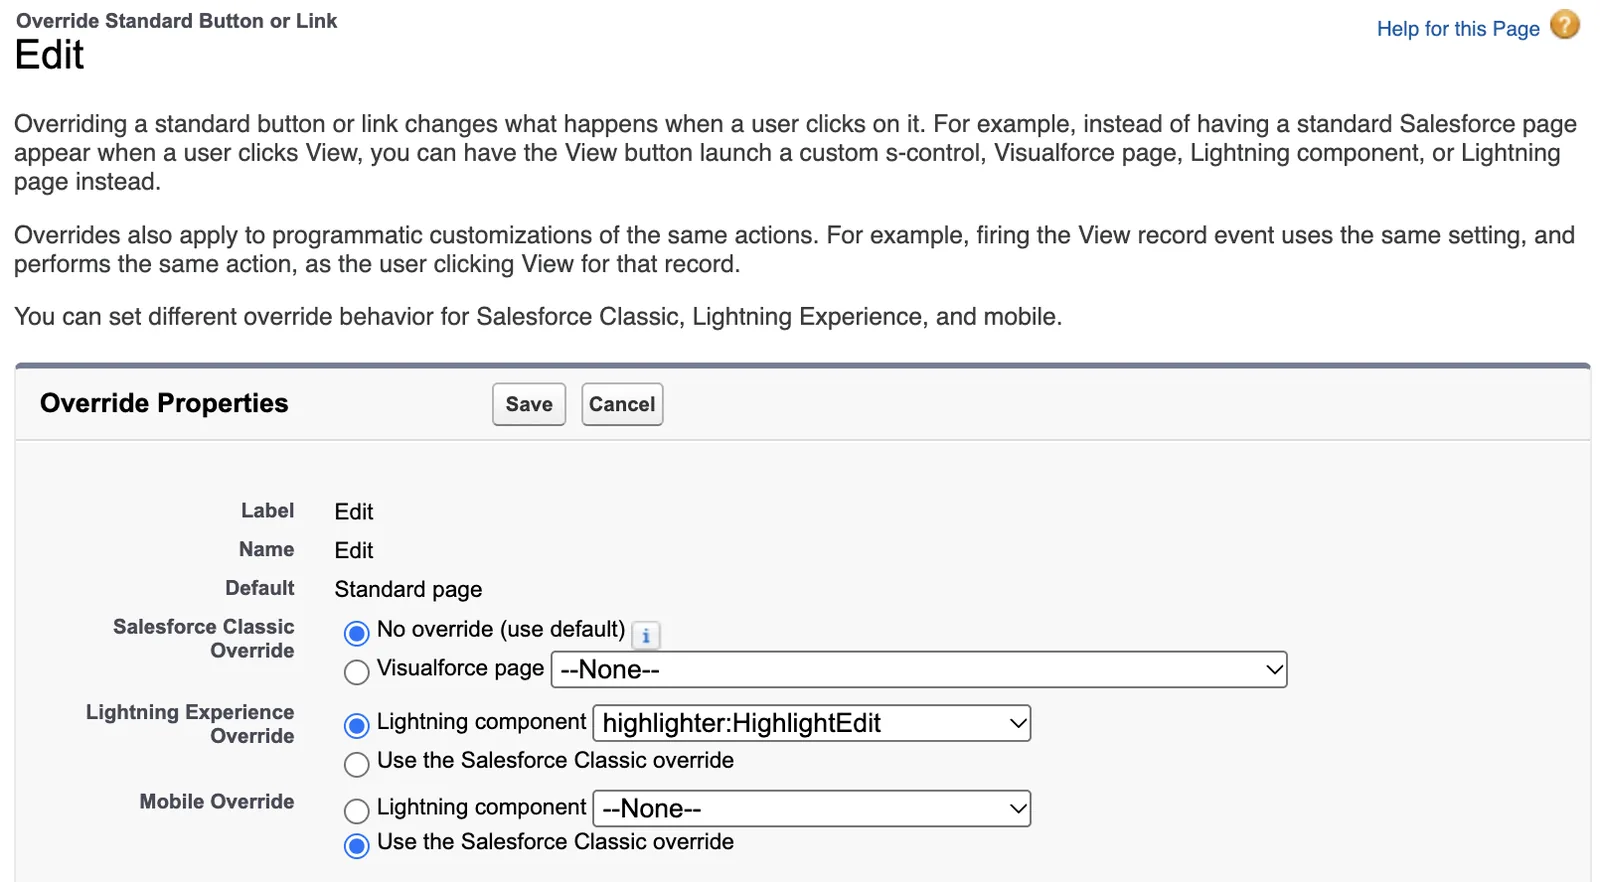
Wait ten seconds. Then refresh the record page several times.
Lightning takes a while to pick up the change. The new Edit window is a little wider and takes a little longer to load. That is how you know it works.
Show a field set with highlights
The fieldsetWithHighlights component shows a group of fields anywhere on a record page. It edits in place and keeps the highlights. You can add it several times to one page, and each copy works on its own. A field set is a named group of fields that you build in Setup.
Open the object in Object Manager.
Open Setup. Click Object Manager. Click your object.
Click Field Sets. Then click New.
To change a field set you already have, click its name instead, and skip the next step.
Name the field set. Then click Save.
Type a Field Set Label. Salesforce fills in Field Set Name. Type a short note in Where is this used?. Click Save. The field set editor opens.
Drag fields into the field set.
Drag from the field list at the top into In the Field Set. Drag a field back out to remove it.
Click Save.
Open the Lightning record page.
In Object Manager, click Lightning Record Pages and open the page. If that list is empty, open a record of the object. Click the gear icon, then Edit Page.
Drag fieldsetWithHighlights onto the page.
fieldsetWithHighlightsDrop it inside a region of the page, such as the right column. A region turns green when the component can drop there. The gray area outside the regions does not take the component.
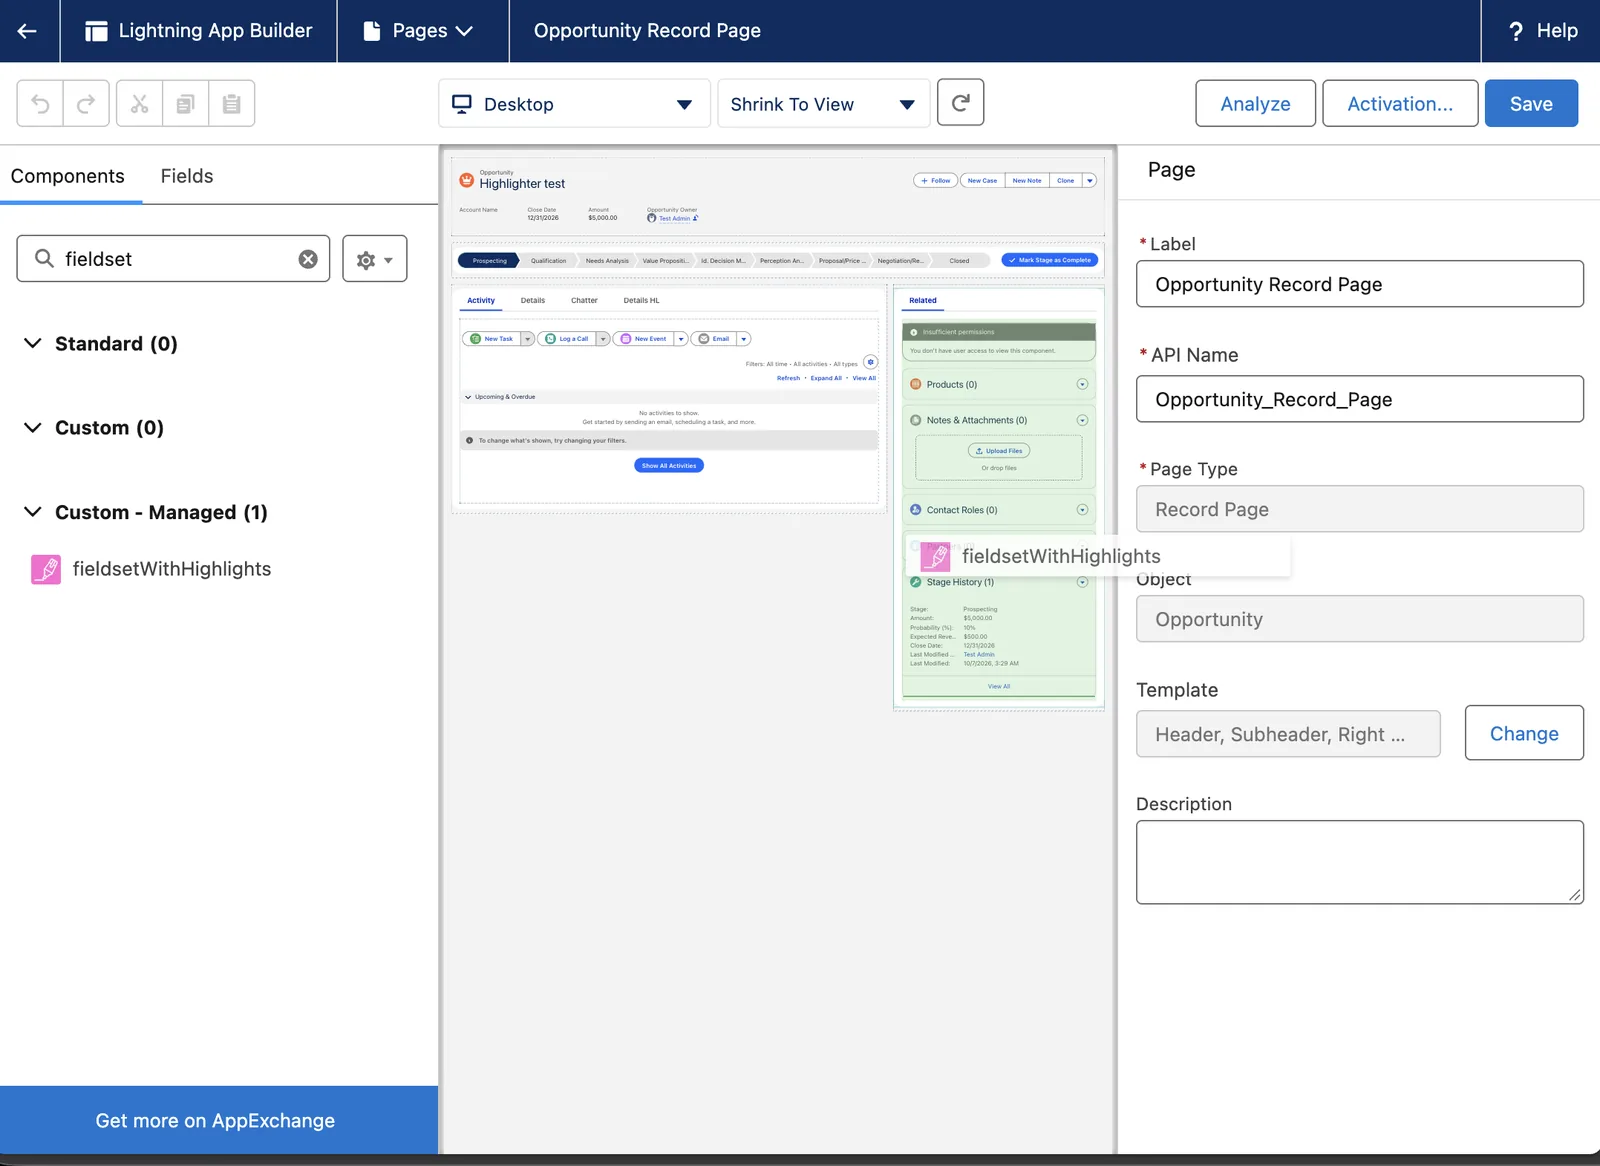
Click the component. Fill in its settings in the right panel.
Setting What to enter objectName Pick the object. Today the list holds only the current object. Enter Layout Title A title for this group of fields. Leave it blank to show the object name. Choose Field Set The field set from steps 2 to 5. Enter Icon Name Leave it blank for the object's own icon. For another icon, type icon_type:icon_name, for exampleutility:activity. The four types are utility, doctype, standard and action. See the Lightning Design System icons.No. Of Columns 1 or 2. Check the component. Click Save. Then click the back arrow.
The component updates as you fill in each setting. After you save, wait a couple of seconds. The back arrow sits at the top left.
The same field in two components
A change in one component may not show in the other until you refresh the page.
Options
The Options button sits at the bottom of the Highlighter setup page. Each option applies to every user in the org. TAF cannot turn one on for a single user.
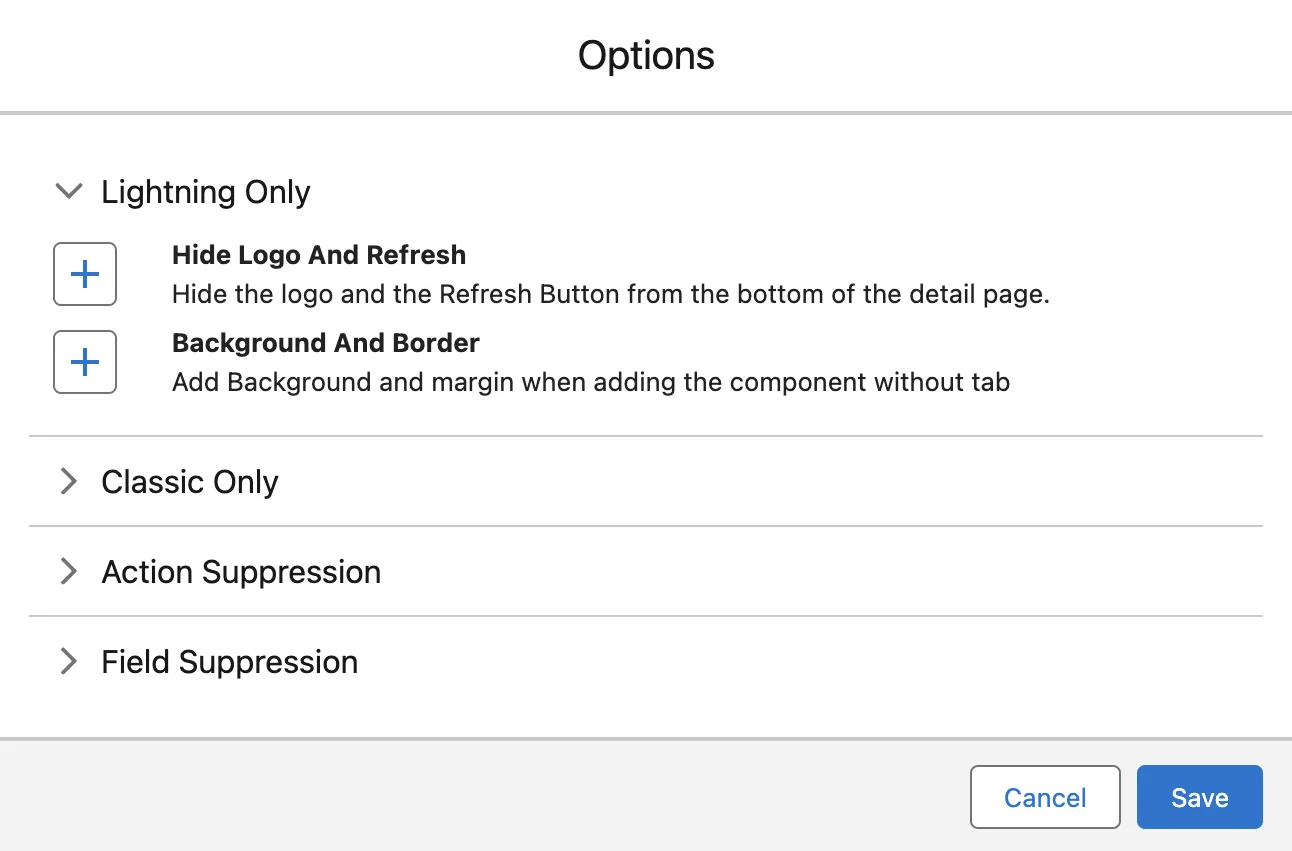
| Option | What it does |
|---|---|
| Hide Logo and Refresh | Removes the logo and the Refresh button from the bottom of the record page. |
| Background and Border | Adds a background and a margin when the component sits on the page without a tab. |
| Stop Highlight Fields Stop Hide Fields Stop Rename Field Label | Highlighter skips that action type. Turn on the ones you do not use, and pages load faster. |
| Disable Checkbox Fields Disable Formula Fields Disable Long Text Fields | Highlighter skips those field types when it checks a page for actions. Pages load faster. |
The window also lists Classic options and button options. They do not apply in Lightning. Some features are not in the window at all. Open a case, and TAF sets them up with access to your org or on a call.
Beta features
TAF is building two features that are not on the setup page yet. Open a case to join the trial. TAF sets each one up by hand, in your sandbox first and then in production, and charges for that time.
| Feature | What it does |
|---|---|
| Lookup Field Hover Replacement | When a user points at a lookup field, Salesforce shows a few fields of the linked record. This shows many more, which you choose. |
| Printable View Replacement | Replaces the standard Printable View. It adds your logo, and lets you pick the fields for an internal page and for a page for clients. |
8Update Highlighter
For later. These steps do not count in the setup progress.
TAF sometimes pushes a new version of Highlighter into every org. Some orgs are on an exclusion list and do not get these pushes. You can also install the newest version yourself at any time, from the install links on the change log. The AppExchange listing no longer updates an installed app.
Update before you report a bug
TAF works on bugs in the newest version only. Check your version before you open a case, and update if it is old.
Check the version you have.
Open Setup. In the Quick Find box, type Installed Packages. Find Highlighter and read the Version Number column.
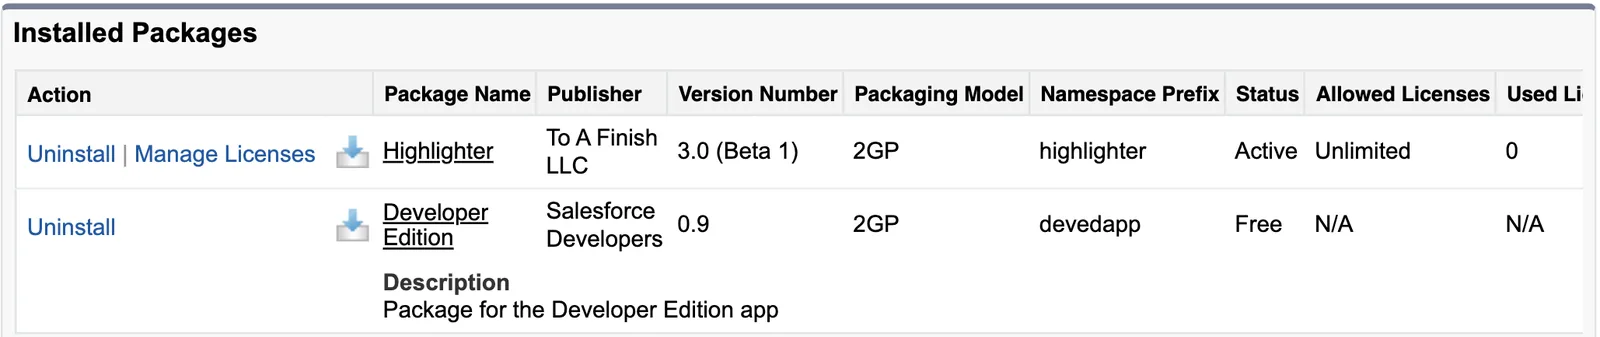
Open the Highlighter change log.
The newest version and its install links sit at the top of the Highlighter change log. If your version matches the newest one, stop here.
Update a sandbox first.
Click Install in a sandbox. Sign in to your sandbox and follow the install screens. If a screen asks who to install for, pick Install for All Users.
Salesforce installs the newer version over the one you have. Your actions and settings stay in place.
Check your record pages in the sandbox.
Open a few records that carry highlights. Make sure the highlights still show.
Update production.
Go back to the change log and click Install in production. Sign in to production and follow the same screens.
Check the version again.
Open Installed Packages again. The Version Number now matches the top of the change log.
You cannot go back to an older version
To go back, you must uninstall Highlighter and set it up again.
9Get help
Open a case if a step does not work. Give the link to the step and paste the exact error text.
Before you report a bug, update to the newest version. TAF works on bugs in the newest version only. See Update Highlighter.
Highlighter is free. TAF answers quick questions. Help with setup or configuration costs an hourly fee. Report a real bug and TAF does its best to fix it.
See what changed in each release in the Highlighter change log.
Found a mistake in this guide? Email support with the link to the step.
Rate Highlighter
If Highlighter helps you, leave a review on the AppExchange. If something is wrong, open a case first, so TAF can fix it with you.
Stuck on a step?
Open a case and send the link to the step. A person reads every case.