


List Browse implementation guide
Install List Browse and browse your first list of records. Pick how you want to work.
Let AI do it for you
Copy this guide into an AI that works in your browser, such as Claude in Chrome. The AI does the steps in your sandbox. You sign in and approve each change.
Lightning Currently free Applies to version 3.0 Last updated 8 Oct 2026
1Before you begin
List Browse lets a user tick records in a list view and then step through them one at a time. The user does not go back to the list between records. This guide takes you from the install to a working Browse button on Accounts.
What you need
- A Salesforce org in Enterprise, Unlimited or a higher edition, Developer or Professional Edition. Professional Edition runs most features. Group Edition does not work.
- A user with admin rights in that org.
- A sandbox, to set List Browse up there first.
- Lightning Experience. This guide covers Lightning only. For Classic, open a case.
- My Domain. The List Browse component is a Lightning component, and Lightning components need My Domain. An org that uses Lightning record pages already has it.
Test in a sandbox first
The Browse button and the List Browse component change list views and record pages for every user. Set each object up in a sandbox before you add it to production.
Objects that work
List Browse comes with a Browse button for Leads, Accounts, Contacts, Opportunities and Cases. You can add a Browse button to other objects yourself. See Browse other objects.
Tasks have no List View Button Layout in Lightning, so this guide does not cover them. To browse Tasks, open a case.
List Browse is free
Since 1 January 2026, List Browse is free to use.
2Install List Browse
Install into a sandbox first. When the whole guide works there, come back and install into production.
Open the List Browse listing on the AppExchange. Click Get It Now.
Go to List Browse on the AppExchange. Sign in when the AppExchange asks. It shows a Trailblazer sign-in or a Salesforce login page. A Trailblazer account is the free login for Trailhead and the AppExchange. If the AppExchange lists your orgs and your org is not there, link it to your Trailblazer account first.
Pick your sandbox as the place to install.
The AppExchange shows the buttons Install in Sandbox and Install in Production, or a list of your orgs. For your first install, pick the sandbox. Later, repeat these steps and pick production.
Tick the terms box. Then click Confirm and Install.
The page lists the package and the org it goes into. Tick I have read and agree to the terms and conditions. Salesforce then asks you to sign in to that org. When List Browse is already in the org, this window may not show.
Sign in to the org.
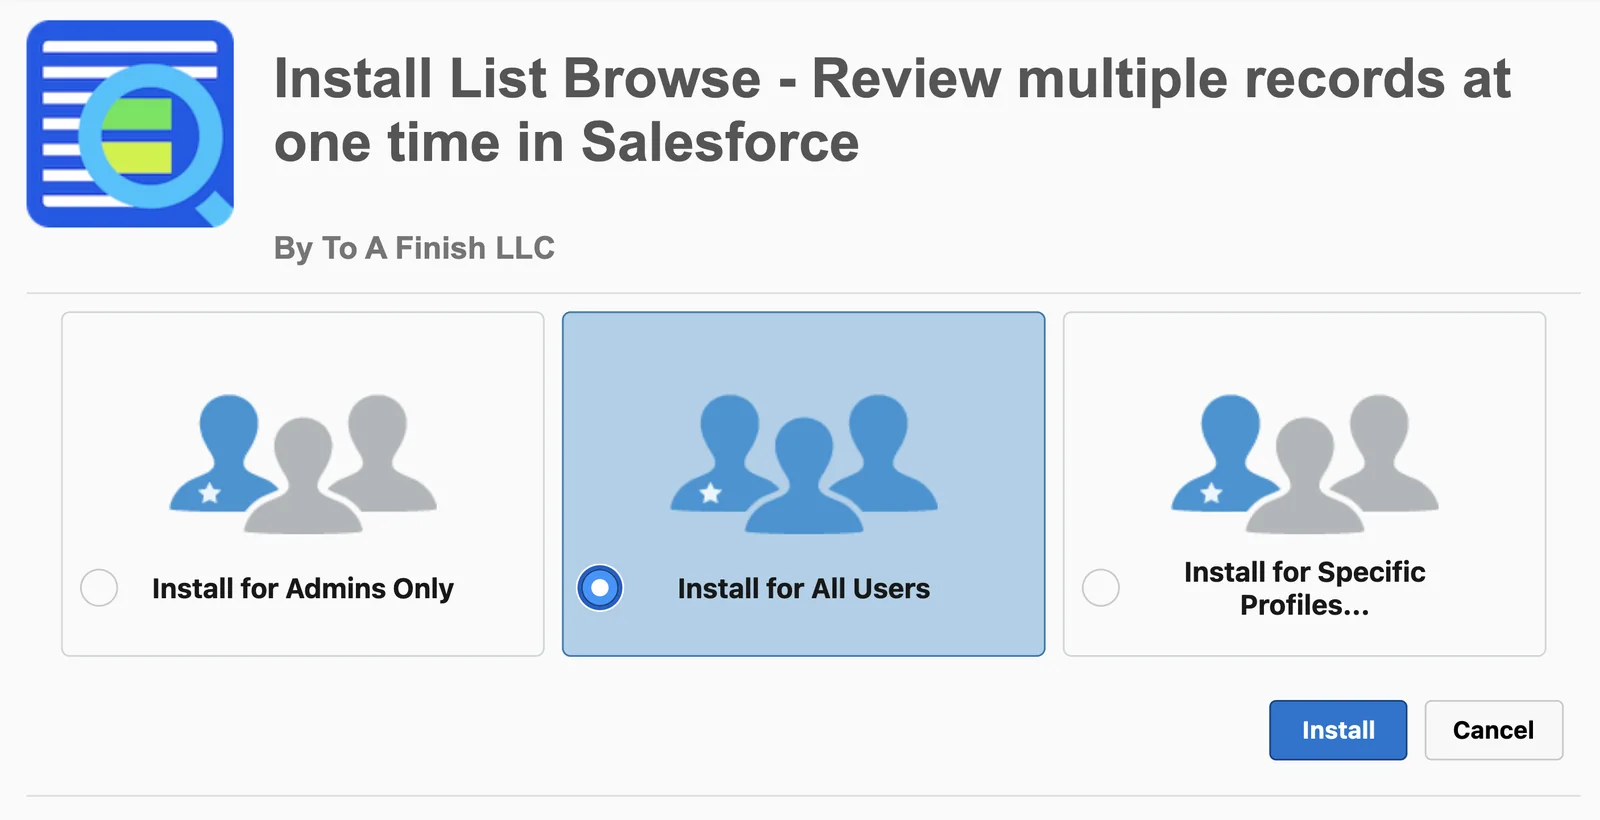
Salesforce opens the install page for List Browse, with three choices of who to install for. When List Browse is already in the org, the page offers Upgrade in place of Install.
Pick Install for All Users. Then click Install.
Every user who browses records needs access to List Browse. When the install takes a while, Salesforce says it will email you when it finishes.
Assign List Browse (Admin) to each admin who sets up List Browse.
List Browse has three permission sets.
Who Permission set What it allows Admins who set up List Browse List Browse (Admin) Runs List Browse and opens its Configure page. Every other user List Browse (User) Runs List Browse, without the admin features. Users of an Experience Cloud site List Browse (Guest) Runs List Browse on a site. Skip it if you have no site. Open Setup. In the Quick Find box, type Permission Sets. Click Permission Sets. Click List Browse (Admin). Click Manage Assignments, then Add Assignment. Tick each admin. Click Next. Salesforce asks whether the assignment expires. Leave it with no expiration date. Click Assign.
Assign List Browse (User) to every other user.
Go back to Permission Sets. Click List Browse (User). Assign it the same way, to every user who browses records.
3Add the Browse button
Each object needs the Browse button on its list views. This chapter uses Account. Do it again for each object you want to browse.
Open the object in Object Manager.
Open Setup. Click Object Manager. Click Account.
Click List View Button Layout.
The page shows one row, named List View.
On the List View row, open the menu at the right. Click Edit.
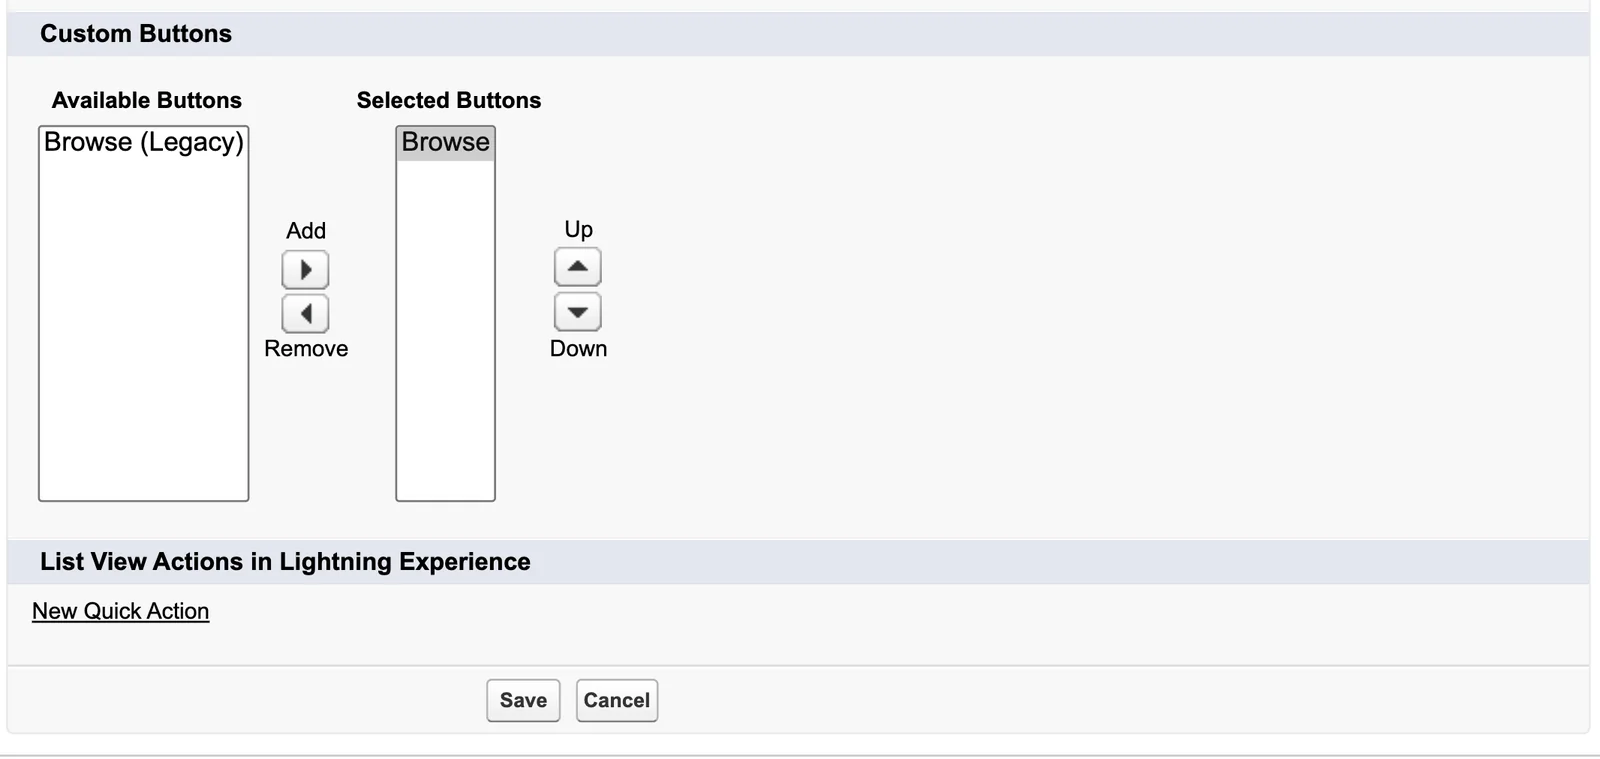
The edit page opens. Standard Buttons sit at the top. Custom Buttons sit below them.
Under Custom Buttons, move Browse into Selected Buttons.
Click Browse in Available Buttons. Click the Add arrow. Pick Browse, not Browse (Legacy). Browse (Legacy) is the older button.
Click Save.
Salesforce goes back to List View Button Layout.
4Add the List Browse component
The List Browse component is the bar of browse controls on the record page. You add it once for each object, from a record that you open with the Browse button.
Open the Accounts tab. Pick a list view.
Use the app your users work in, for example Sales. Pick a list view such as All Accounts. You need at least two records. In a sandbox with no accounts, click New, type an Account Name and click Save. Make three test accounts this way.
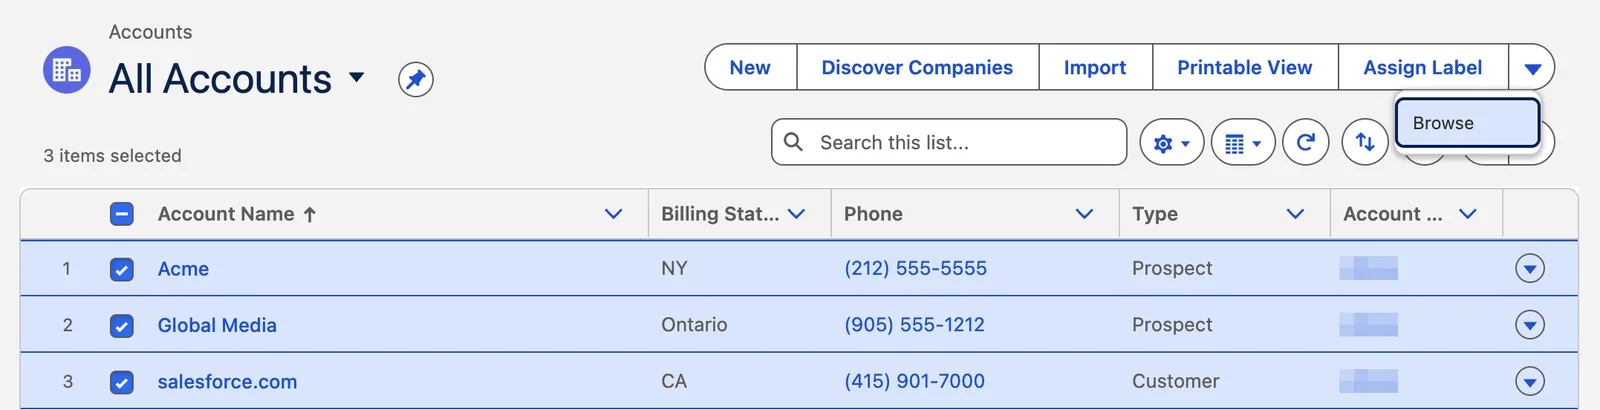
Tick two or more records. Click Browse.
Browse sits with the other list buttons at the top right. If you do not see it, click the arrow at the end of the buttons. The first record you ticked opens.
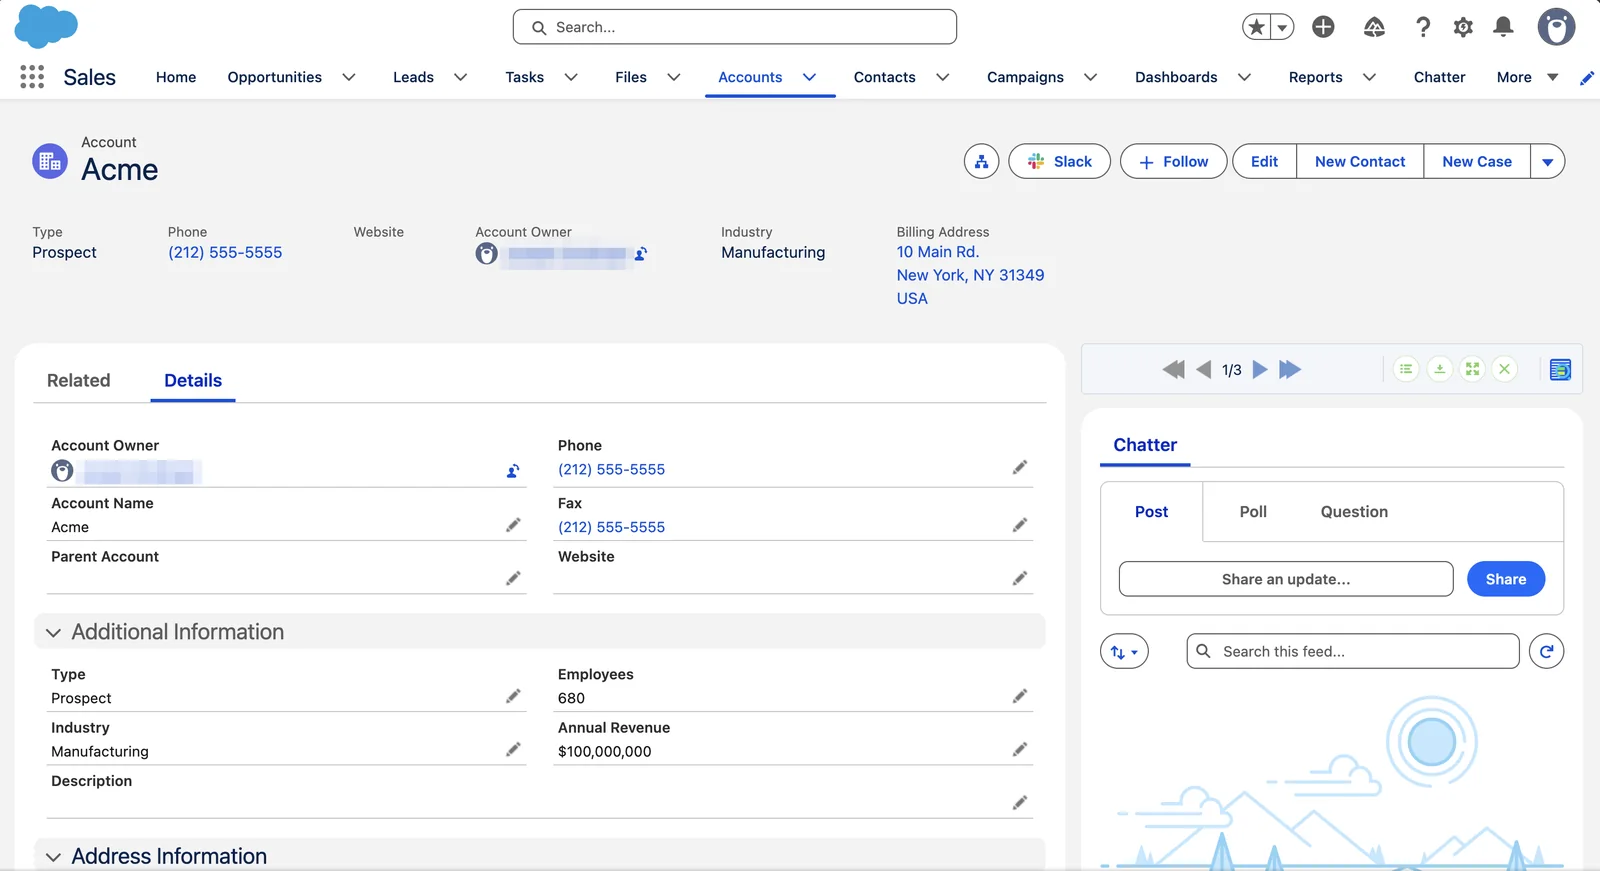
Click the gear icon at the top right. Click Edit Page.
The Lightning App Builder opens. Components sit in the left panel, the page sits in the middle, and the settings of the item you click sit in the right panel.
Drag ListBrowse onto the page.
ListBrowseFind it under Custom - Managed in the left panel. Drop it at the top of the right column, so users see it without a scroll. A region turns green when the component can drop there.
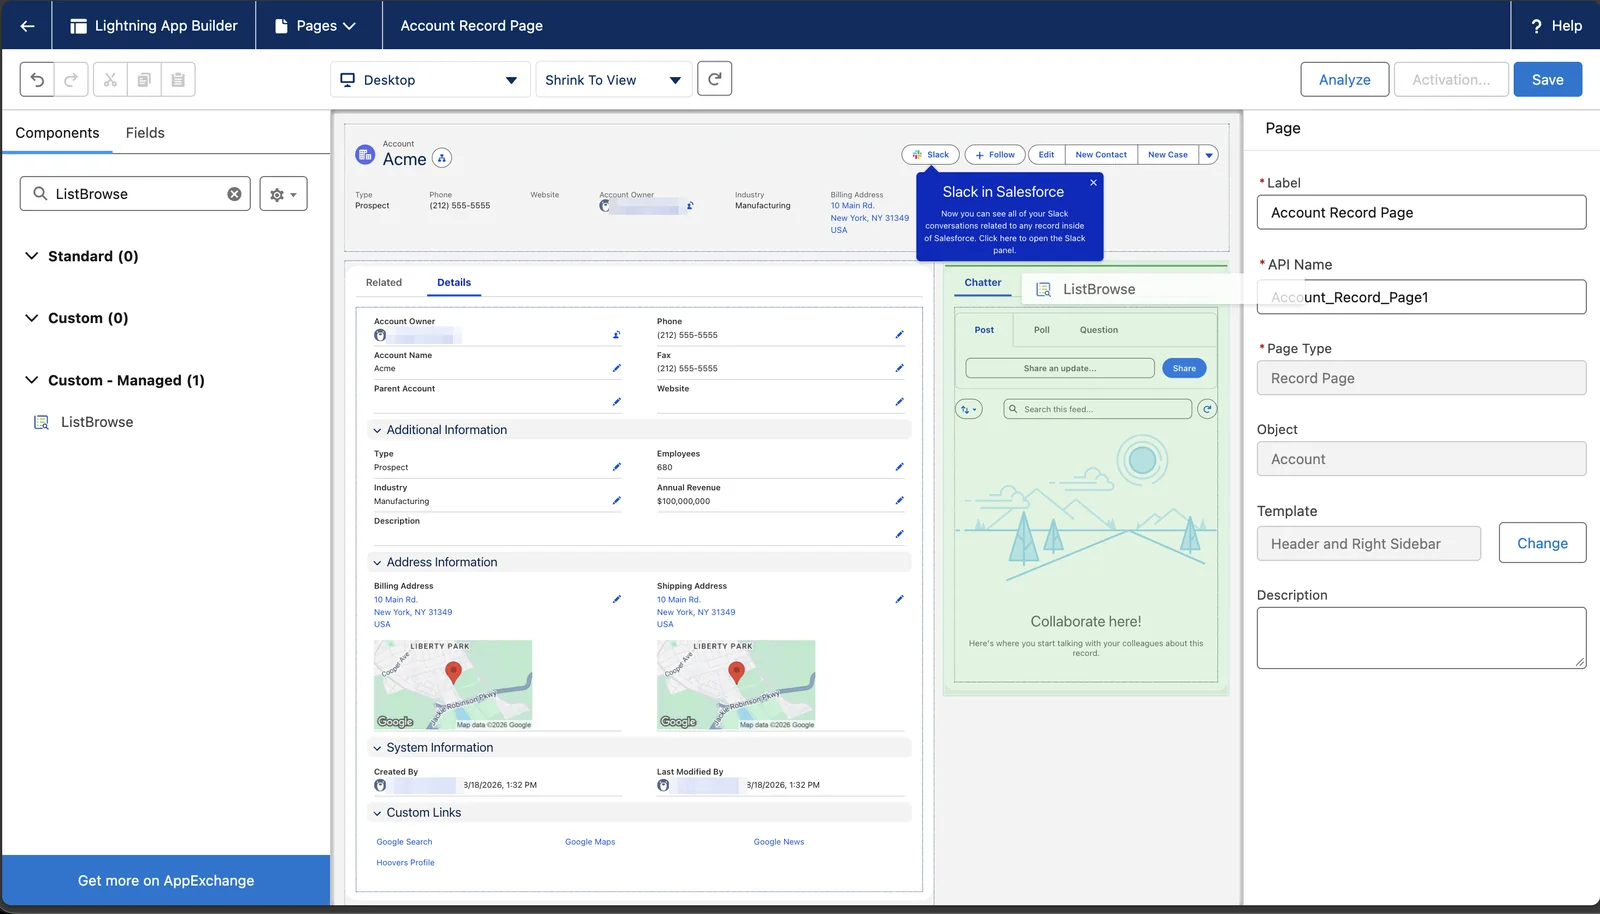
Click Save.
Salesforce saves the page. If Salesforce asks to activate it, go to the next step.
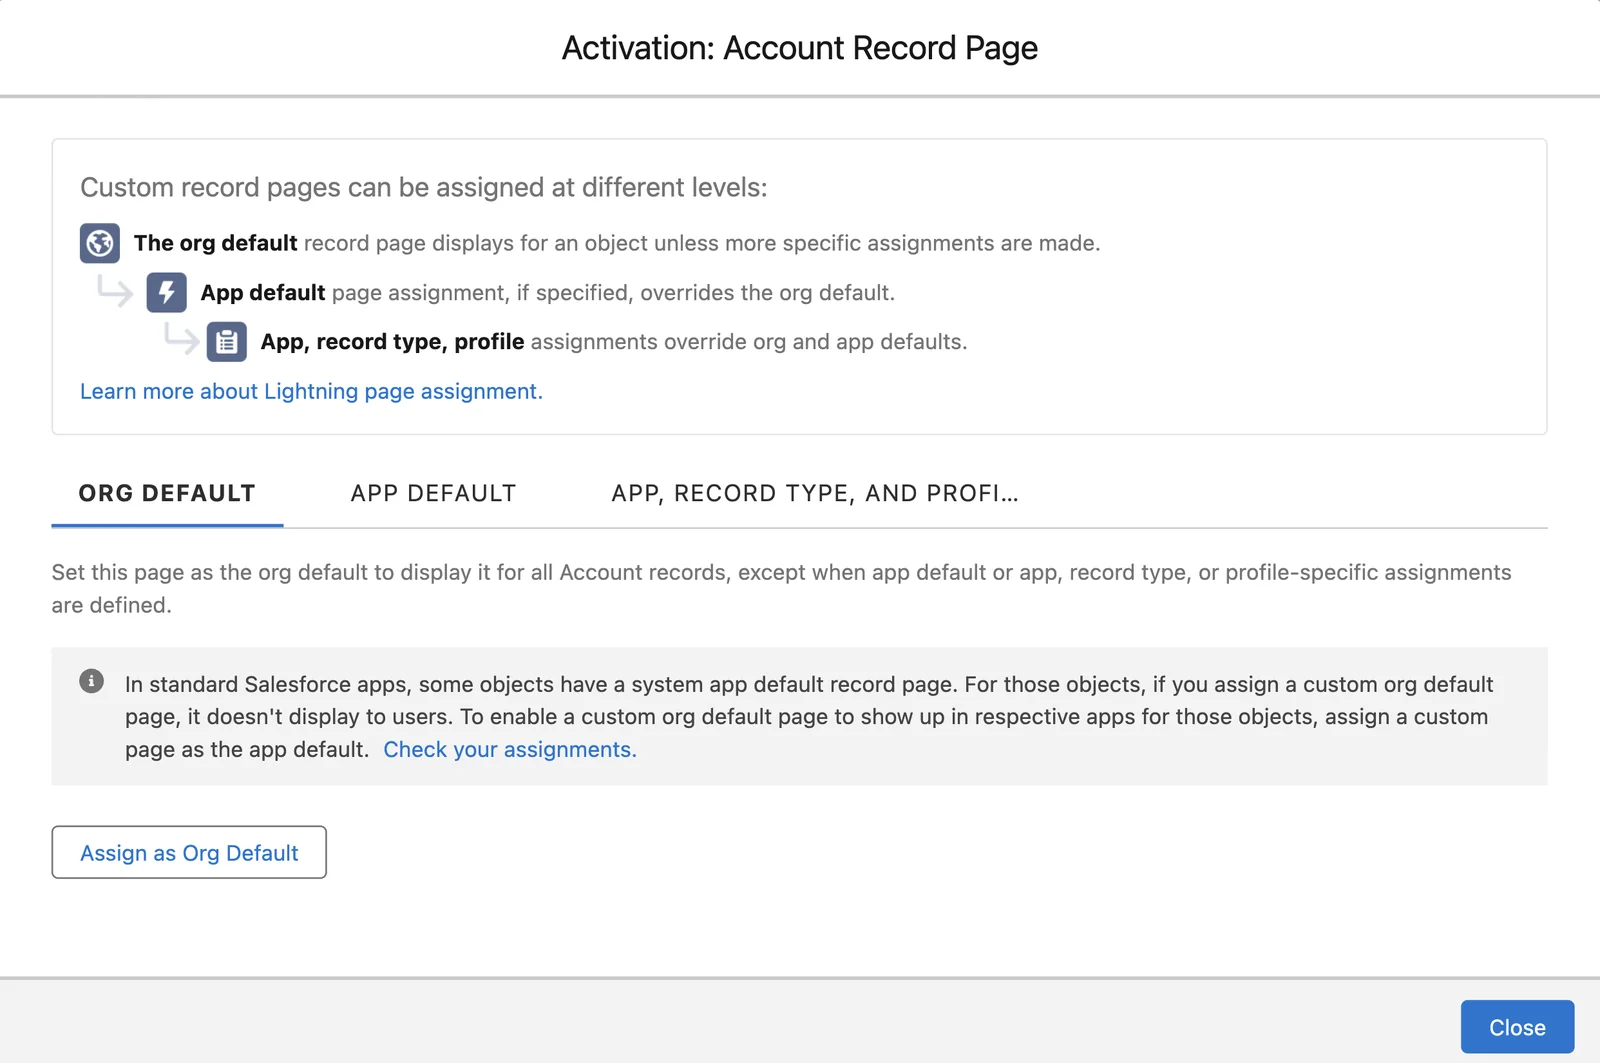
Activate the page, if Salesforce asks.
Salesforce asks the first time you edit the Lightning page of an object. Click Activate. Click Assign as Org Default. Choose Desktop. Click Next. Salesforce shows a review of the assignment. Click Save.
If a click in this window does nothing, click the same button again.
Click Back. Check the List Browse bar.
Back sits at the top right of the Lightning App Builder. The record opens with the List Browse bar. The bar shows where you are in the list. Click the next arrow. The next record you ticked opens.
No bar in one app
An app can have its own record page for an object. Then the org default page does not show in that app, and neither does the bar. Open the activation window again. Click App Default. Assign the page to each app your users browse in.
Do the same for each object
Repeat Add the Browse button and this chapter for Leads, Contacts, Opportunities, Cases and Tasks, as your users need them.
5Browse records
A user ticks records in a list view and clicks Browse. The first record opens, with the List Browse bar on it. That list of ticked records is the active browse list.

The controls have no labels, and no name shows when you point at one. The table names them from left to right.
| Control | What it does |
|---|---|
| First (double left arrow) | Goes to the first record in the list. A gray arrow means you are already there. |
| Previous (left arrow) | Goes one record back. A gray arrow means you are on the first record. |
| Position, for example 1/3 | Shows the record you are on and the number of records in the list. |
| Next (right arrow) | Goes one record forward. A gray arrow means you are on the last record. |
| Last (double right arrow) | Goes to the last record in the list. |
| Saved lists (list icon) | Shows the browse lists you saved on this object. Click a name to make that list the active list. It replaces the list you had open. |
| Save (down arrow icon) | Saves the active browse list under a name, so you can open it later. |
| All records (four arrows icon) | Shows every record in the active list. Click one to go to it. |
| Close (X) | Clears the active list. With the default options, the bar goes away and you stay on the record. Two options on the Configure page change this. See Set the options. |
6Set the options
The List Browse Configure page holds three options and a box about remote sites.
Open the List Browse Configure page.
Open Setup. In the Quick Find box, type Installed Packages. Click Configure beside List Browse. The List Browse Setup page opens, with the Functionality Switches. It can also show a blue box about remote sites.
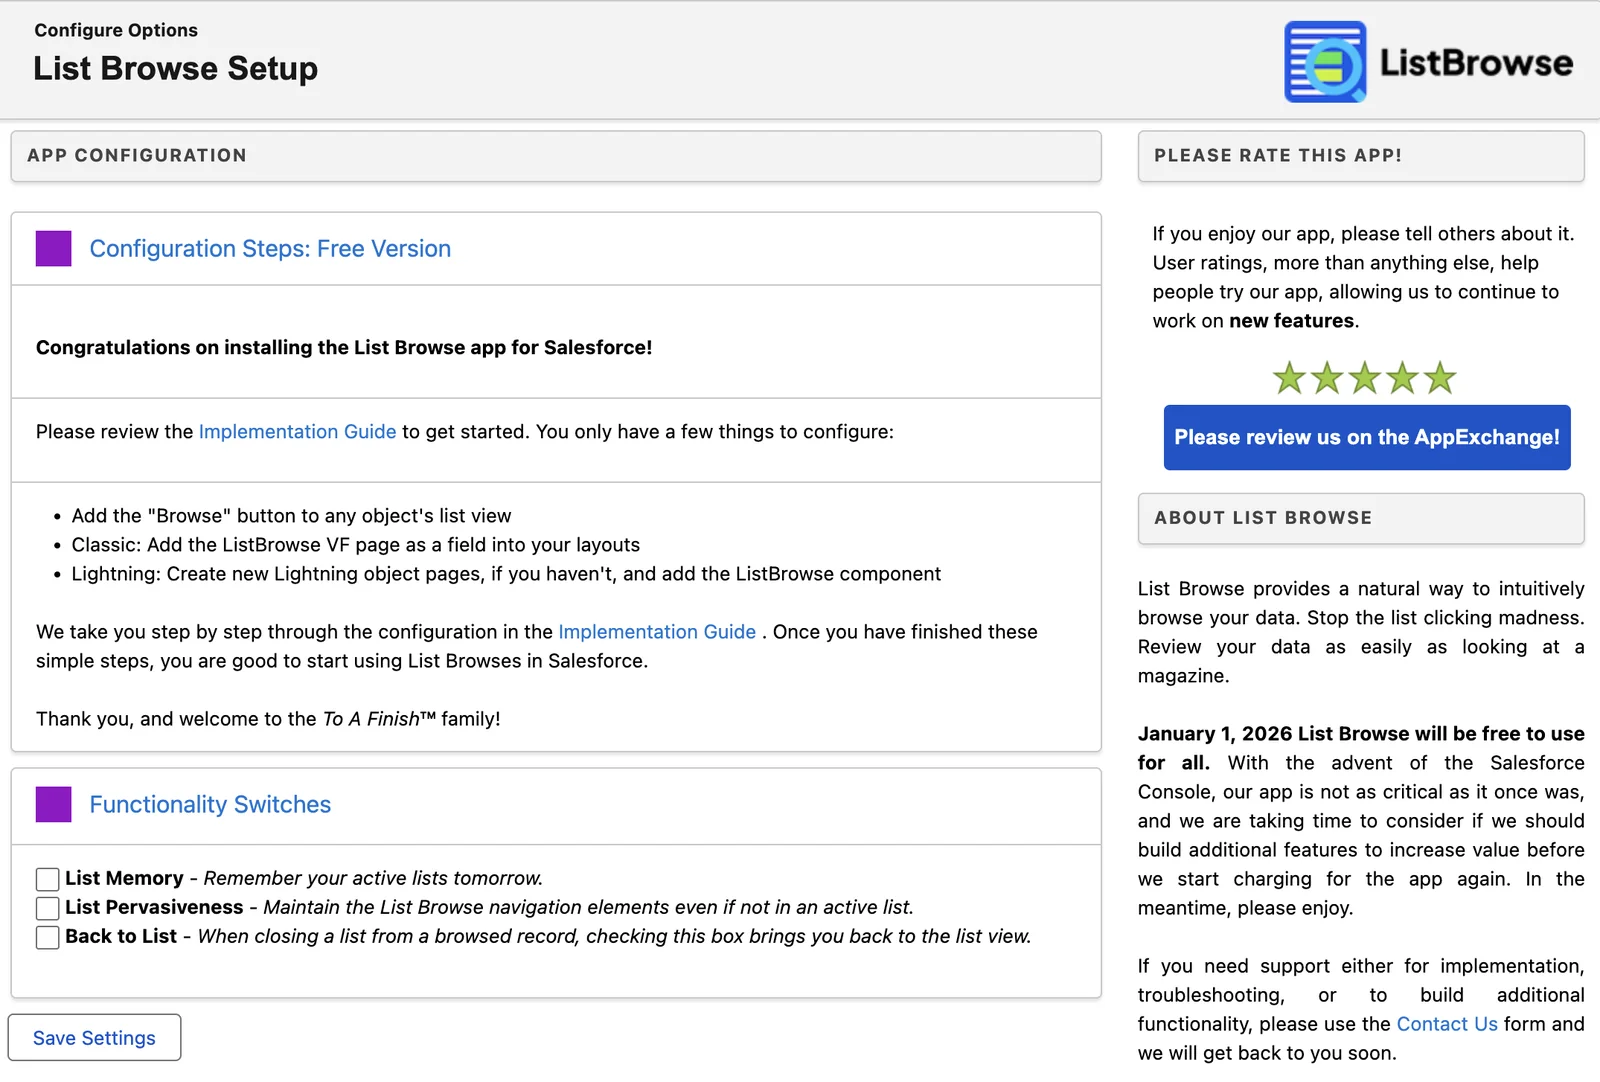
Tick the options you want.
Option What it does List Memory Keeps each user's active browse lists from day to day. Without it, users may start over each day. List Pervasiveness Keeps the List Browse bar on the record page, even when the record is not in a browse list. Without it, the bar goes away after a click on the X, until the user clicks Browse again. Back to List Sends the user back to the list view after a click on the X. Without it, the X clears the list and leaves the user on the current record. Click Save Settings.
The page shows no message after the save. Your choices apply to every user in the org.
Add the remote sites
A remote site is a web address that Salesforce lets an app call. The blue box lists two addresses, and both are addresses of your own org. List Browse uses them to read how a list view is sorted. Without them, every browse list sorts by Name, whatever order the list view shows.
- The first address is for the Browse buttons that come with List Browse.
- The second address is for Browse buttons you make yourself. See Browse other objects.
No blue box?
Then the remote sites are already in place. Skip the steps below.
TAF cannot reach your org through this setting
The remote sites only let your org read its own list views through List Browse.
Copy the first address in the blue box.
Copy from
https://to the end of the address.Open Remote Site Settings. Click New Remote Site.
Open Setup. In the Quick Find box, type Remote Site Settings. Click Remote Site Settings. Click New Remote Site. The Remote Site Edit page opens.
Type a name in Remote Site Name.
Use letters and numbers only, for example
ListBrowse1.Paste the address into Remote Site URL.
Make sure Active is ticked. Then click Save.
Salesforce shows the new remote site.
Add the second address the same way.
Do steps 1 to 5 again with the second address. Use another name, for example
ListBrowse2.Open the Configure page again.
Use step 1 above. The blue box is gone.
7Browse other objects
Optional. Skip this chapter if the six standard objects are enough.
List Browse can browse almost any standard or custom object. Each extra object needs a small Visualforce page and a Browse button that opens it. This asks for more Salesforce skill.
Find the API name of the object.
Open Setup. Click Object Manager. Click the object. Copy its API Name. A custom object ends in
__c, for exampleProject__c. For Products, the API name isProduct2.Open Visualforce Pages. Click New.
Open Setup. In the Quick Find box, type Visualforce Pages. Click Visualforce Pages. Click New.
Fill in Label and Name.
Type a Label, for example
Browse Products. In Name, type the same words with an underscore for each space, for exampleBrowse_Products. Name takes letters, numbers and underscores only.Tick Available for Lightning Experience, Experience Builder sites, and the mobile app.
Paste this code into the page editor. Change MyObject__c to your API name.
<apex:page standardController="MyObject__c" recordSetVar="myrecords" extensions="taf_listbrowse.PassSelectedRecordsExt" showHeader="false" action="{!createListRecord}"> </apex:page>The same code sits in the pages folder of the List Browse sample code on GitHub.
Click Save.
Give users access to the page.
Go back to the Visualforce Pages list. Click Security beside the new page. The page Enable Profile Access for Visualforce Page opens. Move each profile that browses this object into Enabled Profiles. Click Save.
Without this, users who are not admins get an insufficient access error.
Make the Browse button on the object.
In Object Manager, click the object. Click Buttons, Links, and Actions. Click New Button or Link. Fill in the form as below. Click Save.
Do not press Enter while you fill in the form. Enter saves the form before it is complete, and Salesforce shows Invalid Data.
Field Value Label BrowseName BrowseDisplay Type List Button Display Checkboxes (for Multi-Record Selection) Ticked Behavior Display in existing window without sidebar Content Source Visualforce Page Content The page from step 3, for example Browse Products [Browse_Products] 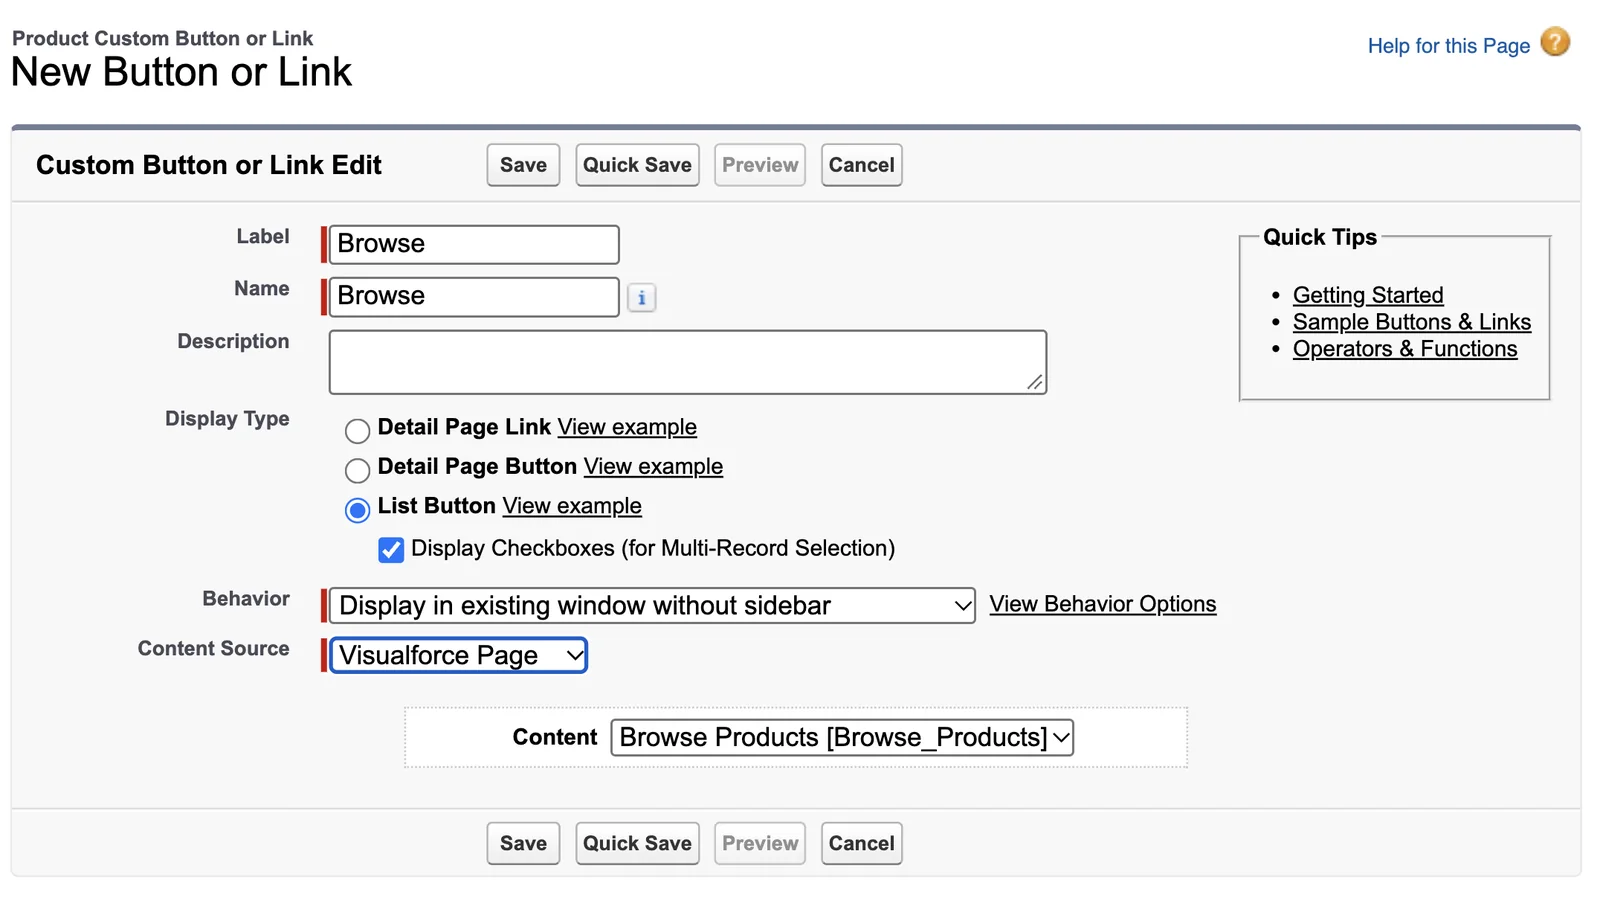
Add the button and the component to the object.
Do Add the Browse button and Add the List Browse component for this object.
8If Browse shows an error
Object type not accessible
Some list view filters stop the Browse button. The error looks like this:
core.apexpages.exceptions.ApexPagesHandledException: Object type not accessible. Please check permissions and make sure the object is not in development mode: ... ERROR at Row:4:Column:18 line 4:18 no viable alternative at character '%'.Change the filter on the list view. Filters with greater than or less than cause this error most often. For example, a filter that says a field is greater than blank fails. Change it to say the field does not equal blank. The list is the same, and Browse works.
Insufficient access
This error shows on a Browse button that you made yourself. Give users access to its Visualforce page. See step 7 of Browse other objects.
No List Browse bar on the record
Check that the ListBrowse component sits on the record page of that object. See Add the List Browse component. If it does, the app may use its own record page. Assign your page as the default for that app too.
No Browse button on the list view
Check that Browse sits in Selected Buttons. See Add the Browse button. Also check that the user has List Browse (User) or List Browse (Admin).
9Update List Browse
For later. These steps do not count in the setup progress.
TAF sometimes pushes a new version of List Browse into every org. Some orgs are on an exclusion list and do not get these pushes. You can also install the newest version yourself at any time, from the install links on the change log. The AppExchange listing no longer updates an installed app.
Update before you report a bug
TAF works on bugs in the newest version only. Check your version before you open a case, and update if it is old.
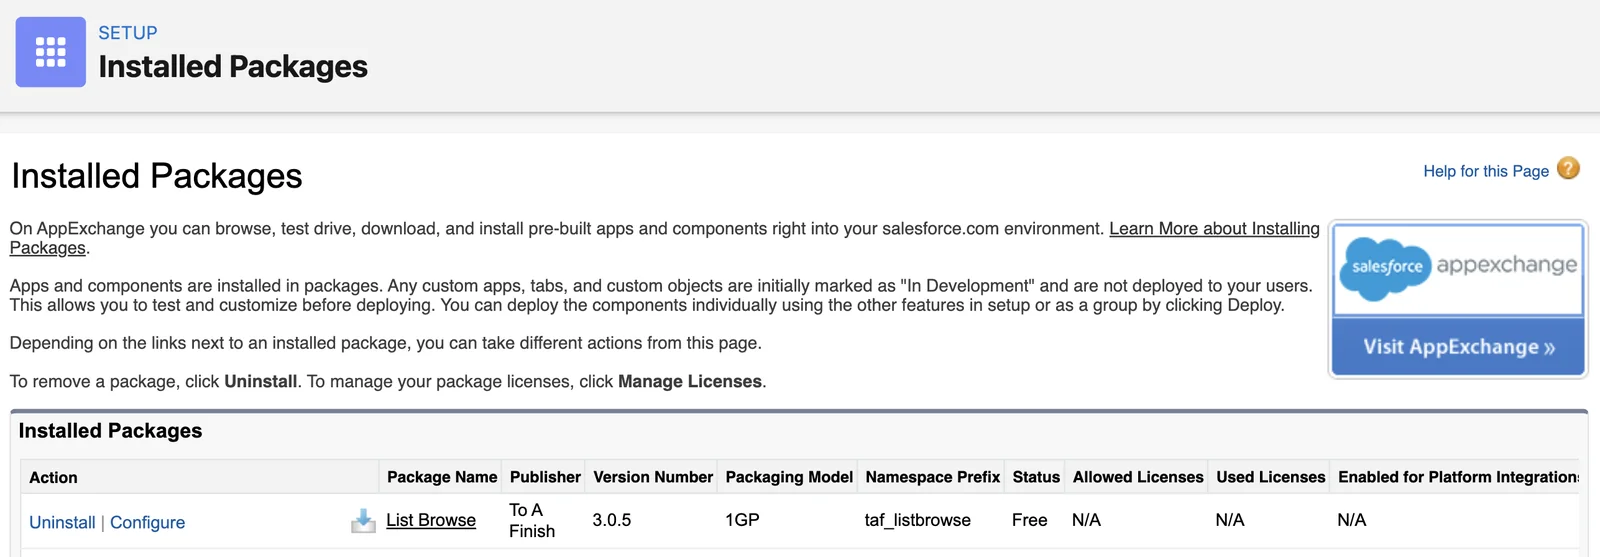
Check the version you have.
Open Setup. In the Quick Find box, type Installed Packages. Find List Browse and read the Version Number column.
Open the List Browse change log.
The newest version and its install links sit at the top of the List Browse change log. If your version matches the newest one, stop here.
Update a sandbox first.
Click Install in a sandbox. Sign in to your sandbox and follow the install screens. The install page shows Upgrade in place of Install. If a screen asks who to install for, pick Install for All Users.
Salesforce installs the newer version over the one you have. Your buttons, pages and settings stay in place.
Check your list views and record pages in the sandbox.
Tick a few records and click Browse. Make sure the List Browse bar still shows and moves between records.
Update production.
Go back to the change log and click Install in production. Sign in to production and follow the same screens.
Check the version again.
Open Installed Packages again. The Version Number now matches the top of the change log.
You cannot go back to an older version
To go back, you must uninstall List Browse and set it up again.
10Get help
Open a case if a step does not work. Give the link to the step and paste the exact error text.
Before you report a bug, update to the newest version. TAF works on bugs in the newest version only. See Update List Browse.
See what changed in each release in the List Browse change log.
Found a mistake in this guide? Email support with the link to the step.
Rate List Browse
If List Browse helps you, leave a review on the AppExchange. If something is wrong, open a case first, so TAF can fix it with you.
Stuck on a step?
Open a case and send the link to the step. A person reads every case.