

Browse other objects
How to do it in List Browse, one step at a time.
Last updated 8 Oct 2026
Optional. Skip this chapter if the six standard objects are enough.
List Browse can browse almost any standard or custom object. Each extra object needs a small Visualforce page and a Browse button that opens it. This asks for more Salesforce skill.
Find the API name of the object.
Open Setup. Click Object Manager. Click the object. Copy its API Name. A custom object ends in
__c, for exampleProject__c. For Products, the API name isProduct2.Open Visualforce Pages. Click New.
Open Setup. In the Quick Find box, type Visualforce Pages. Click Visualforce Pages. Click New.
Fill in Label and Name.
Type a Label, for example
Browse Products. In Name, type the same words with an underscore for each space, for exampleBrowse_Products. Name takes letters, numbers and underscores only.Tick Available for Lightning Experience, Experience Builder sites, and the mobile app.
Paste this code into the page editor. Change MyObject__c to your API name.
<apex:page standardController="MyObject__c" recordSetVar="myrecords" extensions="taf_listbrowse.PassSelectedRecordsExt" showHeader="false" action="{!createListRecord}"> </apex:page>The same code sits in the pages folder of the List Browse sample code on GitHub.
Click Save.
Give users access to the page.
Go back to the Visualforce Pages list. Click Security beside the new page. The page Enable Profile Access for Visualforce Page opens. Move each profile that browses this object into Enabled Profiles. Click Save.
Without this, users who are not admins get an insufficient access error.
Make the Browse button on the object.
In Object Manager, click the object. Click Buttons, Links, and Actions. Click New Button or Link. Fill in the form as below. Click Save.
Do not press Enter while you fill in the form. Enter saves the form before it is complete, and Salesforce shows Invalid Data.
Field Value Label BrowseName BrowseDisplay Type List Button Display Checkboxes (for Multi-Record Selection) Ticked Behavior Display in existing window without sidebar Content Source Visualforce Page Content The page from step 3, for example Browse Products [Browse_Products] 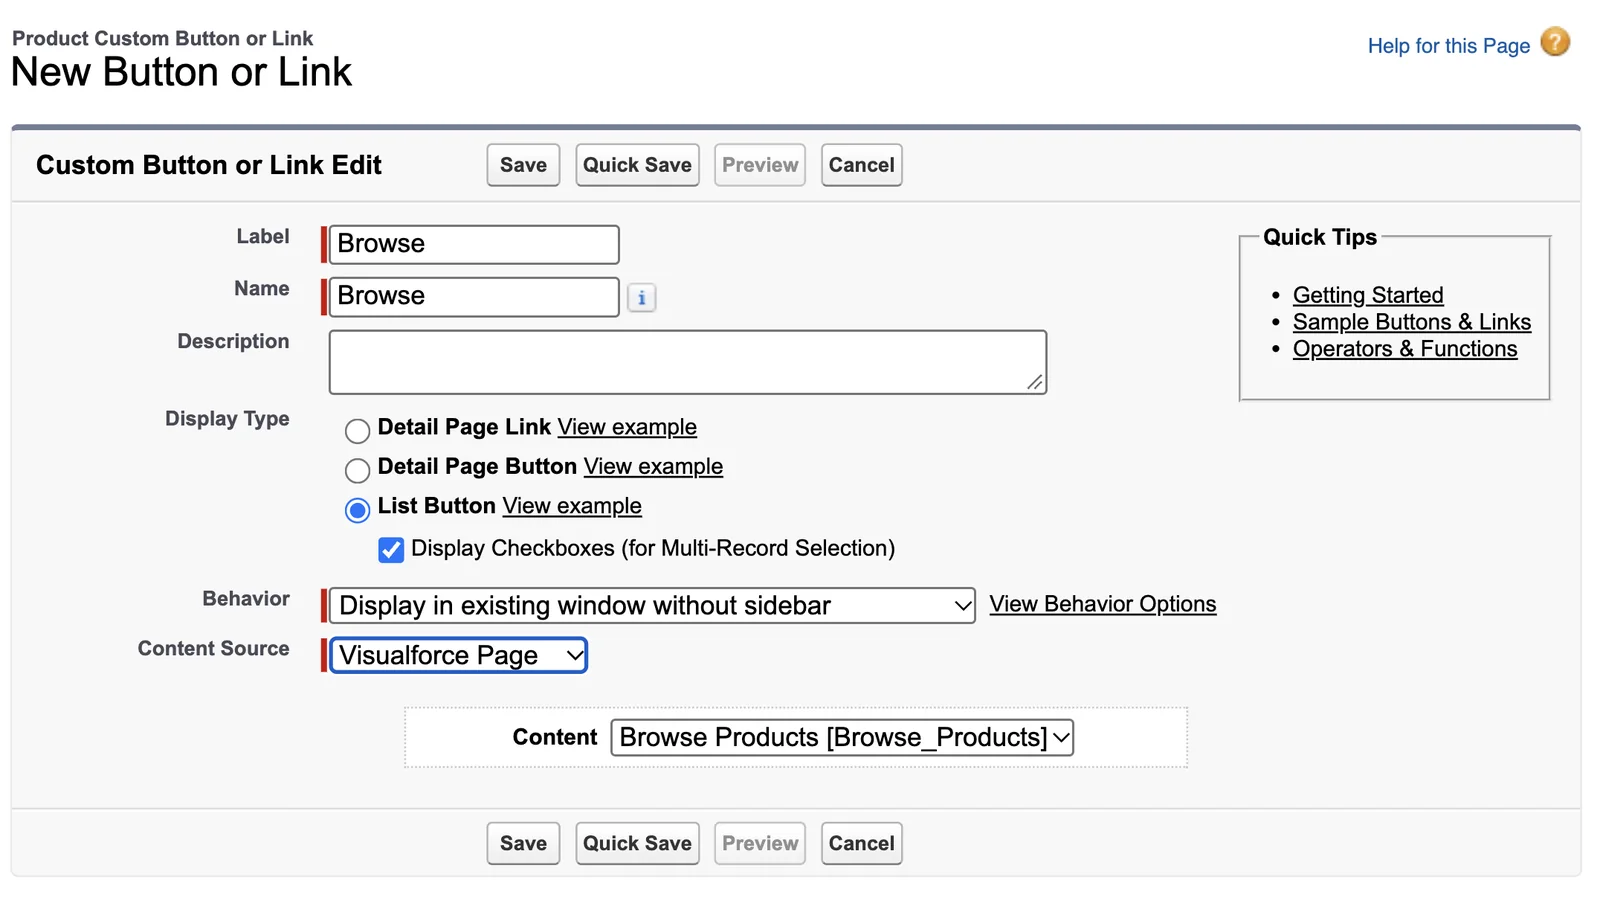
Add the button and the component to the object.
Do Add the Browse button and Add the List Browse component for this object.
Applies to
List Browse 3.0.x. These steps come from the tested List Browse implementation guide, where they sit with the steps before and after them.
Was this helpful?
Thank you. It helps us know which articles work.
Related
Still stuck?
Open a case and paste the exact error text. A person reads every case.