

Add autocomplete to New and Edit
How to do it in Address Verification, one step at a time.
Last updated 11 Oct 2026
Optional. Needs a Smarty plan with autocomplete.
Autocomplete shows a list of addresses while a user types in Street. A click on one address fills the other address fields. It works in the New and Edit windows of an object, for physical addresses only.
Save uses a lookup
The list of suggestions comes from the autocomplete part of your Smarty plan. Save then sends a normal check to Smarty, and that check uses one lookup.
Check that your Smarty plan includes autocomplete.
Autocomplete uses the default Smarty keys on the Authentication tab. If autocomplete runs on another Smarty account, paste its keys in Autocomplete Domestic. The fields are Auth-Id (only for AutoComplete) and Auth-Token (only for AutoComplete). Then click Save All Settings.
Do this in each sandbox and in production.
Put the address fields in their own section on each page layout.
Open Setup. Click Object Manager. Click your object. Click Page Layouts. Open each layout that your users work with.
The address fields must sit in a section named Address Information, with no other fields in it. If you set a Layout Section Name for the object on the Automation tab, use that name. See The options of an object.
If the layout has no such section, drag Section from the palette onto the layout. Name it Address Information. Move the address fields into it. Salesforce can put the new section at the top of the layout.
Click Save.
Check the address entry on the Data Mapping tab.
The address must have an entry. If it has none, add one. See Set up the addresses, or step 4 of Verify addresses on a custom object.
Country must be mapped, also when you verify US addresses only. The Country field must sit in the section from step 2.
For more lines of the street, map Street 2. Then tick Use Street 2 at the bottom of the entry. Street 3 and Street 4 work the same way.
To block the save of a bad address, tick Stop record creation on bad addresses. It removes the Use as it is button. See Address options.
Override the New button, the Edit button, or both.
Override New for autocomplete on new records. Override Edit for autocomplete when a user changes a record.
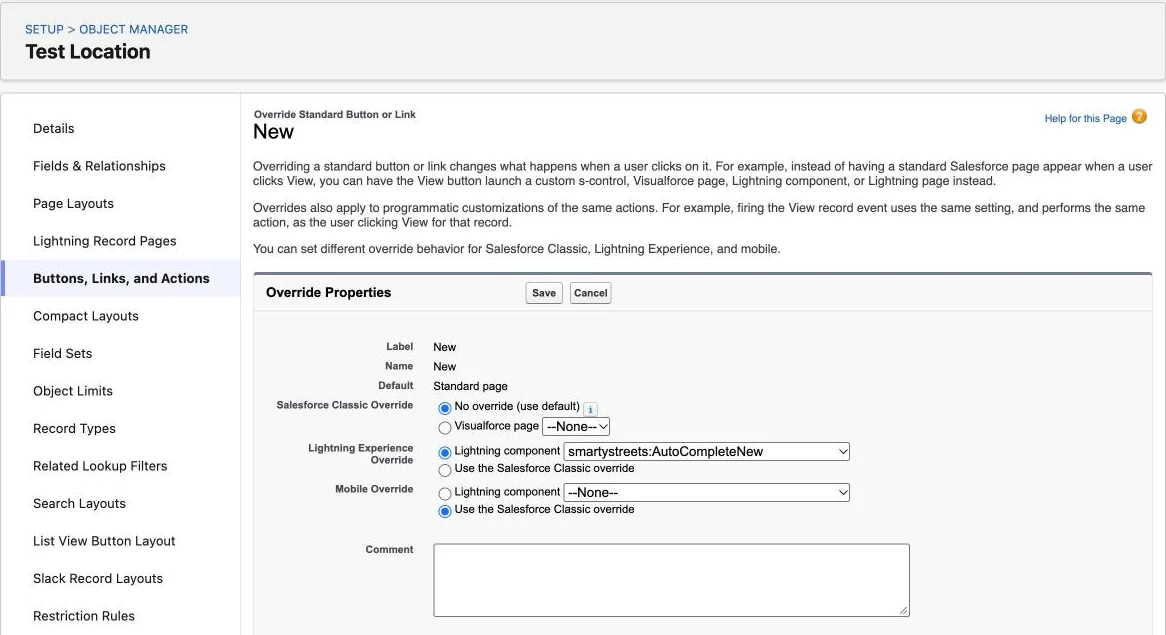
In Object Manager, click your object. Click Buttons, Links, and Actions. Click the arrow at the end of the New row. Click Edit.
Under Lightning Experience Override, pick Lightning component. Pick this component. Click Save.
smartystreets:AutoCompleteNewSalesforce then opens Fields & Relationships. For the Edit row, click Buttons, Links, and Actions again. Do the same with this component:
smartystreets:AutoCompleteEditWith the Edit override, Salesforce turns off inline editing on the object. Many orgs make an action that opens AutoCompleteEdit in place of the override.
To remove an override later, click Edit on its row. Under Lightning Experience Override, pick Use the Salesforce Classic override. Click Save. Click OK.
Wait 10 seconds. Open the tab of the object. Click New, or open a record and click Edit.
Scroll to the address section. It looks a little different. If it looks the same, reload the page. Lightning can take a few reloads to show the new window.
You can also untick Enable secure and persistent browser caching to improve performance in Setup, Session Settings. Tick it again after the window shows.
The window can show no fields, with the red line Named credential is not configured. Then do Set up the Named Credential for autocomplete first. The window then also shows Please add Section Address Information In the layout, even when the section is there.
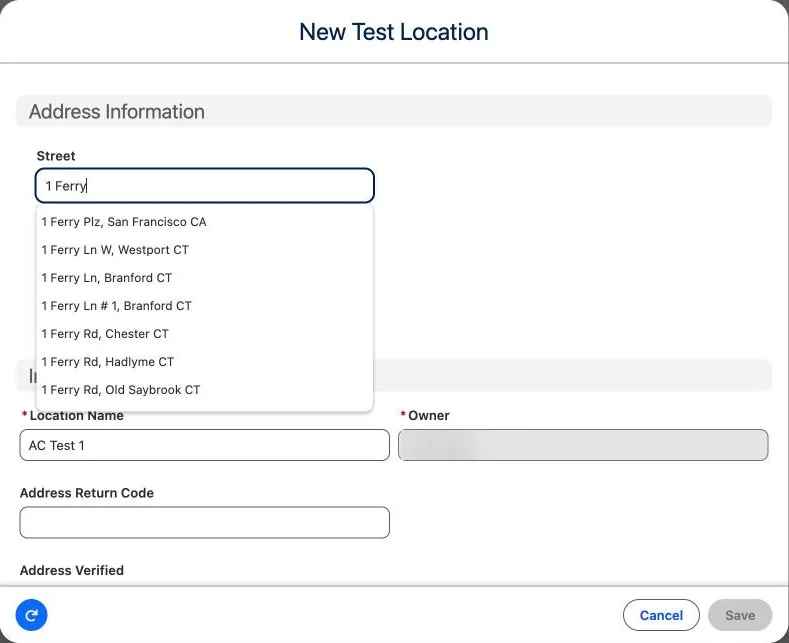
Type a street in Street. Click an address in the list. Click Save.
A list of addresses opens as you type. It shows street addresses, not the names of buildings. While it is open, Save is greyed out.
After the click, Street, City and State fill in. Save checks the address with Smarty and uses one lookup. The check fills in Zip Code and the other result fields.
Country stays empty unless Fixed Name for USA Verifications is set. See Options on the Authentication tab.
When Smarty cannot verify an address, a window reads YOU ENTERED AN UNVERIFIED ADDRESS. Click Go Back to fix the address, or Use as it is to save it anyway. The record then shows Bad or Blank Address.
Stop record creation on bad addresses removes the Use as it is button.
Users who cannot build the window
The first time a user opens the window, it takes a little longer. It builds a copy of the screen for later use. For that, the user needs the permissions Customize Application and API Enabled, from the profile or a permission set. The Address Verification permission sets do not give them.
For users who cannot have these permissions, an admin copies the screen to their profile:
As an admin, open the New or Edit window of the object once.
On the setup page, click the More... tab.
Under Page Layout Sync, pick the Object and the Profile.
Pick the profile of the users who lack the two permissions.
Click Sync Page Assignment.
An Apex job copies the screen to that profile.
Sync again after each layout change
The copy does not follow the page layout. After each change to the layout, do these steps again.
Applies to
Address Verification 7.3.x. These steps come from the tested Address Verification implementation guide, where they sit with the steps before and after them.
Was this helpful?
Thank you. It helps us know which articles work.
Related
Still stuck?
Open a case and paste the exact error text. A person reads every case.