

Set up the Named Credential for autocomplete
How to do it in Address Verification, one step at a time.
Last updated 11 Oct 2026
Needed when autocomplete shows the message Named credential is not configured. TAF's test org needed it.
Autocomplete reads the page layout through the Salesforce API. In some orgs, that call needs a Named Credential: a saved sign-in that Salesforce uses for a call to a web address.
The setup has three parts. An Auth. Provider tells Salesforce how to sign in. An External Client App, the newer form of a connected app, gives the rights. The Named Credential then joins them.
Technical steps that change often
Do these steps as an admin. Keep the Consumer Key and the Consumer Secret private.
Make an Auth. Provider.
Open Setup. In the Quick Find box, type Auth Providers, with no dot. Click Auth Providers. Click New.
Field Value Provider Type Salesforce Name, URL Suffix Any name, for example AV_Autocomplete. URL Suffix fills itself.Consumer Key, Consumer Secret NAin both. Step 6 replaces them.Default Scopes refresh_token fullUse Proof Key for Code Exchange (PKCE) Extension Ticked. It is ticked at first. Include Consumer Secret in SOAP API Responses Ticked. It is ticked at first. Click Save.
Copy the Callback URL.
The saved Auth. Provider shows the Callback URL under Salesforce Configuration, at the bottom of the page. Keep it for step 4.
Make an External Client App.
In the Quick Find box, type External Client App Manager. Click it. Click New External Client App.
Field Value External Client App Name Any name, for example AV AutocompleteContact Email Your email address Contact Phone Your phone number Distribution State Local Turn on OAuth for the app. Then click Create.
Open the section API (Enable OAuth Settings). Tick Enable OAuth. In Callback URL, paste the URL from step 2.
Under OAuth Scopes, move these three to the selected list:
- Manage user data via APIs (api)
- Full access (full)
- Perform requests at any time (refresh_token, offline_access)
Lower down, under Flow Enablement, find Security. Tick Require secret for Web Server Flow and Require secret for Refresh Token Flow. Leave the greyed boxes as they are.
Click Create. A message reads Success! External Client App created successfully.
Copy the Consumer Key and the Consumer Secret.
Click the Settings tab. Open OAuth Settings. Under App Settings, click Consumer Key and Secret. It opens in a new window. Salesforce can send a code to your email first. Copy both values to a safe place.
Put the key and the secret in the Auth. Provider.
Open the Auth. Provider from step 1. Click Edit. Replace NA in Consumer Key and Consumer Secret. Click Save.
Switch to Salesforce Classic.
The next step does not work in Lightning. Click your profile picture. Click Switch to Salesforce Classic.
Make a Named Credential.
Open Setup. In the Quick Find box, type Named Credentials. Click Named Credentials. Click New Named Credential. Leave the entry old_CallMeBack as it is. It comes with the app.
Field Value Label, Name CallMeBack. The app looks for this name when Name Of Named Credential is empty.URL The address of your org up to salesforce.com/, from the address bar in Classic. For example https://yourcompany.my.salesforce.com/ Identity Type Named Principal Authentication Protocol OAuth 2.0 Authentication Provider The Auth. Provider from step 1 Scope refresh_token fullStart Authentication Flow on Save Ticked. It ticks itself. Generate Authorization Header Ticked. It is ticked at first. Allow Merge Fields in HTTP Header Ticked Allow Merge Fields in HTTP Body Ticked Authentication Provider and Scope show after you pick OAuth 2.0.
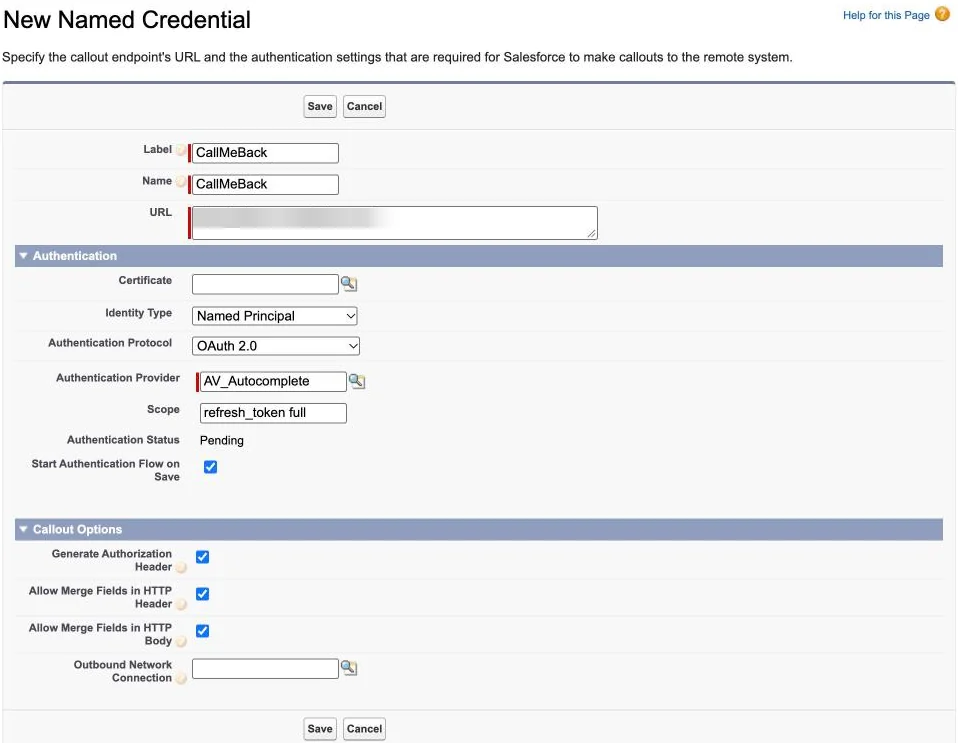
Click Save. Sign in. Allow access on the two screens.
Salesforce opens a login page. Sign in with your own user. Two screens ask you to allow access. Allow both. The Named Credential then shows Authentication Status: Authenticated as your user.
In a sandbox, the sign-in needs one change first. See The Named Credential sign-in fails in a sandbox.
If INSUFFICIENT PRIVILEGES shows here, ask Salesforce support to turn on External Client Apps in your org.
Paste the name in Name Of Named Credential. Click Save All Settings.
Switch back to Lightning. On the setup page, open the Authentication tab. Scroll to the bottom. Type the Name from step 8 in Name Of Named Credential. Click Save All Settings. A message reads Successfully saved the setting.
If a button floats over the box, see A button on the setup page covers a field.
Open the New window again. Type a street.
The window shows its fields, and the list of addresses opens, with no red message.
Applies to
Address Verification 7.3.x. These steps come from the tested Address Verification implementation guide, where they sit with the steps before and after them.
Was this helpful?
Thank you. It helps us know which articles work.
Related
Still stuck?
Open a case and paste the exact error text. A person reads every case.