

Check email addresses and phone numbers
How to do it in Address Verification, one step at a time.
Last updated 11 Oct 2026
Only with the email or phone add-on from TAF.
Address Verification checks phone numbers and email addresses through a TAF service. To buy the add-on, email [email protected].
Each phone or email field needs its own result fields and its own entry on the Data Mapping tab. No email entry exists at first. A Contact Mobile entry exists, but it is not active, and it maps only the phone field.
Make the result fields for each phone number.
Make them on the object of the phone field, as in step 1 of Verify addresses on a custom object. The labels are examples for a phone field named Mobile.
Example label Type What it holds Mobile Phone The phone number. Most objects already have it. Mobile Verified Checkbox Ticked when the number is verified. Verify skips a number whose box is ticked. Mobile Country Text(40) The two-letter code of the country of the number, for example US. When it is empty, Address Verification uses US. Mobile Last Verified Date/Time The date and time of the last check. Mobile Return Code Text(40) The result of the check. See Return codes for phone numbers. Mobile API Response Long Text Area The whole answer from the service. It is not for display. Make these fields for the Contact Mobile entry too. Contact has no result fields for phones or emails at first.
Make the result fields for each email address.
Example label Type What it holds Email Email The email address. Most objects already have it. Email Verified Checkbox Ticked when the address is verified. Verify skips an address whose box is ticked. Email Last Verified Date/Time The date and time of the last check. Email Return Code Text(40) The result of the check. See Return codes for email addresses. For more data, see Optional fields for phone and email below.
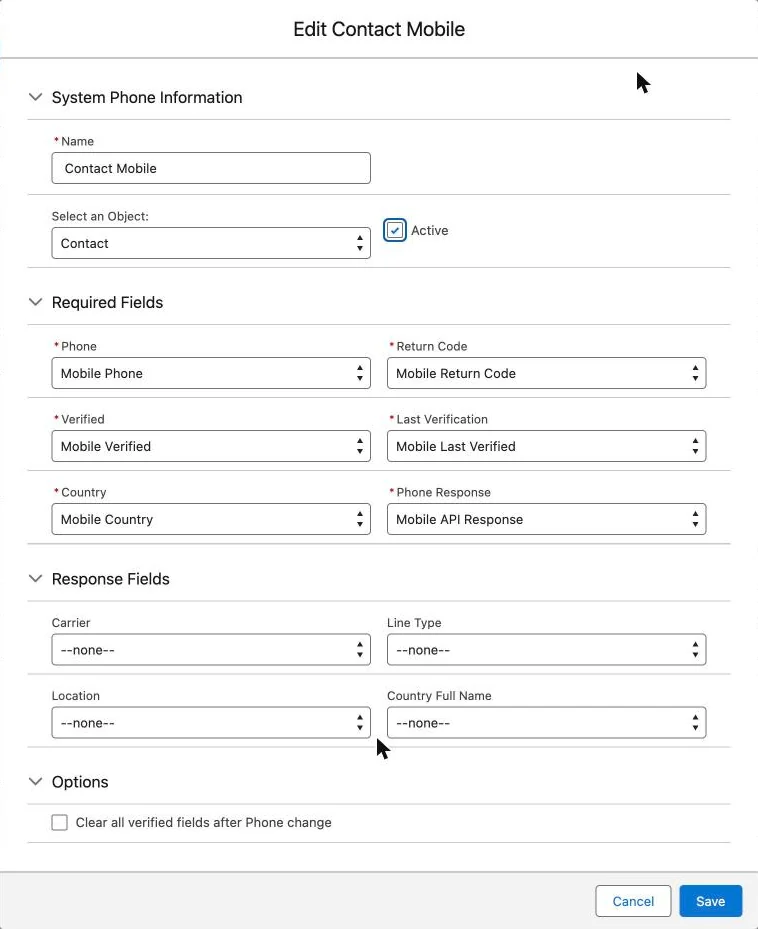
On the Data Mapping tab, click New Phone. Fill in the entry. Then click Save.
To use the default entry, click Edit beside Contact Mobile instead.
Type a Name that starts with the object name. Select the object. Tick Active. Pick the fields for Phone, Verified, Country, Return Code, Last Verification and Phone Response. Map the optional fields you made.
The optional fields sit under Response Fields. With Clear all verified fields after Phone change ticked, a new number clears every mapped field. Without it, a new number unticks Verified and clears Return Code.
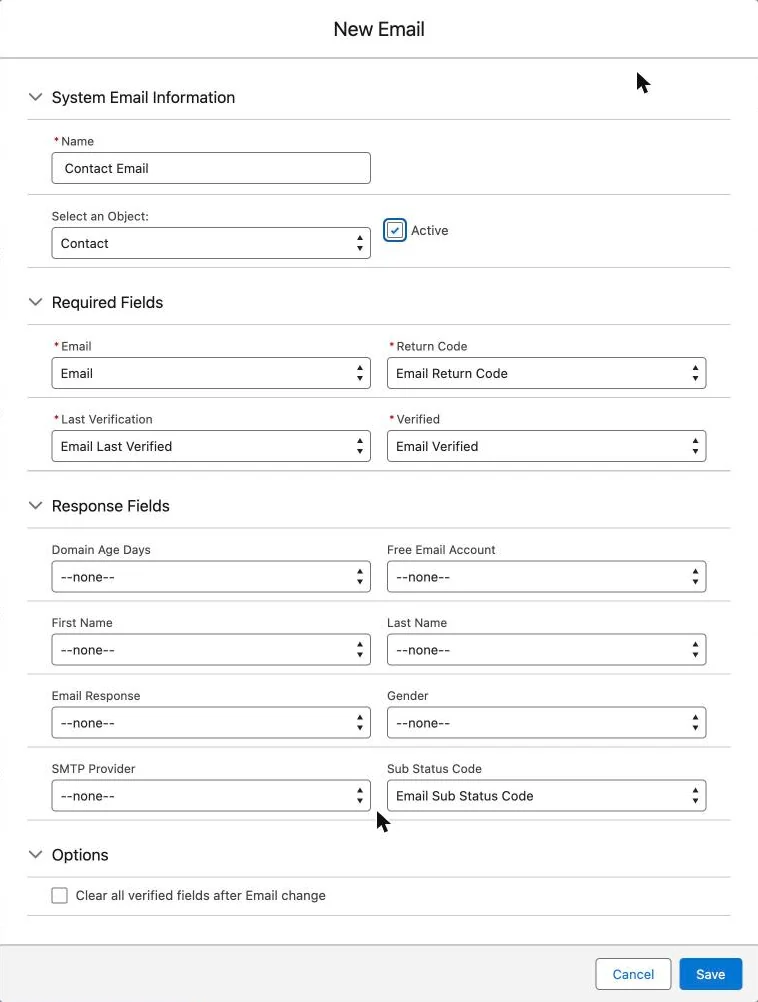
Click New Email. Fill in the entry. Then click Save.
Type a Name that starts with the object name. Select the object. Tick Active. Pick the fields for Email, Verified, Last Verification and Return Code. Map the optional fields you made.
The Return Code list offers every text field of the object. Pick your Return Code field with care.
With Clear all verified fields after Email change ticked, a new email address clears every mapped field. Without it, only Verified and Return Code change.
Add the Verify action for phones or emails to the page layout.
Add it as in step 4 of Add the Verify button. In the palette, each label shows twice: as a Quick Action and as a Custom Button for Classic. Point at each one to see its name. Use the Quick Action. Its name starts with the object name and a dot, for example
Lead.smartystreets__VerifyEmails. The table leaves out that start.Object Action label Quick Action name Contact Verify Phones smartystreets__Verify_Phone_Lightning_ContactContact Verify Emails smartystreets__Verify_EmailsLead Verify Phones smartystreets__Verify_Phone_Lightning_LeadLead Verify Emails smartystreets__VerifyEmailsDo not use the Custom Buttons for Classic, or the actions marked Deprecated.
On a custom object, make a new action as in step 5 of Verify addresses on a custom object. Use the component
smartystreets:VerifyPhonefor phone numbers, orsmartystreets:VerifyEmailfor email addresses.Open a record with a phone number or an email address. Click the Verify action.
A message reads Record Updated, with Phone Verified. or Email Verified. The message shows for every result, also a bad one.
Reload the page. The Return Code field shows the result. The Verified box stays empty when the result is not valid. Each check uses one lookup from your add-on.
See Return codes for phone numbers and Return codes for email addresses.
On a custom object, add a Flow that marks a changed number or email.
Build it as in Mark changed addresses on a custom object, with two conditions. Row 1: the phone or email field, Is Changed, True. Row 2: its Verified field, Equals, True. Use the logic
1 AND 2. Set the Verified field to False and the Return Code to Changed.On Contact and Lead, the triggers of Address Verification do this, when Active is ticked for the object on the Automation tab.
Optional fields for phone and email
Make the ones you need. Then map each one in the entry.
| Field in the entry | Example label | Type | What it holds |
|---|---|---|---|
| Carrier | Mobile Carrier | Text(255) | The phone company. |
| Line Type | Mobile Line Type | Text(40) | The type of line, for example mobile or landline. |
| Location | Mobile Location | Text(100) | The city or place of the owner, if known. Often where the phone was bought. |
| Country Full Name | Mobile Full Country Name | Text(100) | The full name of the country in the Country field. |
| Domain Age Days | Email Domain Age Days | Number | The days since the domain of the email was registered. Divide by 365 for years. |
| Free Email Account | Email Free Account | Checkbox | Ticked for a throwaway address, made only for a short time. TAF advises never to email it. |
| First Name, Last Name | Email Owner First Name, Email Owner Last Name | Text(100) | The name of the owner, if known. |
| Email Response | Email Verification Response | Long Text Area | The whole answer from the service. |
| Gender | Email Owner Gender | Text(40) | The gender of the owner, if known. |
| SMTP Provider | Email SMTP Provider | Text(100) | The email host. |
| Sub Status Code | Email Sub Status Code | Text(100) | More detail about the result. See Sub codes for email addresses. |
Formula fields for phone and email
Make them as in Formula fields that show the result. Replace RETURNCODE with your Return Code field.
Phone Status shows the result of a phone check with an icon.
If(RETURNCODE = "Valid", IMAGE("/img/msg_icons/confirm16.png", "Valid", 16, 16) & " Valid",
If(RETURNCODE = "Error", IMAGE("/img/msg_icons/error16.png", "Error", 16, 16) & " Error",
IMAGE("/img/msg_icons/info16.png", "Not Verified", 16, 16) & " Not Verified"))Email Status shows the result of an email check with an icon.
If(RETURNCODE = "valid", IMAGE("/img/msg_icons/confirm16.png", "Valid", 16, 16) & " Valid",
If(RETURNCODE = "catch-all", IMAGE("/img/msg_icons/warning16.png", "Accept all (Unverifiable)", 16, 16) & " Accept all (Unverifiable)",
If(RETURNCODE = "do_not_mail", IMAGE("/img/msg_icons/warning16.png", "Do Not Mail", 16, 16) & " Do Not Mail",
If(RETURNCODE = "invalid", IMAGE("/img/msg_icons/error16.png", "Invalid", 16, 16) & " Invalid",
If(Or(RETURNCODE = "disposable", RETURNCODE = "spamtrap"), IMAGE("/img/msg_icons/error16.png", "Disposable", 16, 16) & " Disposable",
If(RETURNCODE = "unknown", IMAGE("/img/msg_icons/error16.png", "Unknown", 16, 16) & " Unknown",
IMAGE("/img/msg_icons/info16.png", "Not Verified", 16, 16) & " Not Verified"))))))Applies to
Address Verification 7.3.x. These steps come from the tested Address Verification implementation guide, where they sit with the steps before and after them.
Was this helpful?
Thank you. It helps us know which articles work.
Related
Still stuck?
Open a case and paste the exact error text. A person reads every case.