

Verify many records from a list
How to do it in Address Verification, one step at a time.
Last updated 11 Oct 2026
Optional. For a cleanup of records that are already in Salesforce.
A list button checks up to 200 selected records at once. Each address, email or phone number on each record uses its own lookup. One exception: when two address fields of a record hold the same address, for example Billing and Shipping, the check uses one lookup.
On Accounts, Contacts and Leads
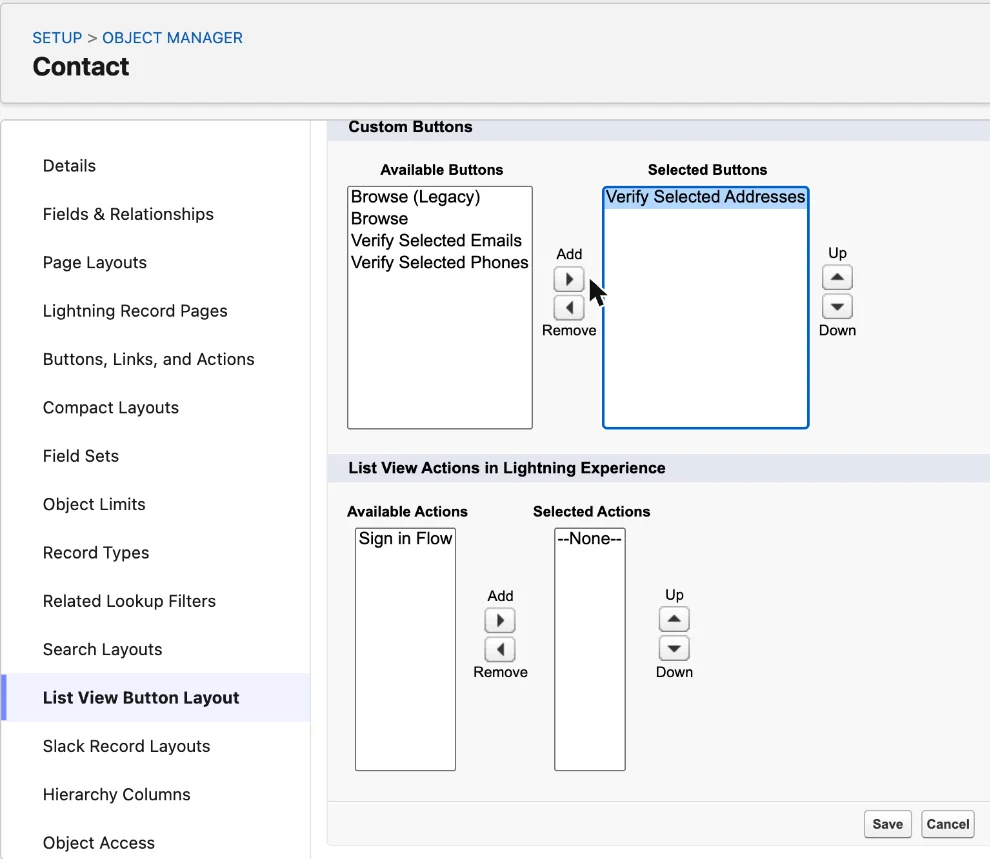
The buttons come with the app. This part uses Lead. Account and Contact work the same way. The pictures show Contact.
Open Lead in Object Manager. Click List View Button Layout.
Open Setup. Click Object Manager. Click Lead. Click List View Button Layout.
In the List View row, click the arrow at the end of the row. Click Edit.
Move Verify Selected Addresses to Selected Buttons. Then click Save.
Under Custom Buttons, click Verify Selected Addresses in Available Buttons. Click the Add arrow. For emails and phone numbers, add Verify Selected Emails or Verify Selected Phones too.
Lead also offers Verify All List Leads. It checks the Leads of the whole list view, not only the ticked ones. Each address uses a lookup, so add it only if you need it.
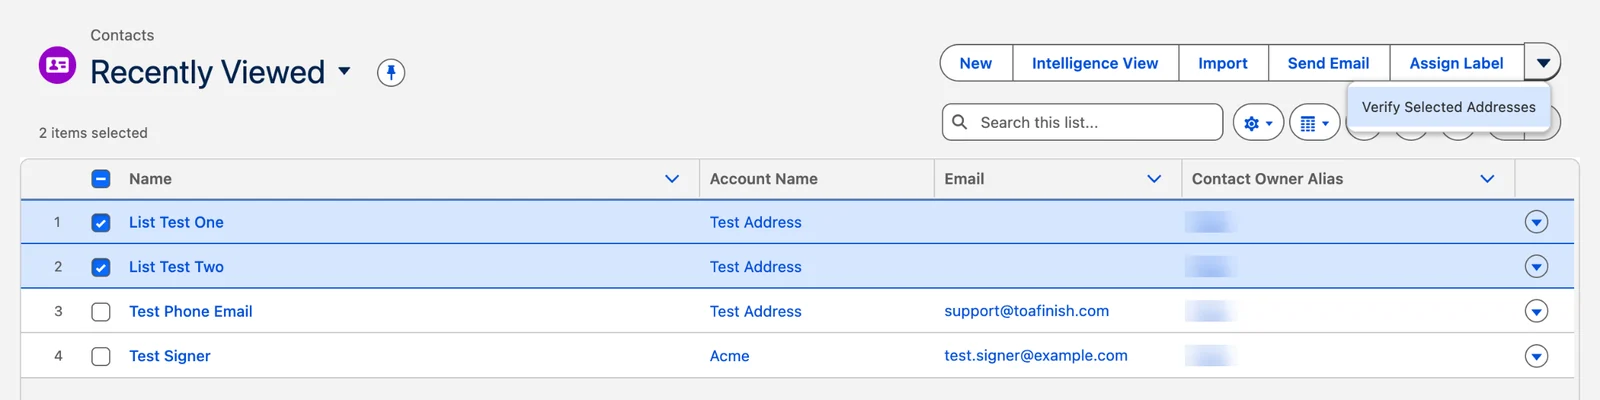
Open a Lead list view. Tick the records. Click Verify Selected Addresses.
Tick up to 200 records. The button sits at the top right of the list, or in the menu under the arrow.
A blank page with a spinner shows for a few seconds. Then the list shows again, with no message. Open a record to see the result.
If Salesforce shows an error for long addresses, tick fewer records and try again.
On a custom object
A custom object needs a Visualforce page and a list button that opens it.
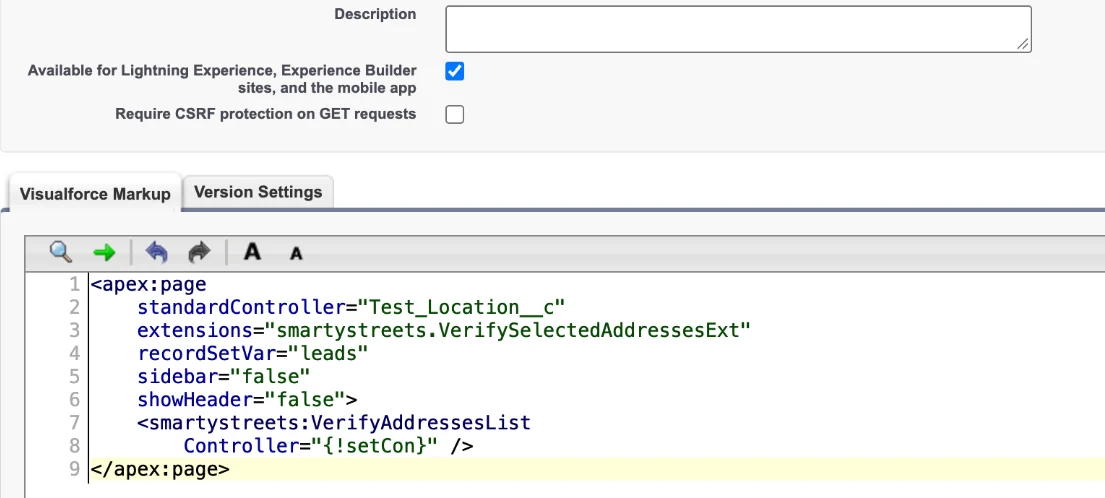
Make a Visualforce page with the code below.
Open Setup. In the Quick Find box, type Visualforce Pages. Click Visualforce Pages. Click New. Type a Label, for example
Verify Location Addresses.Salesforce copies the Label into Name, with spaces. A name with spaces fails on Save. Type underscores in place of the spaces, for example
Verify_Location_Addresses.Tick Available for Lightning Experience, Experience Builder sites, and the mobile app.
Paste the code. The editor adds its own indents. They do no harm. Replace Object_Name__c with the API name of your object. Click Save.
<apex:page standardController="Object_Name__c" extensions="smartystreets.VerifySelectedAddressesExt" recordSetVar="leads" sidebar="false" showHeader="false"> <smartystreets:VerifyAddressesList Controller="{!setCon}" /> </apex:page>For email addresses or phone numbers, make one more page with one of these:
<apex:page standardController="Object_Name__c" recordSetVar="recs" extensions="smartystreets.VerifySelectedAddressesExt" sidebar="false" setup="true"> <smartystreets:BulkEmail Controller="{!setCon}" /> </apex:page><apex:page standardController="Object_Name__c" recordSetVar="recs" extensions="smartystreets.VerifySelectedAddressesExt" sidebar="false" setup="true"> <smartystreets:BulkPhone Controller="{!setCon}" /> </apex:page>TAF's older samples for these pages use another extension. It does not work in version 7.3, so use the code above.
Make a list button that opens the page.
Open your object in Object Manager. Click Buttons, Links, and Actions. Click New Button or Link.
Field Value Label Verify Selected AddressesDisplay Type List Button Display Checkboxes (for Multi-Record Selection) Ticked. The box shows after you pick List Button. It is ticked at first. Behavior Display in existing window without sidebar or header Content Source Visualforce Page Content The page from step 1 Click Save. For email addresses or phone numbers, make one more button for each page.
Add the button to the list view layout of the object.
Click List View Button Layout. In the List View row, click the arrow at the end of the row. Click Edit. Move your button to Selected Buttons. Click Save.
If your object has no List View Button Layout, see A custom object has no List View Button Layout.
Open a list view of your object. Tick the records. Click the button.
The button sits in the row of buttons at the top of the list. As on Lead, a blank page shows for a few seconds, then the list. Open a record to see the result. Each address uses its own lookup.
The email page shows Records Verified Successfuly with a Back button, then the list. The email and phone pages also check records that are verified already. Each one uses a lookup.
Applies to
Address Verification 7.3.x. These steps come from the tested Address Verification implementation guide, where they sit with the steps before and after them.
Was this helpful?
Thank you. It helps us know which articles work.
Related
Still stuck?
Open a case and paste the exact error text. A person reads every case.