

Verify on the record page
How to do it in Address Verification, one step at a time.
Last updated 11 Oct 2026
Optional. Edit and verify an address, an email or a phone number on the record page itself.
Three components put an edit box with a check on a Lightning record page: inlineVerifyAddress, inlineVerifyEmail and inlineVerifyPhone.
An address
The address component also works in Dynamic Forms, with some limits.
Check that autocomplete works on the object.
The address component needs autocomplete and the External Client App. See Add autocomplete to New and Edit and Set up the Named Credential for autocomplete.
Open a record. Click the gear icon. Click Edit Page.
Add inlineVerifyAddress to a column.
inlineVerifyAddressFind it under Custom - Managed. Drag it onto a column. Salesforce lets you put it in some places only.
If the drag does not work, click a component in the column. Click the + above or below it. Then click inlineVerifyAddress.
Click the component. Fill in its properties.
Fill in all of them.
Property Value Address Configuration Name The address entry. The list shows only the entries of this object. Object API Name The API name of the object, for example Location__cStreet Field API Name, City Field API Name, State Field API Name, Country Field API Name, Postal Code Field API Name The API name of each address field, not its label Address Label The name of the address on the page 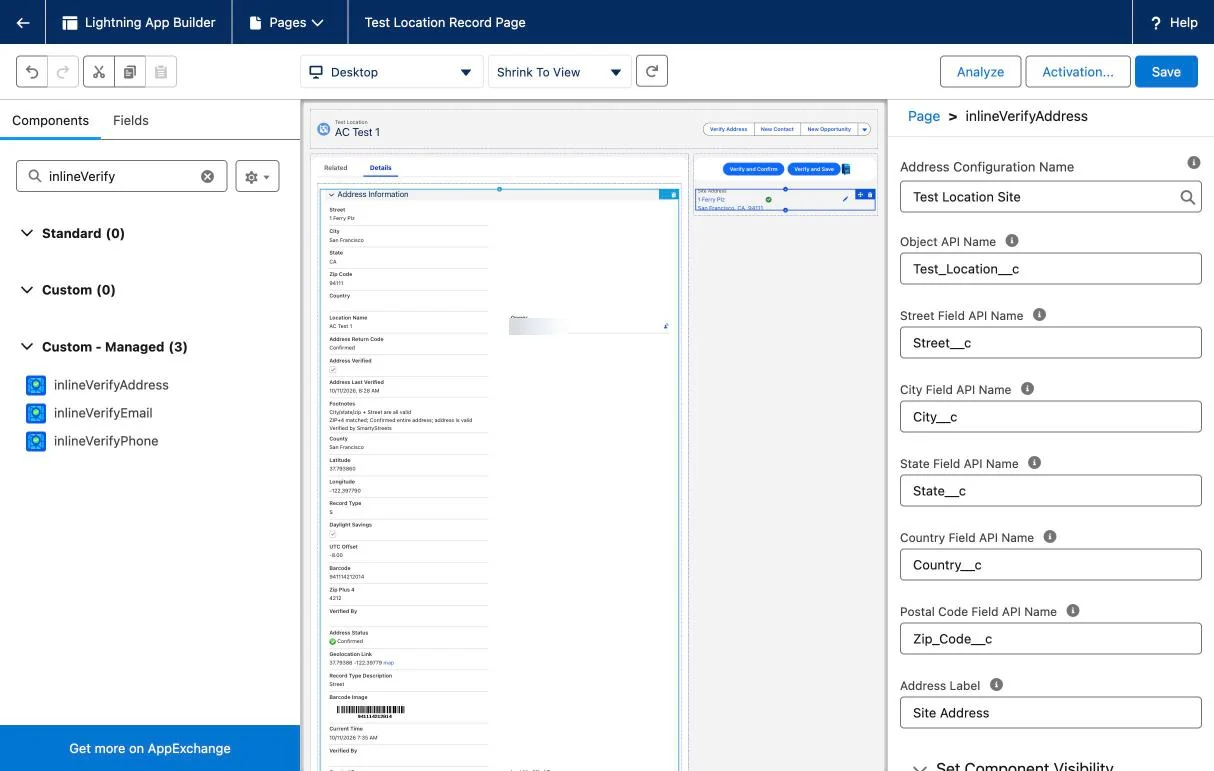
Click Save. Activate the page, if Salesforce asks.
If a window named Inline edit disabled shows, click Save. It shows when the Edit button has an override.
Activate it as in step 4 of Add the Verify and Confirm button. Then click the back arrow.
Click the pencil beside the address. Pick an address from the list. Click Save.
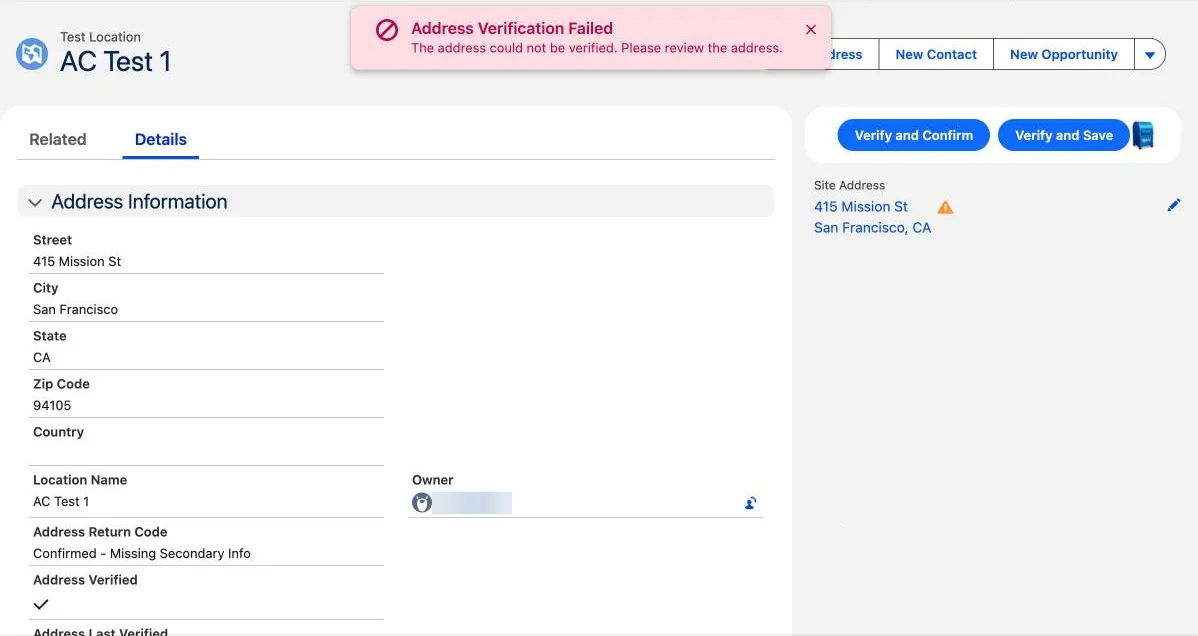
The pencil opens Country, Street, City, State and Zip Code. Type the street with its type, for example
415 Mission St, so the list finds it.A green tick shows a confirmed address. Any other result shows an orange triangle and the message Address Verification Failed. This also happens when the record is verified, for example with Confirmed - Missing Secondary Info. Check Address Return Code for the result. The check uses one lookup.
An email address or a phone number
Check that the email or phone entry works.
TAF turns on the email or phone add-on after you buy it. The field also needs its entry on the Data Mapping tab. See Check email addresses and phone numbers.
Open a record. Click the gear icon. Click Edit Page.
Add inlineVerifyEmail or inlineVerifyPhone to a column.
Find it under Custom - Managed. Drag it onto a column. If the drag does not work, click a component in the column. Click the + above or below it. Then click the component.
Click the component. Fill in its properties.
Property Value Email Configuration Name, or Phone Configuration Name The email or phone entry. An empty list means the field has no entry yet. Make it first. Object API Name The API name of the object Field API Name The API name of the email or phone field Click Save. Activate the page, if Salesforce asks.
Change the value in the component. Press Enter, or click Save.
The component checks the value and fills in the result fields. The check uses one lookup from your add-on.
A valid result shows a green tick. Any other result shows a red message, for example Email Verification Failed for the result do_not_mail. Reload the page to see the result fields.
Applies to
Address Verification 7.3.x. These steps come from the tested Address Verification implementation guide, where they sit with the steps before and after them.
Was this helpful?
Thank you. It helps us know which articles work.
Related
Still stuck?
Open a case and paste the exact error text. A person reads every case.