

Link a new child record to its parent
How to do it in Address Verification, one step at a time.
Last updated 11 Oct 2026
Optional. For a new record made from a related list, for example a Contact from an Account.
The autocomplete windows stand alone. A Contact made from an Account with AutoCompleteNew does not fill in the Account. The user must pick the Account again.
A small Lightning component of your own fixes this. It opens AutoCompleteNew from an action on the parent record, with the parent filled in. It cannot override the New button of the child object.
Open the Developer Console.
Click the gear icon at the top right. Click Developer Console. It opens in a new window.
Some orgs show Web Console in the menu in its place. Then type the address of your org in the browser, with this at the end:
/_ui/common/apex/debug/ApexCSIPageClick File, New, Lightning Component. Type a name. Click Submit.
A window named New Lightning Bundle opens. Use a name that says what the component makes, for example
NewContactWithAddress. Leave the boxes under Component Configuration unticked.Replace all the code with the code below.
Delete all the code first. Then paste the code below. Do not type it, because the editor adds closing tags as you type.
This is the file child_object_create_quick_action in the lightning folder of the Address Verification repository on GitHub. Take it from there for the newest version.
<aura:component implements="flexipage:availableForRecordHome,force:lightningQuickActionWithoutHeader,force:hasRecordId,force:hasSObjectName"> <aura:attribute name="sObjectName" type="String" access="global" description="The parent sObject Name"/> <aura:attribute name="recordId" type="String" access="global" description="The parent record Id"/> <!-- CHANGE THE "OBJECT" NAME BELOW TO THE API NAME OF THE CHILD OBJECT and THE LOOKUP FIELD NAME --> <!-- Example, if for the Contact object, use: "Contact-AccountId" --> <!-- After version 6.24.11, you can also determine if the component dumps the user in the child --> <!-- record (the default) or if they remain on the parent record. Usage = redirectTo="parent". --> <smartystreets:AutoCompleteConnector sObjectName="{!v.sObjectName}" recordId="{!v.recordId}" currentsObjectInfo="OBJECT-FIELD"></smartystreets:AutoCompleteConnector> </aura:component>Replace OBJECT-FIELD. Click File, Save.
Type the API name of the child object, then a hyphen. After it, type the API name of the lookup field to the parent. For a Contact under an Account, type
Contact-AccountId.To keep the user on the parent record after the save, add
redirectTo="parent"to the smartystreets:AutoCompleteConnector tag. This works from version 6.24.11.Close the Developer Console.
Make an action on the parent object.
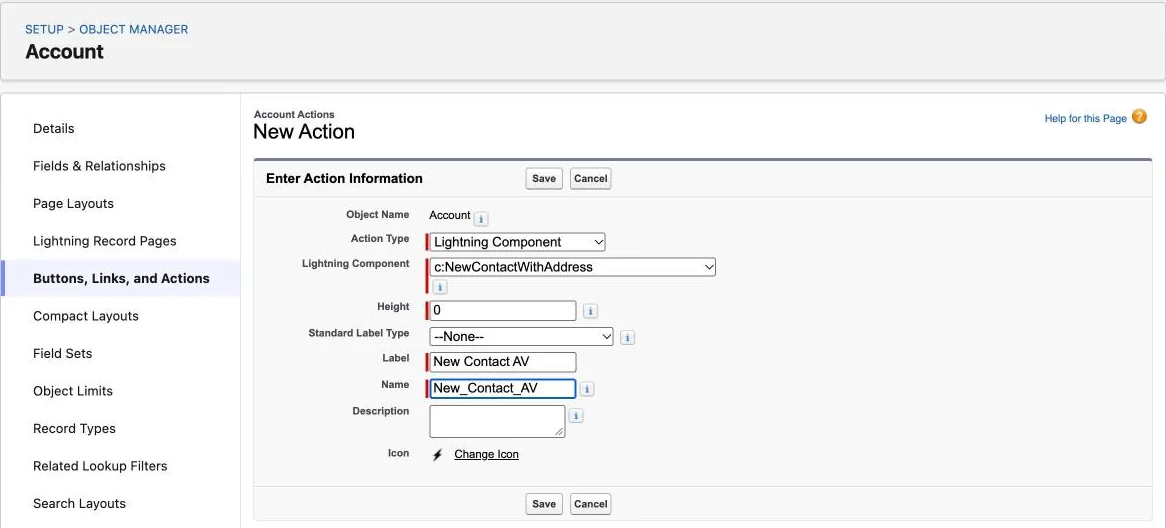
In Object Manager, click the parent object, for example Account. Click Buttons, Links, and Actions. Click New Action.
Field Value Action Type Lightning Component Lightning Component The component from step 2, for example c:NewContactWithAddress Height 0. The box shows 250px at first.Label Any label, for example New ContactName Any name, for example New_Contact. It fills itself.Click Save.
Add the action to the page layout of the parent.
Click Page Layouts. Open the layout. In the palette, click Mobile & Lightning Actions. Drag the action into the Salesforce Mobile and Lightning Experience Actions section.
If the section asks you to override the predefined actions, click the link first.
In the related list of the child object, remove the New button. Then users do not mix up the two buttons. This is optional, but TAF advises it.
Click Save. Do the same on each layout that needs the action.
Open a parent record. Click the action.
The action can sit in the menu under the arrow. The window for the new record opens after a few seconds, with the parent already filled in.
Street, City and State fill in from the list. Save opens the new record and uses one lookup.
Applies to
Address Verification 7.3.x. These steps come from the tested Address Verification implementation guide, where they sit with the steps before and after them.
Was this helpful?
Thank you. It helps us know which articles work.
Related
Still stuck?
Open a case and paste the exact error text. A person reads every case.