

Verify records in the background
How to do it in Address Verification, one step at a time.
Last updated 11 Oct 2026
Optional. For records that come in through imports, integrations or other automation.
Address Verification can check a record each time someone makes it, or changes its address. Accounts, Contacts and Leads use the triggers that come with the app. Each check uses a lookup.
The check runs a few seconds after the save
Salesforce cannot call Smarty during a save, so the check runs in the background just after it. A user who stays on the record sees the old values until the page reloads. The Background Verification Tracker helps.
Test with a few records first
A data import with background checks on uses a lookup for each address of each record.
On the setup page, click the Automation tab. Click Edit beside the object.
Under Object Setup, the tab lists Account, Contact, Contact Point Address and Lead, and each object you added with Add Supported Object.
Tick Verify Addresses.
Verify Addresses sits in the right column, above Verify Phones and Verify Emails. For emails and phone numbers, tick Verify Emails or Verify Phones too. Keep Active ticked. For the other options, see The options of an object below.
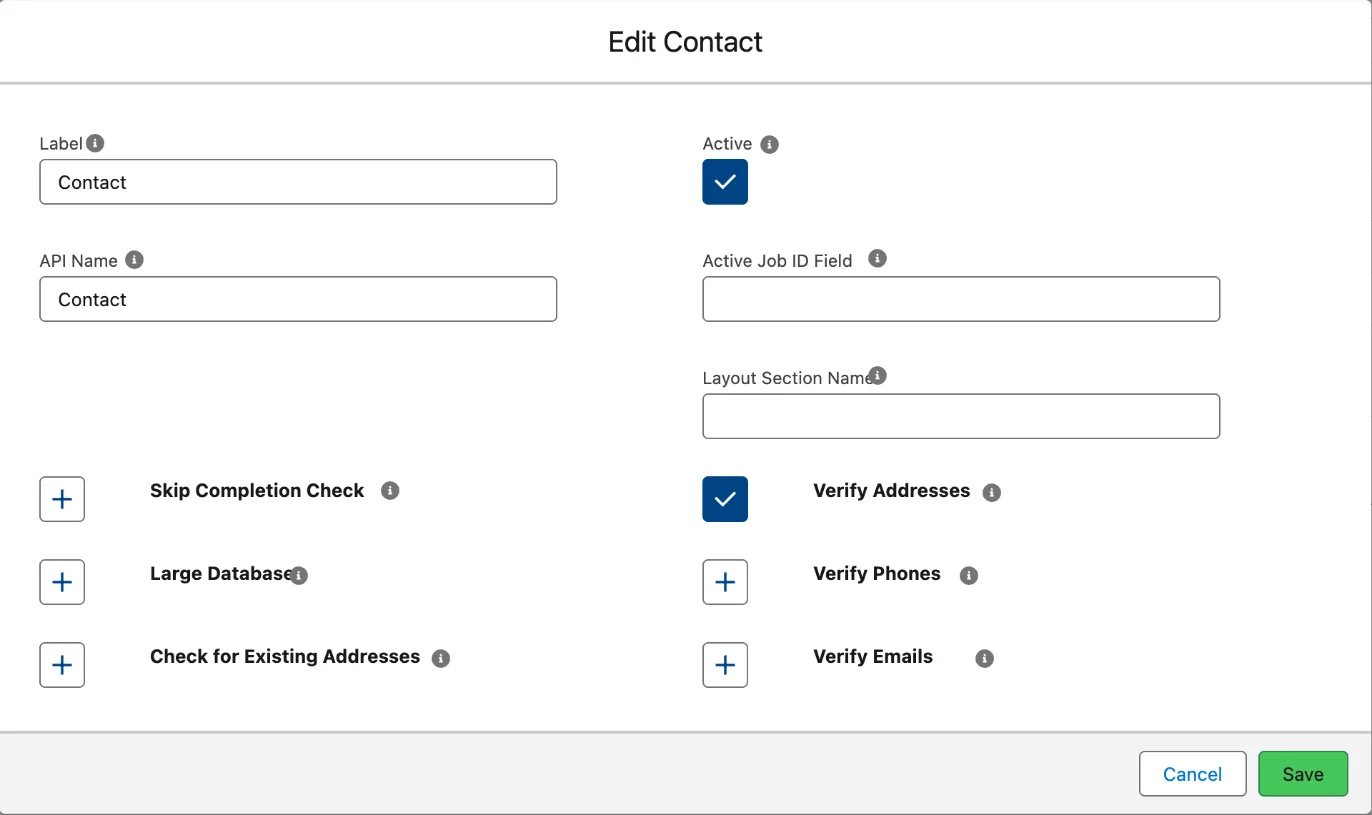
Click Save.
The window closes. No message shows.
Test with one record.
Change the street of a test record. Save. Wait a few seconds. Reload the page. The fields show the result of the check.
The options of an object
| Option | What it does |
|---|---|
| Label | Any name for the object. |
| Active | Turns on the trigger of the object. It unticks Verified when an address, email or phone number changes. It does not verify anything by itself. |
| API Name | The API name of the object. |
| Active Job ID Field | The API name of a Text field with a length of at least 18. Batch jobs need it. See Verify records with a batch job. |
| Layout Section Name | The name of the section of the record page that holds the address fields. When it is empty, Address Information is used. |
| Verify Addresses, Verify Emails, Verify Phones | Turn on the background checks for that kind of data. |
| Skip Completion Check | For the autocomplete components only. Lets a user save a blank or incomplete address. |
| Large Database | For an object with more than 200,000 records. It helps to stay under the Salesforce limits, but it slows a small object down. |
| Check for Existing Addresses | Physical addresses only. See Reuse earlier checks of the same address. |
Show background checks on the record page
The Background Verification Tracker sits on the record page. For about 5 seconds after a save, it looks for a background check. When it finds one, it refreshes the page and shows a message, for example Addresses Verified. It does not catch every check. It works for physical addresses only.
Open a record of the object. Click the gear icon. Click Edit Page.
Add BackgroundVerificationTracker at the bottom of a column.
BackgroundVerificationTrackerType the name in the search box of the Components list. Find it under Custom - Managed. Drag it to the bottom of a column. If the drag does not work, click the + at the bottom of the column. Then click the component.
You cannot see it on the page most of the time. It shows as an empty box in the builder.
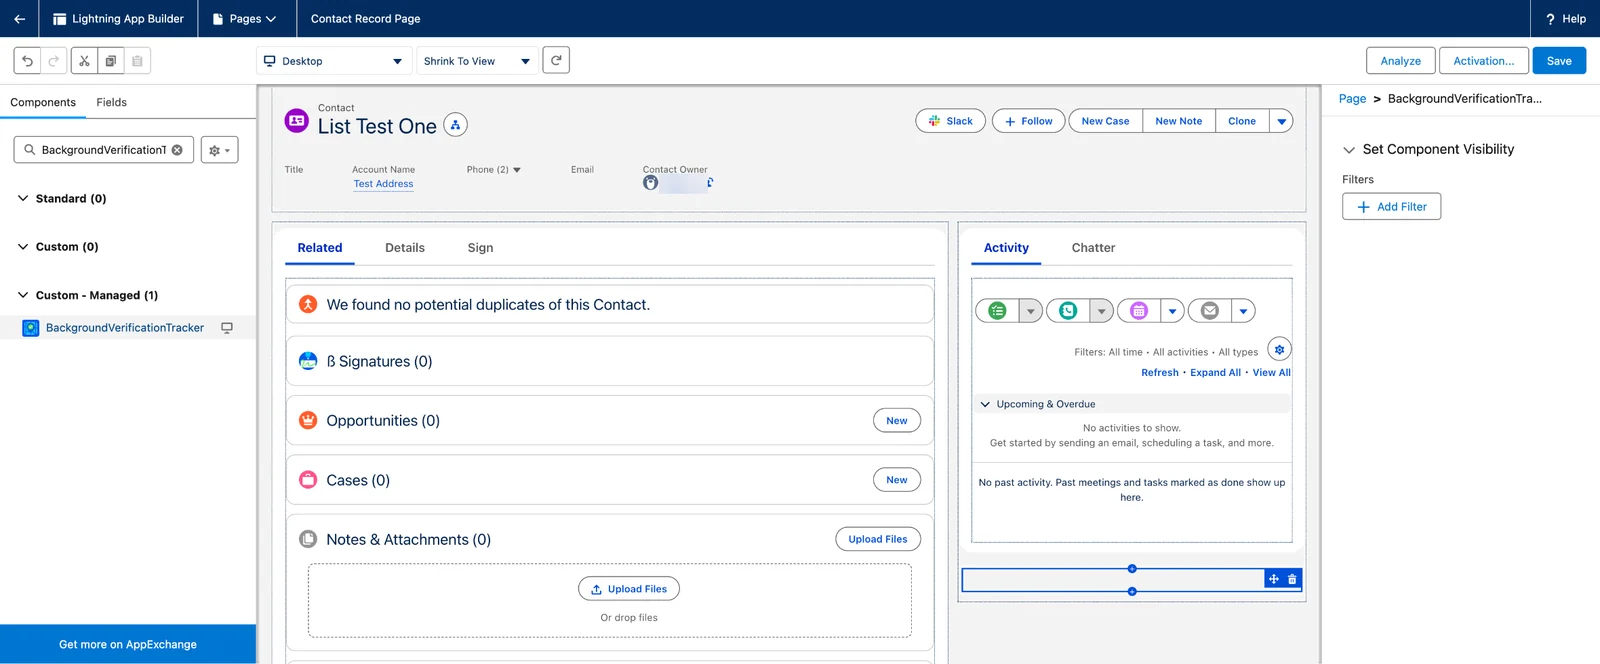
Click Save. Activate the page, if Salesforce asks.
A message reads Changes saved.
Activate it as in step 4 of Add the Verify and Confirm button.
Click the back arrow at the top left.
Reuse earlier checks of the same address
Check for Existing Addresses looks for a verified record with the same address in the same object, before it calls Smarty. A match saves a lookup. The search makes each check a little slower, so TAF advises it only for a small Smarty plan.
- It looks only at records of the same object. A new Lead does not find a verified Account.
- Above about 200,000 records in the object, it can fail. Open a case before you turn it on.
- A reused result looks the same as a new check. Nothing on the record shows which one it was.
Map a Clean Street field in each address entry.
On the Data Mapping tab, click Edit beside the entry. Pick a field for Clean Street. If the object has no such field, make a Text(255) field first.
Tick Clean Address Prior to Verification in the entry too. Without it, the checks leave Clean Street empty. Click Save.
Address Verification matches the clean street, the city and the state.
On the Automation tab, edit the object. Tick Active, Verify Addresses and Check for Existing Addresses. Click Save.
Optional: fill Clean Street on older records.
Without this step, the match works only for records saved from now on. To fill older records, verify them again, which uses lookups. Or a developer can run Apex in the Developer Console, for example this sample, which cleans 100 Leads:
List<Lead> leadlist = [select Id, Street, CleanStreet__c from Lead where Street != null and CleanStreet__c = null and isConverted = false limit 100]; for(Lead l:leadlist) { l.CleanStreet__c = SmartyStreets.Clean.AddressCleanse(l.Street); } update leadlist;Replace CleanStreet__c with the API name of your Clean Street field. For help, open a case.
Background checks on a custom object
A custom object needs its own Apex trigger. TAF's sample is the file verifyTrigger.java in the trigger folder of the Address Verification repository on GitHub. Replace each Object_Name__c with the API name of your object:
trigger verifyTrigger on Object_Name__c (before insert, before update, after insert, after update) {
    new smartystreets.AutoVerificationServices().HandleAutoVerify('Object_Name__c'); // for PHYSICAL ADDRESSES
    //new smartystreets.AutoVerificationServicesEmails().HandleAutoVerify('Object_Name__c'); // for EMAIL ADDRESSES
    //new smartystreets.AutoVerificationServicesPhone().HandleAutoVerify('Object_Name__c'); // for PHONE NUMBERS
}The line that ends in PHYSICAL ADDRESSES checks addresses. To check email addresses or phone numbers too, remove the // at the start of the line that ends in EMAIL ADDRESSES or PHONE NUMBERS.
The same folder holds verifyTriggerTests.java, a sample test class. Build the trigger in a sandbox and deploy it to production, with test code if no test class covers the object. Only an admin who writes Apex should do this. Then tick Active and Verify Addresses for the object on the Automation tab.
Without code, a record-triggered Flow does the same job. See Verify records with a Flow.
Turn off all background checks
On the Options tab, tick Turn OFF All Triggers. Then click Save Settings. This stops the triggers on Account, Contact and Lead. Flows still run.
Use it to find a problem, or before a large data load. To keep checks without the triggers, use Flows: Mark changed addresses on a custom object and Verify records with a Flow.
Keep a log of each check
On the Options tab, tick Log Responses. Then click Save Settings. Address Verification then saves each call to Smarty in the √ Verification Log object. Without it, only errors are saved. The object can grow very large.
The app has no tab for the object. To see the logs, make a tab for it. Open Setup. In the Quick Find box, type Tabs. Click Tabs. Under Custom Object Tabs, click New.
Pick the object √ Verification Log. Pick any Tab Style; it is required. Click Next twice. Click Save. A user also needs access to the object and its fields.
The tab opens on Recently Viewed. Pick the list view All to see every log. In TAF's test, phone checks made no log record.
Applies to
Address Verification 7.3.x. These steps come from the tested Address Verification implementation guide, where they sit with the steps before and after them.
Was this helpful?
Thank you. It helps us know which articles work.
Related
Still stuck?
Open a case and paste the exact error text. A person reads every case.